Bernina Bernette 56 Instruction Manual - Page 62

Making a Buttonhole, Knoopsgat maken, aileen 50 en 60

Page 62 highlights

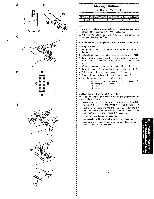
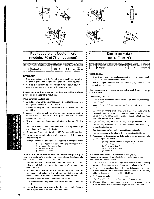
Making a Buttonhole (50 and 60 only) NOTE: •• 1. It ls recommended to practice making a buttonhole on a scrap piece • of fabric before attempting it on the actual garment. • 2. When sewing buttonholes on thin fabrics, place stabilizer material • • on the underside of the fabric . •• Buttonhole-making is a simple process that provides reliable results. •• Making a Buttonhole •• 1. Using tailor's chalk, mark the position and length of the buttonhole • on the fabric . • 2. Attach the buttonhole foot, then slide the outside frame of the but- ~ • tonhole foot as far back as possible. •• 3. The front bar tack will be sewn first. Place the fabric under the • • • presser foot so that the center of the front bar tack mark is directly under the center of the presser foot and aligned with the two red • lines as shown . •

  • 1
  • 2
  • 3
  • 4
  • 5
  • 6
  • 7
  • 8
  • 9
  • 10
  • 11
  • 12
  • 13
  • 14
  • 15
  • 16
  • 17
  • 18
  • 19
  • 20
  • 21
  • 22
  • 23
  • 24
  • 25
  • 26
  • 27
  • 28
  • 29
  • 30
  • 31
  • 32
  • 33
  • 34
  • 35
  • 36
  • 37
  • 38
  • 39
  • 40
  • 41
  • 42
  • 43
  • 44
  • 45
  • 46
  • 47
  • 48
  • 49
  • 50
  • 51
  • 52
  • 53
  • 54
  • 55
  • 56
  • 57
  • 58
  • 59
  • 60
  • 61
  • 62
  • 63
  • 64
  • 65
  • 66
  • 67
  • 68
  • 69
  • 70
  • 71
  • 72
  • 73
  • 74
  • 75
  • 76
  • 77
  • 78
  • 79
  • 80
  • 81
  • 82
  • 83
  • 84
  • 85
  • 86

~
Making a Buttonhole
(50 and
60
only)
NOTE:
1.
It
ls
recommended to practice making a buttonhole on a scrap piece
of fabric before attempting
it
on the actual garment.
2.
When sewing buttonholes on thin fabrics, place stabilizer material
on the underside of the fabric .
Buttonhole-making
is
a simple process
that
provides reliable results .
Making a Buttonhole
1.
Using tailor's chalk, mark the position and length of the buttonhole
on the fabric .
2.
Attach the buttonhole foot, then slide the outside frame of the but-
tonhole foot as
far
back as possible .
3.
The front bar tack will be sewn first. Place the fabric under the
presser foot
so
that the center of the front bar tack mark
is
directly
under the center of the presser foot and aligned with the two red
lines as shown .
<D
Front
of
chalk mark
•••••••••••••••••••••••••••••••••••••••••••••••••••••••••••••••
Pour faire une boutonniere
(modeles 50
et
60
uniquement)
REMARQUE:
1.
II
est vivement conseillS
de
s'entrainer au pr9alab!e sur
une
chute
de
tissu
av~mt
de couche
Ia
boutonniere sur le tissu souhaitS.
2.
Lars
de
Ia
realisation
de
boutonnieres sur des tissus doux et
19-
gers, placer
une
piece
de
renfort
a
l'enve'rs
du
tissu,
Facile
a
realiser,
Ia
couture
automatique
de·
boutonnieres
a
Ia
machine
donne
des
resultats
tres
fiables.
Pour
falre
une
boutonniere
1.
A !'aide d'une craie de tailleur, marquer
sur
le tissu !'emplace-
ment
et
Ia
longueur d8sir9e
de
Ia
boutonniere.
2.
Installer le pied pour
boutonnieres
et pousser le cadre
exterieur
du
pied
a
fond vers l'arriSre.
3.
La
partie avant de
Ia
bride d'arn3t doit etre cousue en premier.
Placer
le
tissu sous le pied·de·biche de telle mani9re que
le
mi·
lieu de
Ia
bride d'arret se trouve au centre du pied·de- biche,
aligne avec les deux marques rouges, comme indique.
CD
Partie avant
de
Ia marque
a
Ia craie
OPMERKING:
Knoopsgat maken
(aileen 50 en 60)
I.
U wordt aangeraden eerst
een
knoopsgat uit
te
proberen op een proef-
lapje voordat u een ecbt exemplaar
maak:t.
2.
Voor
knoopsgaten
op
dunne stof moet er verstevigingsmateriaal onder
de
stof worden gelegd.
Het maken van een knoopsgat is een eenvoudige bandeling met betrouw-
bare
resultaten.
Een
knoopsgat maken
I.
Geef
met
een ldeennakerskrijt
de
positie en
de
lengte
aan
van bet knoops-
gat
op
de
·stof.
2.
Monteer
de
speciale knoopsgatvoet en duw bet metalen plaatje
zo
ver
mogelijk naar achter
.
3,
Berst wordt de bovenkant genaaid. Leg de stof onder de persvoet zodat
het midden
van
de
krijtaantekening van het knoopsgat precies midden
onder
de
persvoet komt, op een lijn met
de
twee rode strepen,
zoalS
getoond
in
de
illustratie .
<D
Krijtaantekening bovenkant