Brother International HL-2170W Network Users Manual - English - Page 108
Enabling or disabling the wireless network (For HL-2170W
 |
UPC - 012502619468
View all Brother International HL-2170W manuals
Add to My Manuals
Save this manual to your list of manuals |
Page 108 highlights
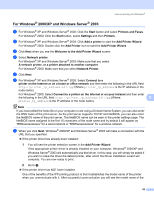
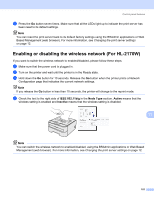
Control panel features d Press the Go button seven times. Make sure that all the LEDs light up to indicate the print server has been reset to its default settings. Note You can reset the print server back to its default factory settings using the BRAdmin applications or Web Based Management (web browser). For more information, see Changing the print server settings on page 12. Enabling or disabling the wireless network (For HL-2170W) 11 If you want to switch the wireless network to enabled/disabled, please follow these steps: a Make sure that the power cord is plugged in. b Turn on the printer and wait until the printer is in the Ready state. c Hold down the Go button for 10 seconds. Release the Go button when the printer prints a Network Configuration page that indicates the current network settings. Note If you release the Go button in less than 10 seconds, the printer will change to the reprint mode. d Check the text to the right side of IEEE 802.11b/g in the Node Type section. Active means that the wireless setting is enabled and Inactive means that the wireless setting is disabled. 11 Note You can switch the wireless network to enabled/disabled, using the BRAdmin applications or Web Based Management (web browser). For more information, see Changing the print server settings on page 12. 101
-
 1
1 -
2
-
3
-
4
-
5
-
6
-
7
-
8
-
9
-
10
-
11
-
12
-
13
-
14
-
15
-
16
-
17
-
18
-
19
-
20
-
21
-
22
-
23
-
24
-
25
-
26
-
27
-
28
-
29
-
30
-
31
-
32
-
33
-
34
-
35
-
36
-
37
-
38
-
39
-
40
-
41
-
42
-
43
-
44
-
45
-
46
-
47
-
48
-
49
-
50
-
51
-
52
-
53
-
54
-
55
-
56
-
57
-
58
-
59
-
60
-
61
-
62
-
63
-
64
-
65
-
66
-
67
-
68
-
69
-
70
-
71
-
72
-
73
-
74
-
75
-
76
-
77
-
78
-
79
-
80
-
81
-
82
-
83
-
84
-
85
-
86
-
87
-
88
-
89
-
90
-
91
-
92
-
93
-
94
-
95
-
96
-
97
-
98
-
99
-
100
-
101
-
102
-
 103
103 -
 104
104 -
 105
105 -
 106
106 -
 107
107 -
 108
108 -
 109
109 -
 110
110 -
 111
111 -
 112
112 -
 113
113 -
114
-
115
-
116
-
117
-
118
-
119
-
120
-
121
-
122
-
123
-
124
-
125
-
126
-
127
-
128
-
129
-
130
-
131
-
132
-
133
-
134
-
135
-
136
-
137
 |
 |