Brother International Innov-ís 1200 Users Manual - English - Page 137
Start sewing., Check the sewn pattern., Press, Settings key on the operation panel., Vertical
 |
View all Brother International Innov-ís 1200 manuals
Add to My Manuals
Save this manual to your list of manuals |
Page 137 highlights
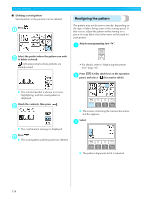
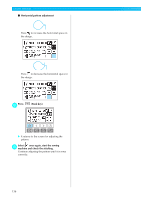
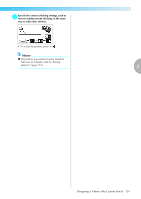
Start sewing. d Press f (Settings key) on the operation panel. X The pattern for making the adjustment is sewn. X The sewing machine stops after it has finished sewing the pattern. Check the sewn pattern. e If the part of the pattern indicated in the illustration is sewn uniformly, the pattern is correctly aligned. X The settings screen appears. Press . g To adjust the vertical position, press for vertical pattern adjustment. To adjust the horizontal position, press for horizontal pattern adjustment. 3 If the pattern appears as shown below, the stitching is misaligned in the vertical direction. X Make the necessary adjustments according to how the pattern is sewn. ■ Vertical pattern adjustment If the pattern appears as shown below, the stitching is misaligned in the horizontal direction. Press to increase the vertical space in the design. If the pattern is not sewn correctly, follow the steps below to adjust the sewing. Press to decrease the vertical space in the design. Sewing the Various Built-in Decorative Patterns 135
-
 1
1 -
2
-
3
-
4
-
5
-
6
-
7
-
8
-
9
-
10
-
11
-
12
-
13
-
14
-
15
-
16
-
17
-
18
-
19
-
20
-
21
-
22
-
23
-
24
-
25
-
26
-
27
-
28
-
29
-
30
-
31
-
32
-
33
-
34
-
35
-
36
-
37
-
38
-
39
-
40
-
41
-
42
-
43
-
44
-
45
-
46
-
47
-
48
-
49
-
50
-
51
-
52
-
53
-
54
-
55
-
56
-
57
-
58
-
59
-
60
-
61
-
62
-
63
-
64
-
65
-
66
-
67
-
68
-
69
-
70
-
71
-
72
-
73
-
74
-
75
-
76
-
77
-
78
-
79
-
80
-
81
-
82
-
83
-
84
-
85
-
86
-
87
-
88
-
89
-
90
-
91
-
92
-
93
-
94
-
95
-
96
-
97
-
98
-
99
-
100
-
101
-
102
-
103
-
104
-
105
-
106
-
107
-
108
-
109
-
110
-
111
-
112
-
113
-
114
-
115
-
116
-
117
-
118
-
119
-
120
-
121
-
122
-
123
-
124
-
125
-
126
-
127
-
128
-
129
-
130
-
131
-
 132
132 -
 133
133 -
 134
134 -
 135
135 -
 136
136 -
 137
137 -
 138
138 -
 139
139 -
 140
140 -
 141
141 -
 142
142 -
143
-
144
-
145
-
146
-
147
-
148
-
149
-
150
-
151
-
152
-
153
-
154
-
155
-
156
-
157
-
158
-
159
-
160
-
161
-
162
-
163
-
164
-
165
-
166
-
167
-
168
-
169
-
170
-
171
-
172
-
173
-
174
-
175
-
176
-
177
-
178
-
179
-
180
-
181
-
182
-
183
-
184
-
185
-
186
-
187
-
188
-
189
-
190
-
191
-
192
-
193
-
194
-
195
-
196
-
197
-
198
 |
 |
