Brother International Innov-ís 1200 Users Manual - English - Page 166
Embroidering
 |
View all Brother International Innov-ís 1200 manuals
Add to My Manuals
Save this manual to your list of manuals |
Page 166 highlights
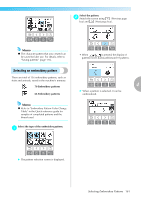
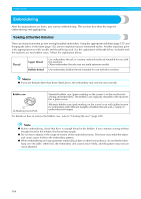
EMBROIDERY Embroidering After the preparations are done, you can try embroidering. This section describes the steps for embroidering and appliquéing. Sewing attractive finishes There are many factors that go into sewing beautiful embroidery. Using the appropriate stabilizer (page 151) and hooping the fabric in the frame (page 152) are two important factors mentioned earlier. Another important point is the appropriateness of the needle and thread being used. See the explanation of threads below. Included with this machine are two bobbin cases. Follow the explanation below. Thread Upper thread Bobbin thread Use embroidery thread, or country embroidery thread intended for use with this machine. Other embroidery threads may not yield optimum results. Use embroidery bobbin thread intended for use with this machine. Memo z If you use threads other than those listed above, the embroidery may not sew out correctly. Bobbin case Standard bobbin case (green marking on the screw) is in the machine for sewing and embroidery. The bobbin case originally installed in the machine has a green screw. a 1 Marking Green/Pink Alternate bobbin case (pink marking on the screw) is set with tighter tension for embroidery with different weights of bobbin threads and a variety of embroidery techniques. For details on how to remove the bobbin case, refer to "Cleaning the race" (page 180). Note z Before embroidering, check that there is enough thread in the bobbin. If you continue sewing without enough thread in the bobbin, the thread may tangle. z Do not leave objects in the range of motion of the embroidery frame. The frame may strike the object and cause a poor finish to the embroidery pattern. z When embroidering on large garments (especially jackets or other heavy fabrics), do not let the fabric hang over the table. Otherwise, the embroidery unit cannot move freely, and the pattern may not turn out as planned. 164
-
 1
1 -
2
-
3
-
4
-
5
-
6
-
7
-
8
-
9
-
10
-
11
-
12
-
13
-
14
-
15
-
16
-
17
-
18
-
19
-
20
-
21
-
22
-
23
-
24
-
25
-
26
-
27
-
28
-
29
-
30
-
31
-
32
-
33
-
34
-
35
-
36
-
37
-
38
-
39
-
40
-
41
-
42
-
43
-
44
-
45
-
46
-
47
-
48
-
49
-
50
-
51
-
52
-
53
-
54
-
55
-
56
-
57
-
58
-
59
-
60
-
61
-
62
-
63
-
64
-
65
-
66
-
67
-
68
-
69
-
70
-
71
-
72
-
73
-
74
-
75
-
76
-
77
-
78
-
79
-
80
-
81
-
82
-
83
-
84
-
85
-
86
-
87
-
88
-
89
-
90
-
91
-
92
-
93
-
94
-
95
-
96
-
97
-
98
-
99
-
100
-
101
-
102
-
103
-
104
-
105
-
106
-
107
-
108
-
109
-
110
-
111
-
112
-
113
-
114
-
115
-
116
-
117
-
118
-
119
-
120
-
121
-
122
-
123
-
124
-
125
-
126
-
127
-
128
-
129
-
130
-
131
-
132
-
133
-
134
-
135
-
136
-
137
-
138
-
139
-
140
-
141
-
142
-
143
-
144
-
145
-
146
-
147
-
148
-
149
-
150
-
151
-
152
-
153
-
154
-
155
-
156
-
157
-
158
-
159
-
160
-
 161
161 -
 162
162 -
 163
163 -
 164
164 -
 165
165 -
 166
166 -
 167
167 -
 168
168 -
 169
169 -
 170
170 -
 171
171 -
172
-
173
-
174
-
175
-
176
-
177
-
178
-
179
-
180
-
181
-
182
-
183
-
184
-
185
-
186
-
187
-
188
-
189
-
190
-
191
-
192
-
193
-
194
-
195
-
196
-
197
-
198
 |
 |
