Canon PowerShot SD700 IS ZoomBrowser EX 5.6 Software User Guide - Page 69
Using the Viewer Window 1/5
 |
View all Canon PowerShot SD700 IS manuals
Add to My Manuals
Save this manual to your list of manuals |
Page 69 highlights
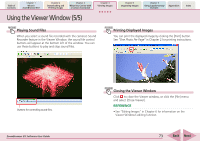
Table of Contents Chapter 1 What is ZoomBrowser EX? Chapter 2 Downloading and Printing Images Chapter 3 What You Can Do with a Camera Connected Chapter 4 Viewing Images Chapter 5 Organizing Images Chapter 6 Using Supplementary Features Appendices Index Using the Viewer Window (1/5) This section explains how to use the Viewer Window. Opening the Previous or Next Image You can display the image ahead or behind the displayed image by clicking the Previous or Next button in the Viewer Window. REFERENCE • If you select multiple images and display them in the Viewer Window, you can click the Previous or Next button to move the selection between images. If you select one image and display it in the Viewer Window, you can switch to other images within the same folder by clicking these buttons. REFERENCE • When the display magnification level is high, a Navigator window such as the one at the right appears. The area enclosed by the red marks indicates the area of the image shown in the Browser Area. You can change the area displayed in the Viewer window by moving the red symbols or by clicking anywhere but on the red symbols. Using the Full Screen Display You can display an image at the full screen size by clicking the [Show Image Full Screen] button in the Viewer Window. To restore the standard display, click the image or press any key on the keyboard. Changing the Display Magnification You can change the display magnification by moving the slider above the image either left or right. To match the display size to the Viewer Window size, click (Fit to Window). REFERENCE • You can also switch to the full screen display by double-clicking the image display area in the Viewer Window, or by clicking the [View] menu and selecting [Full screen]. ZoomBrowser EX Software User Guide 69 Back Next
-
 1
1 -
2
-
3
-
4
-
5
-
6
-
7
-
8
-
9
-
10
-
11
-
12
-
13
-
14
-
15
-
16
-
17
-
18
-
19
-
20
-
21
-
22
-
23
-
24
-
25
-
26
-
27
-
28
-
29
-
30
-
31
-
32
-
33
-
34
-
35
-
36
-
37
-
38
-
39
-
40
-
41
-
42
-
43
-
44
-
45
-
46
-
47
-
48
-
49
-
50
-
51
-
52
-
53
-
54
-
55
-
56
-
57
-
58
-
59
-
60
-
61
-
62
-
63
-
 64
64 -
 65
65 -
 66
66 -
 67
67 -
 68
68 -
 69
69 -
 70
70 -
 71
71 -
 72
72 -
 73
73 -
 74
74 -
75
-
76
-
77
-
78
-
79
-
80
-
81
-
82
-
83
-
84
-
85
-
86
-
87
-
88
-
89
-
90
-
91
-
92
-
93
-
94
-
95
-
96
-
97
-
98
-
99
-
100
-
101
-
102
-
103
-
104
-
105
-
106
-
107
-
108
-
109
-
110
-
111
-
112
-
113
-
114
-
115
-
116
-
117
-
118
-
119
-
120
-
121
-
122
-
123
-
124
-
125
-
126
-
127
-
128
-
129
-
130
-
131
-
132
-
133
-
134
-
135
-
136
-
137
-
138
-
139
-
140
-
141
-
142
-
143
-
144
-
145
-
146
-
147
-
148
-
149
-
150
-
151
-
152
-
153
 |
 |
