Canon PowerShot SD700 IS ZoomBrowser EX 5.6 Software User Guide - Page 88
Deleting Images 1/2
 |
View all Canon PowerShot SD700 IS manuals
Add to My Manuals
Save this manual to your list of manuals |
Page 88 highlights
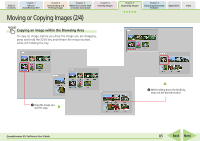
Table of Contents Chapter 1 What is ZoomBrowser EX? Chapter 2 Downloading and Printing Images Chapter 3 What You Can Do with a Camera Connected Chapter 4 Viewing Images Chapter 5 Organizing Images Chapter 6 Using Supplementary Features Appendices Index Deleting Images (1/2) This section explains how to delete images and folders you no longer need. How to delete an image 1. Select an image in the Browser Area to delete. 2. Click (Delete). 3. Click [Yes] when a confirmation dialog like the one below appears. REFERENCE • If you accidentally delete a required image, double-click the [Recycle Bin] icon on the Windows desktop to open it. Select the image and, in the Recycle Bin Tasks section, click [Restore]. (With Windows 2000/Windows Me/Windows 98 SE in web page view mode, select the image and then click [Restore this item back to its original location] at the left side of the window.) When you switch back to ZoomBrowser EX and click the [View] menu and select [Refresh Current Folder], the image will reappear in its original location. A Click an image. B Click [Delete]. ZoomBrowser EX Software User Guide 88 Back Next
-
 1
1 -
2
-
3
-
4
-
5
-
6
-
7
-
8
-
9
-
10
-
11
-
12
-
13
-
14
-
15
-
16
-
17
-
18
-
19
-
20
-
21
-
22
-
23
-
24
-
25
-
26
-
27
-
28
-
29
-
30
-
31
-
32
-
33
-
34
-
35
-
36
-
37
-
38
-
39
-
40
-
41
-
42
-
43
-
44
-
45
-
46
-
47
-
48
-
49
-
50
-
51
-
52
-
53
-
54
-
55
-
56
-
57
-
58
-
59
-
60
-
61
-
62
-
63
-
64
-
65
-
66
-
67
-
68
-
69
-
70
-
71
-
72
-
73
-
74
-
75
-
76
-
77
-
78
-
79
-
80
-
81
-
82
-
 83
83 -
 84
84 -
 85
85 -
 86
86 -
 87
87 -
 88
88 -
 89
89 -
 90
90 -
 91
91 -
 92
92 -
 93
93 -
94
-
95
-
96
-
97
-
98
-
99
-
100
-
101
-
102
-
103
-
104
-
105
-
106
-
107
-
108
-
109
-
110
-
111
-
112
-
113
-
114
-
115
-
116
-
117
-
118
-
119
-
120
-
121
-
122
-
123
-
124
-
125
-
126
-
127
-
128
-
129
-
130
-
131
-
132
-
133
-
134
-
135
-
136
-
137
-
138
-
139
-
140
-
141
-
142
-
143
-
144
-
145
-
146
-
147
-
148
-
149
-
150
-
151
-
152
-
153
 |
 |
