Canon PowerShot SD700 IS ZoomBrowser EX 5.6 Software User Guide - Page 9
Task Buttons and Main Window Features 2/4
 |
View all Canon PowerShot SD700 IS manuals
Add to My Manuals
Save this manual to your list of manuals |
Page 9 highlights
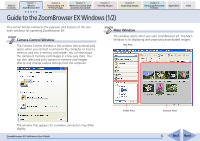
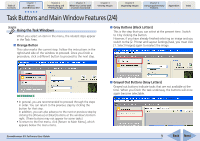
Table of Contents Chapter 1 What is ZoomBrowser EX? Chapter 2 Downloading and Printing Images Chapter 3 What You Can Do with a Camera Connected Chapter 4 Viewing Images Chapter 5 Organizing Images Chapter 6 Using Supplementary Features Appendices Index Task Buttons and Main Window Features (2/4) Using the Task Windows When you select an item in the menu, the related steps appear in the Task Area. ■ Orange Button This color marks the current step. Follow the instructions in the right-hand side of the window to proceed. Once you finish a procedure, click a different button to proceed to the next step. ■ Gray Buttons (Black Letters) This is the step that you can select at the present time. Switch to it by clicking the button. However, if you have already finished selecting an image and you switch to the [2. Printer and Layout Settings] task, you must click [1. Select Images] again to reselect the image. REFERENCE • In general, you are recommended to proceed through the steps in order. You can return to the previous step by clicking the button for that step. In addition, you can also advance to the next or previous step by clicking the [Previous] or [Next] buttons at the window's bottom right. (These buttons may not appear for some tasks.) • To return to the first menu, click [Return to Main Menu], which appears below the menu items. ZoomBrowser EX Software User Guide ■ Grayed Out Buttons (Gray Letters) Grayed out buttons indicate tasks that are not available at the time. When you finish the task underway, the buttons will once again become selectable. 9 Back Next
-
 1
1 -
2
-
3
-
 4
4 -
 5
5 -
 6
6 -
 7
7 -
 8
8 -
 9
9 -
 10
10 -
 11
11 -
 12
12 -
 13
13 -
 14
14 -
15
-
16
-
17
-
18
-
19
-
20
-
21
-
22
-
23
-
24
-
25
-
26
-
27
-
28
-
29
-
30
-
31
-
32
-
33
-
34
-
35
-
36
-
37
-
38
-
39
-
40
-
41
-
42
-
43
-
44
-
45
-
46
-
47
-
48
-
49
-
50
-
51
-
52
-
53
-
54
-
55
-
56
-
57
-
58
-
59
-
60
-
61
-
62
-
63
-
64
-
65
-
66
-
67
-
68
-
69
-
70
-
71
-
72
-
73
-
74
-
75
-
76
-
77
-
78
-
79
-
80
-
81
-
82
-
83
-
84
-
85
-
86
-
87
-
88
-
89
-
90
-
91
-
92
-
93
-
94
-
95
-
96
-
97
-
98
-
99
-
100
-
101
-
102
-
103
-
104
-
105
-
106
-
107
-
108
-
109
-
110
-
111
-
112
-
113
-
114
-
115
-
116
-
117
-
118
-
119
-
120
-
121
-
122
-
123
-
124
-
125
-
126
-
127
-
128
-
129
-
130
-
131
-
132
-
133
-
134
-
135
-
136
-
137
-
138
-
139
-
140
-
141
-
142
-
143
-
144
-
145
-
146
-
147
-
148
-
149
-
150
-
151
-
152
-
153
 |
 |
