Canon VIXIA HF G10 VIXIA HF G10 Instruction Manual - Page 24
Grip Belt and Straps - light
 |
View all Canon VIXIA HF G10 manuals
Add to My Manuals
Save this manual to your list of manuals |
Page 24 highlights
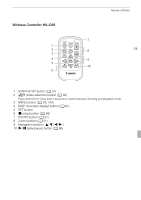
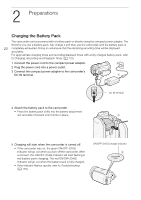
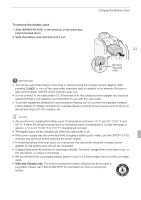
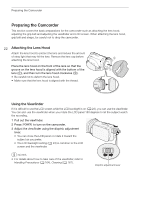
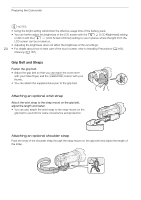
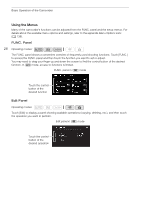
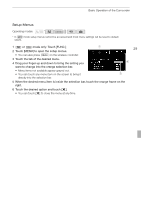
Preparing the Camcorder NOTES • Using the bright setting will shorten the effective usage time of the battery pack. • You can further adjust the brightness of the LCD screen with the 6 [LCD Brightness] setting, or dim it with the 6 [LCD Screen Dimmer] setting to use in places where the light from the LCD screen can be a nuisance. • Adjusting the brightness does not affect the brightness of the recordings. 24 • For details about how to take care of the touch screen, refer to Handling Precautions (0 164), Cleaning (0 167). Grip Belt and Straps Fasten the grip belt. • Adjust the grip belt so that you can reach the zoom lever with your index finger, and the g button with your thumb. • You can attach the supplied stylus pen to the grip belt. Attaching an optional wrist strap Attach the wrist strap to the strap mount on the grip belt, adjust the length and fasten. • You can also attach the wrist strap to the strap mount on the grip belt to use both for extra convenience and protection. Attaching an optional shoulder strap Pass the ends of the shoulder strap through the strap mount on the grip belt and adjust the length of the strap.
-
 1
1 -
2
-
3
-
4
-
5
-
6
-
7
-
8
-
9
-
10
-
11
-
12
-
13
-
14
-
15
-
16
-
17
-
18
-
 19
19 -
 20
20 -
 21
21 -
 22
22 -
 23
23 -
 24
24 -
 25
25 -
 26
26 -
 27
27 -
 28
28 -
 29
29 -
30
-
31
-
32
-
33
-
34
-
35
-
36
-
37
-
38
-
39
-
40
-
41
-
42
-
43
-
44
-
45
-
46
-
47
-
48
-
49
-
50
-
51
-
52
-
53
-
54
-
55
-
56
-
57
-
58
-
59
-
60
-
61
-
62
-
63
-
64
-
65
-
66
-
67
-
68
-
69
-
70
-
71
-
72
-
73
-
74
-
75
-
76
-
77
-
78
-
79
-
80
-
81
-
82
-
83
-
84
-
85
-
86
-
87
-
88
-
89
-
90
-
91
-
92
-
93
-
94
-
95
-
96
-
97
-
98
-
99
-
100
-
101
-
102
-
103
-
104
-
105
-
106
-
107
-
108
-
109
-
110
-
111
-
112
-
113
-
114
-
115
-
116
-
117
-
118
-
119
-
120
-
121
-
122
-
123
-
124
-
125
-
126
-
127
-
128
-
129
-
130
-
131
-
132
-
133
-
134
-
135
-
136
-
137
-
138
-
139
-
140
-
141
-
142
-
143
-
144
-
145
-
146
-
147
-
148
-
149
-
150
-
151
-
152
-
153
-
154
-
155
-
156
-
157
-
158
-
159
-
160
-
161
-
162
-
163
-
164
-
165
-
166
-
167
-
168
-
169
-
170
-
171
-
172
-
173
-
174
-
175
-
176
-
177
-
178
-
179
-
180
-
181
-
182
-
183
-
184
 |
 |