Canon VIXIA HF G10 VIXIA HF G10 Instruction Manual - Page 41
Recording in, Manual Mode
 |
View all Canon VIXIA HF G10 manuals
Add to My Manuals
Save this manual to your list of manuals |
Page 41 highlights
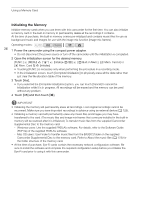
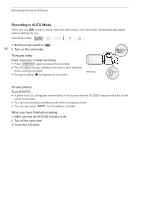
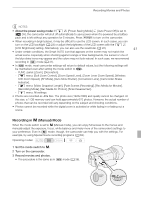
Recording Movies and Photos NOTES • About the power saving mode: If 6 [Power Saving Mode] [Auto Power Off] is set to [A On], the camcorder will shut off automatically to save power when it is powered by a battery pack and is left without any operation for 5 minutes. Press x to turn on the camcorder. • When recording in bright places, it may be difficult to use the LCD screen. In such cases, you can turn on the LCD backlight (0 23) or adjust the brightness of the LCD screen with the 6 [LCD Brightness] setting. Alternatively, you can also use the viewfinder (0 22). 41 • Under certain conditions, the Smart AUTO icon that appears on the screen may not match the actual scene. Especially when shooting against orange or blue backgrounds, the sunset or one of the blue skies icons may appear and the colors may not look natural. In such case, we recommend recording in mode (0 41). • In mode, most camcorder settings will return to default values, but the following settings will be maintained even after setting the mode switch to . - FUNC. panel: [Zoom], [Decoration]. - 7 menu: [Soft Zoom Control], [Zoom Speed Level], [Zoom Lever Zoom Speed], [Wireless Ctrlr Zoom Speed], [AF Mode], [Auto Slow Shutter], [Conversion Lens], [Camcorder Shake Indicator]. - 8 menu: [Video Snapshot Length], [Rate Scenes (Recording)], [Rec Media for Movies], [Recording Mode], [Rec Media for Photos], [Scan Reverse Rec]. - 6 menu: All settings. • Photos are recorded as JPG files. The photo size (1920x1080) and quality cannot be changed. At this size, a 1 GB memory card can hold approximately 670 photos. However, the actual number of photos that can be recorded will vary depending on the subject and shooting conditions. • Photos cannot be recorded while the digital zoom is activated or while fading in or fading out a scene. Recording in y (Manual) Mode When the mode switch is set to y (Manual mode), you can enjoy full access to the menus and manually adjust the exposure, focus, white balance and many more of the camcorder's settings to your preference. Even in mode, though, the camcorder can help you with the settings. For example, by using Special Scene recording programs (0 63). Operating modes: 1 Set the mode switch to y. 2 Turn on the camcorder. 3 Record movies and photos. • The procedure is the same as in mode (0 38).
-
 1
1 -
2
-
3
-
4
-
5
-
6
-
7
-
8
-
9
-
10
-
11
-
12
-
13
-
14
-
15
-
16
-
17
-
18
-
19
-
20
-
21
-
22
-
23
-
24
-
25
-
26
-
27
-
28
-
29
-
30
-
31
-
32
-
33
-
34
-
35
-
 36
36 -
 37
37 -
 38
38 -
 39
39 -
 40
40 -
 41
41 -
 42
42 -
 43
43 -
 44
44 -
 45
45 -
 46
46 -
47
-
48
-
49
-
50
-
51
-
52
-
53
-
54
-
55
-
56
-
57
-
58
-
59
-
60
-
61
-
62
-
63
-
64
-
65
-
66
-
67
-
68
-
69
-
70
-
71
-
72
-
73
-
74
-
75
-
76
-
77
-
78
-
79
-
80
-
81
-
82
-
83
-
84
-
85
-
86
-
87
-
88
-
89
-
90
-
91
-
92
-
93
-
94
-
95
-
96
-
97
-
98
-
99
-
100
-
101
-
102
-
103
-
104
-
105
-
106
-
107
-
108
-
109
-
110
-
111
-
112
-
113
-
114
-
115
-
116
-
117
-
118
-
119
-
120
-
121
-
122
-
123
-
124
-
125
-
126
-
127
-
128
-
129
-
130
-
131
-
132
-
133
-
134
-
135
-
136
-
137
-
138
-
139
-
140
-
141
-
142
-
143
-
144
-
145
-
146
-
147
-
148
-
149
-
150
-
151
-
152
-
153
-
154
-
155
-
156
-
157
-
158
-
159
-
160
-
161
-
162
-
163
-
164
-
165
-
166
-
167
-
168
-
169
-
170
-
171
-
172
-
173
-
174
-
175
-
176
-
177
-
178
-
179
-
180
-
181
-
182
-
183
-
184
 |
 |
