Canon VIXIA HF G10 VIXIA HF G10 Instruction Manual - Page 60
To adjust the Touch AE function for highlights Highlight AE, To use backlight correction
 |
View all Canon VIXIA HF G10 manuals
Add to My Manuals
Save this manual to your list of manuals |
Page 60 highlights
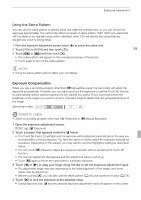
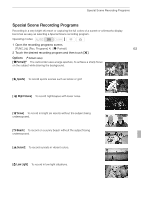
Exposure Adjustment To adjust the Touch AE function for highlights (Highlight AE) Certain subjects, like clouds or white objects, are easily overexposed and can end up appearing as bright areas where all detail is lost. Using the [Highlights] setting, you can touch the brightest area inside the e frame and the camcorder will automatically make corrections so that area is not overexposed. When you touch a dark area in the picture or the highlights are too bright, the camcorder may not be able to correctly adjust the exposure. 60 After step 1 above: 1 Touch [5]. 2 Touch [Highlights] and then touch [f]. • Touch [Normal] to return the camcorder to normal Touch AE settings. To use backlight correction When recording in situations in which the subject is constantly backlit, you can use backlight correction make the entire picture brighter, especially dark areas. This will take precedence over the 7 [Auto Backlight Correction] setting, which is useful in situations in which the subject is not constantly backlit. 1 Open the [ BLC Always On] screen. [FUNC.] [ BLC Always On] 2 Touch [A On] and then touch [a]. NOTES • If the recording program is changed during exposure lock, the camcorder will return to automatic exposure. • You can adjust the exposure value with the CUSTOM dial (0 83), which is set to [e Exposure] by default.
-
 1
1 -
2
-
3
-
4
-
5
-
6
-
7
-
8
-
9
-
10
-
11
-
12
-
13
-
14
-
15
-
16
-
17
-
18
-
19
-
20
-
21
-
22
-
23
-
24
-
25
-
26
-
27
-
28
-
29
-
30
-
31
-
32
-
33
-
34
-
35
-
36
-
37
-
38
-
39
-
40
-
41
-
42
-
43
-
44
-
45
-
46
-
47
-
48
-
49
-
50
-
51
-
52
-
53
-
54
-
 55
55 -
 56
56 -
 57
57 -
 58
58 -
 59
59 -
 60
60 -
 61
61 -
 62
62 -
 63
63 -
 64
64 -
 65
65 -
66
-
67
-
68
-
69
-
70
-
71
-
72
-
73
-
74
-
75
-
76
-
77
-
78
-
79
-
80
-
81
-
82
-
83
-
84
-
85
-
86
-
87
-
88
-
89
-
90
-
91
-
92
-
93
-
94
-
95
-
96
-
97
-
98
-
99
-
100
-
101
-
102
-
103
-
104
-
105
-
106
-
107
-
108
-
109
-
110
-
111
-
112
-
113
-
114
-
115
-
116
-
117
-
118
-
119
-
120
-
121
-
122
-
123
-
124
-
125
-
126
-
127
-
128
-
129
-
130
-
131
-
132
-
133
-
134
-
135
-
136
-
137
-
138
-
139
-
140
-
141
-
142
-
143
-
144
-
145
-
146
-
147
-
148
-
149
-
150
-
151
-
152
-
153
-
154
-
155
-
156
-
157
-
158
-
159
-
160
-
161
-
162
-
163
-
164
-
165
-
166
-
167
-
168
-
169
-
170
-
171
-
172
-
173
-
174
-
175
-
176
-
177
-
178
-
179
-
180
-
181
-
182
-
183
-
184
 |
 |