Canon imageCLASS 2300 Reference Guide for imageCLASS 2300 - Page 36
Function keys F1 to F4, In Use Memory lamp - service mode
 |
View all Canon imageCLASS 2300 manuals
Add to My Manuals
Save this manual to your list of manuals |
Page 36 highlights
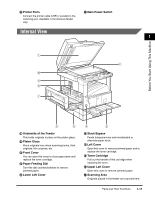
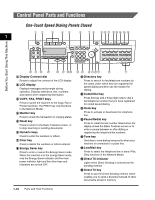
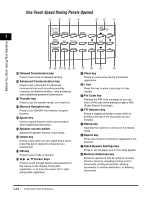
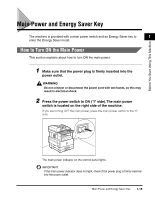
Before You Start Using This Machine q One-touch speed dialing panels y Interrupt key The first panel displays keys 01 to 21. Open the Press to interrupt a continuous copy job when first panel to access keys 22 to 42. Open the you need to make priority copies. second panel to access keys 43 to 63. Open the z Additional Functions key third panel to access the Fax function keys. Press to enter the Additional Functions menu. r One-touch speed dialing keys A OK key Press to dial numbers registered under one-touch speed dialing keys or access the Fax Press to set a mode or function. 1 functions when registered as program-one-touch B BACK key keys. Press to go back to the previous screen when s Main Power indicator adjusting settings in a menu. Lights when the main power is turned ON. C Function keys (F1 to F4) t Stop key Select options that appear on the LCD display. Press to return to the Basic Features screen, or to stop scanning, printing copies or sending a fax. u Start key D Special Features key Press to set special copying features, such as Two-Page Separation, Image Combination, Margin, and Frame Erase. Press to start an operation. E Copy shortcut keys (1 to 4) v ID key Press in order to use the Department ID Management function. w Alarm lamp Lights or blinks red when an error occurs. If the alarm lamp blinks, solve the problem by following the instructions on the LCD display. If the alarm lamp maintains a steady red light, contact your service representative. Press to use registered special copying features. The default settings are as follows: 1: Reduce 2: Enlarge 3: Two-Page Separation 4: Frame Erase You can change the Copy Shortcut keys settings in the Copy Settings menu from the Additional Functions menu. x In Use Memory lamp F Collate key A light that blinks red or maintains a steady green light when the machine is copying or there are documents stored in memory. Press to turn ON/OFF the finisher functions, such as Collate or Rotate. Parts and Their Functions 1-13
-
 1
1 -
2
-
3
-
4
-
5
-
6
-
7
-
8
-
9
-
10
-
11
-
12
-
13
-
14
-
15
-
16
-
17
-
18
-
19
-
20
-
21
-
22
-
23
-
24
-
25
-
26
-
27
-
28
-
29
-
30
-
 31
31 -
 32
32 -
 33
33 -
 34
34 -
 35
35 -
 36
36 -
 37
37 -
 38
38 -
 39
39 -
 40
40 -
 41
41 -
42
-
43
-
44
-
45
-
46
-
47
-
48
-
49
-
50
-
51
-
52
-
53
-
54
-
55
-
56
-
57
-
58
-
59
-
60
-
61
-
62
-
63
-
64
-
65
-
66
-
67
-
68
-
69
-
70
-
71
-
72
-
73
-
74
-
75
-
76
-
77
-
78
-
79
-
80
-
81
-
82
-
83
-
84
-
85
-
86
-
87
-
88
-
89
-
90
-
91
-
92
-
93
-
94
-
95
-
96
-
97
-
98
-
99
-
100
-
101
-
102
-
103
-
104
-
105
-
106
-
107
-
108
-
109
-
110
-
111
-
112
-
113
-
114
-
115
-
116
-
117
-
118
-
119
-
120
-
121
-
122
-
123
-
124
-
125
-
126
-
127
-
128
-
129
-
130
-
131
-
132
-
133
-
134
-
135
-
136
-
137
-
138
-
139
-
140
-
141
-
142
-
143
-
144
-
145
-
146
-
147
-
148
-
149
-
150
-
151
-
152
-
153
-
154
-
155
-
156
-
157
-
158
-
159
-
160
-
161
-
162
-
163
-
164
-
165
-
166
-
167
-
168
-
169
-
170
-
171
-
172
-
173
-
174
-
175
-
176
-
177
-
178
-
179
-
180
-
181
-
182
-
183
-
184
-
185
-
186
-
187
-
188
-
189
-
190
-
191
-
192
-
193
-
194
-
195
-
196
-
197
 |
 |
