Cisco 10720 Configuration Guide
Cisco 10720 - Internet Router Manual
 |
View all Cisco 10720 manuals
Add to My Manuals
Save this manual to your list of manuals |
Cisco 10720 manual content summary:
- Cisco 10720 | Configuration Guide - Page 1
Cisco 10720 Internet Router Installation and Configuration Guide Americas Headquarters Cisco Systems, Inc. 170 West Tasman Drive San Jose, CA 95134-1706 USA http://www.cisco.com Tel: 408 526-4000 800 553-NETS (6387) Fax: 408 527-0883 Customer Order Number: DOC-7813062= Text Part Number: 78-13062-10 - Cisco 10720 | Configuration Guide - Page 2
or Website are the property of their respective owners. The use of the word partner does not imply a partnership relationship between Cisco and any other company. (0612R) Cisco 10720 Internet Router Installation and Configuration Guide Copyright © 2007 Cisco Systems, Inc. All rights reserved. - Cisco 10720 | Configuration Guide - Page 3
Service Request Severity xxiii Obtaining Additional Publications and Information xxiv Product Overview 1-1 Product Description 1-1 Physical and Functional Overview 1-2 Cisco 10720 Internet Router Hardware Features 1-3 Hardware Field Replaceable Units 1-4 Uplink Cards 1-4 Cisco 10720 Internet Router - Cisco 10720 | Configuration Guide - Page 4
Power Guidelines 2-9 AC-Powered Router 2-9 DC-Powered Router 2-9 Site Wiring Distance and Interference Guidelines 2-10 Electromagnetic Interference 2-10 Distance Limitations for Signaling and Unshielded Conductors 2-10 Cable Management 2-11 Cisco 10720 Internet Router Installation and Configuration - Cisco 10720 | Configuration Guide - Page 5
AC Power Supply 3-27 Connecting the DC Power Supply 3-29 Verifying the Router Power Is Turned On 3-32 Initial Setup Configuration 3-32 Configuring the Router 3-32 Configuring Global Parameters Using the Setup Facility 3-33 Host Name 3-33 Assigning Passwords 3-33 Verifying the Cisco 10720 Internet - Cisco 10720 | Configuration Guide - Page 6
the show rpr-ieee protection Command 4-6 Fiber Misconnection 4-7 Basic Troubleshooting SRP for the Uplink Card 4-7 Using the show controller srp Command 4-7 Using the show arp Command 4-9 Verifying Clocking 4-9 PASS-THRU Mode 4-9 Cisco 10720 Internet Router Installation and Configuration Guide vi - Cisco 10720 | Configuration Guide - Page 7
and Equipment Required 5-7 Connecting the AC Power Supply 5-7 Connecting the DC Power Supply 5-9 Removing and Installing the Router Chassis Cover 5-13 Safety 5-13 Required Tools and Equipment 5-13 Removing the Router Cover 5-13 Cisco 10720 Internet Router Installation and Configuration Guide vii - Cisco 10720 | Configuration Guide - Page 8
Dual DC Power Supply 5-42 Verifying AC or Dual DC Power Supply Functionality 5-46 Removing and Installing an Uplink Card 5-49 Safety 5-49 Required Tools and Equipment 5-49 Removing an Uplink Card 5-50 Removing an SFP 5-50 Installing an Uplink Card 5-55 Installing the OC48 SFP Modules in the RPR/SRP - Cisco 10720 | Configuration Guide - Page 9
5-68 Safety 5-68 Required Tools and Equipment 5-68 Removing the Cable-Management System 5-68 Installing the Cable-Management System 5-70 Physical and Environmental Specifications A-1 Power Specifications A-2 Contents 78-13062-10 Cisco 10720 Internet Router Installation and Configuration Guide ix - Cisco 10720 | Configuration Guide - Page 10
Contents Cisco 10720 Internet Router Installation and Configuration Guide x 78-13062-10 - Cisco 10720 | Configuration Guide - Page 11
for the person who will install, configure, and maintain a Cisco 10720 Internet Router. This person typically will have substantial experience configuring router- or switch-based IP networks, but might or might not have experience with Cisco products and Cisco-supported protocols. The user must be - Cisco 10720 | Configuration Guide - Page 12
, site requirements for power, environmental safety, cabling, rack-mounting, electrostatic discharge (ESD), unpacking, and the site log. Contains the procedures for verifying the Cisco 10720 Internet Router installation, grounding, cable connection, powering up the router, and basic configuration - Cisco 10720 | Configuration Guide - Page 13
router> indicates the user level, and the prompt router# indicates the privileged level. Access to the privileged level usually requires a password. • Commands and keywords are in boldface font. • Arguments for which you supply 10 Cisco 10720 Internet Router Installation and Configuration Guide xiii - Cisco 10720 | Configuration Guide - Page 14
sur un équipement, soyez conscient des dangers liés aux circuits électriques et familiarisez-vous avec les procé , référez-vous au numéro de l'instruction situé à la fin de chaque avertissement PÅ DISSE INSTRUKSJONENE Cisco 10720 Internet Router Installation and Configuration Guide xiv 78-13062-10 - Cisco 10720 | Configuration Guide - Page 15
manipular cualquier equipo, considere los riesgos de la corriente eléctrica y familiarícese con los procedimientos estándar de prevención de accidentes. Al final de cada advertencia anordning. SPARA DESSA ANVISNINGAR 78-13062-10 Cisco 10720 Internet Router Installation and Configuration Guide xv - Cisco 10720 | Configuration Guide - Page 16
åelse af ulykker. Brug erklæringsnummeret efter hver advarsel for at finde oversættelsen i de oversatte advarsler, der fulgte med denne enhed. GEM DISSE ANVISNINGER Cisco 10720 Internet Router Installation and Configuration Guide xvi 78-13062-10 - Cisco 10720 | Configuration Guide - Page 17
Preface Warning Definition 78-13062-10 Cisco 10720 Internet Router Installation and Configuration Guide xvii - Cisco 10720 | Configuration Guide - Page 18
for the Cisco 10720 Internet Router document (Document Number 78-13077-xx) that accompanies your Cisco 10720 Internet Router. Cisco recommends you read and understand the safety warnings and guidelines before installing, configuring, or maintaining the router. xviii Cisco 10720 Internet Router - Cisco 10720 | Configuration Guide - Page 19
Cisco 10720 Internet Router document Field-Replaceable Units (FRUs) • Cisco 10720 Internet Router AC and DC Power Supply Replacement Instructions, document number 78-13100-xx • Cisco 10720 Internet Router Access Card Installation and Configuration, document number 78-13082-xx • Cisco 10720 Internet - Cisco 10720 | Configuration Guide - Page 20
Obtaining Documentation Preface Other • Cisco 10720 Internet Router Unpacking Instructions, document number 78-13855-xx • Regulatory Compliance and Safety Information for the Cisco 10720 Internet Router, document number 78-13077-xx • Compressed Air Cleaning Issues for Fiber-Optic Connections • - Cisco 10720 | Configuration Guide - Page 21
is under active attack or a condition for which a severe and urgent security vulnerability should be reported. All other conditions are considered nonemergencies. 78-13062-10 Cisco 10720 Internet Router Installation and Configuration Guide xxi - Cisco 10720 | Configuration Guide - Page 22
or click the Cisco Product Identification Tool link under Alerts & RMAs. The CPI tool offers three search options: by product ID or model name; by tree view; or for certain products, by copying and pasting show command Cisco 10720 Internet Router Installation and Configuration Guide xxii 78-13062 - Cisco 10720 | Configuration Guide - Page 23
service to satisfactory levels. Severity 4 (S4)-You require information or assistance with Cisco product capabilities, installation, or configuration. There is little or no effect on your business operations. 78-13062-10 Cisco 10720 Internet Router Installation and Configuration Guide xxiii - Cisco 10720 | Configuration Guide - Page 24
Journal at this URL: http://www.cisco.com/ipj • Networking products offered by Cisco Systems, as well as customer support services, can be obtained at this URL: http://www.cisco.com/en/US/products/index.html xxiv Cisco 10720 Internet Router Installation and Configuration Guide 78-13062-10 - Cisco 10720 | Configuration Guide - Page 25
a discussion at this URL: http://www.cisco.com/discuss/networking • World-class networking training is available from Cisco. You can view current offerings at this URL: http://www.cisco.com/en/US/learning/index.html 78-13062-10 Cisco 10720 Internet Router Installation and Configuration Guide xxv - Cisco 10720 | Configuration Guide - Page 26
Obtaining Additional Publications and Information Preface xxvi Cisco 10720 Internet Router Installation and Configuration Guide 78-13062-10 - Cisco 10720 | Configuration Guide - Page 27
17 RPR technology for optical connectivity. Each router is equipped with one uplink card and one Ethernet access card. The Cisco 10720 Internet Router overview is presented in the following sections: • Product Description, page 1-1 • Physical and Functional Overview, page 1-2 • Design Specifications - Cisco 10720 | Configuration Guide - Page 28
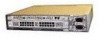
Field Replaceable Units, page 1-4 • Software Features, page 1-8 Figure 1-1 Cisco 10720 Internet Router: AC (Top) and DC (Bottom) Power Supplies PWARCSRAXASACPRPTTIKRIHTVEERRU CONSOLE AUX RESET PSCOYOASWVRTEEDERRFMTAEISLMTPAUS AC OK DC OK OTF LINK/A1C00TCIAVMREB (DPGSF)AIL PCOAWREDRFAIL - Cisco 10720 | Configuration Guide - Page 29
used with one of the Ethernet access cards to customize the Cisco 10720 Internet Router as an Ethernet-only router. Figure 1-2 1 Uplink Card and Access Card PWARCSRAXASACPRPTTIKRIHTVEERRU 57681 2 CONSOLE AUX RESET PSCOYOASWVRTEEDERRFMTAEISLMTPAUS AC OK DC OK OTF LINK/A1C00TCIAVMREB (DPGSF - Cisco 10720 | Configuration Guide - Page 30
card and the access card. The card cage is integrated into a rigid metal frame. The Cisco 10720 Internet Router field replaceable units are presented in the following sections: • Uplink Cards, page 1-4 • Access Card, page 1-6 • Redundant Power Supply, page 1-6 • Fan Assembly, page 1-7 • Mounts - Cisco 10720 | Configuration Guide - Page 31
Cisco sales representative. • Optical power monitoring and 4.6-ppm clock accuracy • SONET OC-48/SDH-16c compliance • IP over DCC management interface • SRP • IEEE 802.17 RPR features • Small Form Factor pluggable (SFP) modules 78-13062-10 Cisco 10720 Internet Router Installation and Configuration - Cisco 10720 | Configuration Guide - Page 32
configuration of Ethernet features Redundant Power Supply The Cisco 10720 Internet Router comes with either dual AC or dual DC power supplies for redundancy. Figure 1-6 shows the AC power supply and Figure 1-7 shows the DC power supply for the Cisco 10720 Internet Router. Cisco 10720 Internet - Cisco 10720 | Configuration Guide - Page 33
Overview Physical and Functional Overview Figure 1-6 Cisco 10720 Internet Router AC Power Supply 57673 AC OK DC OK OTF AC OK DC OK OTF Figure 1-7 Cisco 10720 Internet Router DC Power Supply IN OK DC OTF IN OK DC OTF 57674 Fan Assembly The router is equipped with a four-fan assembly - Cisco 10720 | Configuration Guide - Page 34
Support for classes A, B, and C in transit and Class A and B for transmit and receive - RPR keepalive timer and L1 Holdoff timer For the physical specifications of the Cisco 10720 Internet Router, see Appendix A, "Technical Specifications." Cisco 10720 Internet Router Installation and Configuration - Cisco 10720 | Configuration Guide - Page 35
Cisco 10720 Internet Router. The router is tested to meet the Corporate Mechanical Design Validation and Test (MDVT) specification. Tests verify that the router operating ranges meet handling and earthquake standards. This router Cisco 10720 Internet Router Installation and Configuration Guide 1-9 - Cisco 10720 | Configuration Guide - Page 36
Design Specifications Chapter 1 Product Overview 1-10 Cisco 10720 Internet Router Installation and Configuration Guide 78-13062-10 - Cisco 10720 | Configuration Guide - Page 37
Cisco IOS Software Configuration, page 2-11 • Required Tools and Equipment, page 2-5 • Verifying the Contents in the Box, page 2-11 • Site Log Preparation, page 2-12 Regulatory Compliance and Safety Information See the Regulatory Compliance and Safety Information for the Cisco 10720 Internet Router - Cisco 10720 | Configuration Guide - Page 38
grounding should be in accordance with local and national electrical codes. • A Cisco 10720 Internet Router configured with a dual DC-input power supply requires an external circuit breaker for the DC-input power source. This circuit breaker should protect against short-circuit and overcurrent - Cisco 10720 | Configuration Guide - Page 39
when electronic cards or AUX RESET PSCOYOASWVRTEEDERRFMTAEISLMTPAUS AC OK DC OK OTF LINK/A1C00TCIAVMREB (DPGSF)AIL PCOAWREDRFAIL WODITROHNINTNSHOEERTPTROCEWAMEBORLVEOESN AC OK DC OK OTF INPUT 100-200- 50/60Hz 2-5A 78-13062-10 Cisco 10720 Internet Router Installation and Configuration Guide - Cisco 10720 | Configuration Guide - Page 40
stare into open line card ports. The following laser warnings apply to the Cisco 10720 Internet Router: Class 1 Laser Cisco 10720 Internet Router publication. Class 1 LED Product Warning Warning Class 1 LED product. Statement 1027 Cisco 10720 Internet Router Installation and Configuration Guide - Cisco 10720 | Configuration Guide - Page 41
are required to install the Cisco 10720 Internet Router: • ESD-preventive wrist strap • Number 1 Phillips screwdriver • 1/8-inch flat-blade screwdriver • Antistatic mat (optional) • Antistatic bag • Cable ties • Wire stripper Rack-Mounting Guidelines Before installing the Cisco 10720 Internet Router - Cisco 10720 | Configuration Guide - Page 42
cards and power supply. • Ensure that cables from other equipment do not interfere with access to the cards and LEDs located in the front of the router. • When mounting the router in a rack, be sure to use all the screws provided to secure the router to the rack posts. Cisco 10720 Internet Router - Cisco 10720 | Configuration Guide - Page 43
Rack-Mounting Guidelines Figure 2-2 Cisco 10720 Internet Router Outer Dimensions (Top View) 17.50 in. (44.45 cm) 18.25 in. (46.36 cm) Chassis 21.80 in. (55.37 cm) 57878 Cable management bracket Height = 2 RU 78-13062-10 Cisco 10720 Internet Router Installation and Configuration Guide - Cisco 10720 | Configuration Guide - Page 44
• Temperature and Humidity Guidelines, page 2-8 • Power Guidelines, page 2-9 • Site Wiring Distance and Interference Guidelines, page 2-10 • Cable Management, page 2-11 • Mounting the Router, page 2-11 Airflow Guidelines The Cisco 10720 Internet Router air circulation system consists of four fans - Cisco 10720 | Configuration Guide - Page 45
for Installation Environmental Safety Guidelines Power Guidelines Caution Read the installation instructions before you connect the router to its power source. The Cisco 10720 Internet Router requires a 120/220 VAC or -48 VDC dual power supply. Site requirements differ depending on the type - Cisco 10720 | Configuration Guide - Page 46
and protect the equipment. This list does not include every potentially hazardous situation, so be alert. A Cisco 10720 Internet Router configured with the dual DC-input power supply should have a readily accessible disconnect device incorporated for fixed wiring. See the "Safety Guidelines" section - Cisco 10720 | Configuration Guide - Page 47
verify that the following are included with your shipment: • One Cisco 10720 Internet Router fully assembled that includes the following: - 1 uplink card - 1 access card - 1 AC or DC dual power supply - 1 main board 78-13062-10 Cisco 10720 Internet Router Installation and Configuration Guide 2-11 - Cisco 10720 | Configuration Guide - Page 48
- AC power cable (quantity 2) - Metal AC bracket clips (quantity 2) - Screws (quantity 22) - Ground lug (quantity 1) - Lug-mounting 6.3 mm (M5) screws (quantity 2) • Cisco 10720 Internet Router Unpacking Instructions • Regulatory Compliance and Safety Information for the Cisco 10720 Internet Router - Cisco 10720 | Configuration Guide - Page 49
Chapter 2 Preparing for Installation Table 2-1 Site Log for the Cisco 10720 Internet Router Device Identification: Date Description of Action Performed or Symptom Observed Site Log Preparation Initials 78-13062-10 Cisco 10720 Internet Router Installation and Configuration Guide 2-13 - Cisco 10720 | Configuration Guide - Page 50
Site Log Preparation Chapter 2 Preparing for Installation 2-14 Cisco 10720 Internet Router Installation and Configuration Guide 78-13062-10 - Cisco 10720 | Configuration Guide - Page 51
17 • Connecting Ethernet Ports on the Access Card, page 3-22 • Installing the Cable-Management System, page 3-25 • Turning On Power to the Router, page 3-26 • Verifying the Router Power Is Turned On, page 3-32 • Initial Setup Configuration, page 3-32 • Verifying the Cisco 10720 Internet Router LEDs - Cisco 10720 | Configuration Guide - Page 52
for rack-mounting, one set of brackets for wall-mounting, and four rubber foot pads for desk-mounting. Check the clearance around the router before you install the router. See the "Required Tools and Equipment" section on page 2-5 for detailed dimension requirements. Cisco 10720 Internet Router - Cisco 10720 | Configuration Guide - Page 53
3 Installing the Cisco 10720 Internet Router Setting up the Cisco 10720 Internet Router Figure 3-1 Ventilation Requirements for Rack Mounting 6 in. (15.24 cm) 0.75 in. (1.9 cm) 0.75 in. (1.9 cm) 57879 6 in. (15.24 cm) Note Warm air exhausts out the back end of the router by drawing cool - Cisco 10720 | Configuration Guide - Page 54
Setting up the Cisco 10720 Internet Router Chapter 3 Installing the Cisco 10720 Internet Router The following steps describe how to mount the router on a 19-inch EIA, 23-inch, or 24-inch EIA, or ETSI rack: Figure 3-2 Rack-Mounting Brackets 19 inch ETSI 23/24 inch 57664 Step 1 Step 2 Step 3 - Cisco 10720 | Configuration Guide - Page 55
Chapter 3 Installing the Cisco 10720 Internet Router Figure 3-3 Installing Rack Mounting Brackets Setting up the Cisco 10720 Internet Router PWARCSRAXASACPRPTTIKRIHTVEERRU CONSOLE AUX RESET PSCOYOASWVRTEEDERRFMTAEISLMTPAUS AC OK DC OK OTF LINK/A1C00TCIAVMREB (DPGSF)AIL PCOAWREDRFAIL - Cisco 10720 | Configuration Guide - Page 56
up the Cisco 10720 Internet Router Chapter 3 Installing the Cisco 10720 Internet Router Use a Number 1 Phillips screwdriver to attach the four screws that are supplied in the cable accessory kit to attach each side of the router chassis to the rack. (See Figure 3-4.) Wall-Mounting the Router The - Cisco 10720 | Configuration Guide - Page 57
the Cisco 10720 Internet Router Setting up the Cisco 10720 Internet Router Figure 3-6 Attaching Wall-Mounting Brackets to the Router Chassis 57853 IN OK DC OTF IN OK DC OTF Note When the rack is mounted on the wall, make sure that the power receptacles are at the bottom of the router, as - Cisco 10720 | Configuration Guide - Page 58
Setting up the Cisco 10720 Internet Router Figure 3-7 Wall-Mount Rack Chapter 3 Installing the Cisco 10720 Internet Router IN OK DC OTF IN OK DC OTF 57666 Step 5 Match the holes in the wall-mounting brackets to the predrilled holes on the mounting surface. Mount the brackets to the wall using - Cisco 10720 | Configuration Guide - Page 59
Commission (IEC) 320 plugs for the AC power supply and DC power supply. For additional NEBS information, see the Regulatory Compliance and Safety Information for the Cisco 10720 document. Supplemental Unit Bonding and Grounding Guidelines If the router is not installed in a NEBS environment - Cisco 10720 | Configuration Guide - Page 60
Ø 0.267 2 holes 0.25 0.63 0.37 0.08 Crimp area 25527 Figure 3-10 1 Crimping the Lug 57808 2 1 Place ground wire in the lug 2 Crimp the lug 3-10 Cisco 10720 Internet Router Installation and Configuration Guide 78-13062-10 - Cisco 10720 | Configuration Guide - Page 61
Chapter 3 Installing the Cisco 10720 Internet Router SONET Distance Limitations Figure 3-11 Attaching the Grounding Lug to the Router Chassis PWARCSRAXASACPRPTTIKRIHTVEERRU 57750 CONSOLE AUX RESET PSCOYOASWVRTEEDERRFMTAEISLMTPAUS AC OK DC OK OTF LINK/A1C00TCIAVMREB (DPGSF)AIL - Cisco 10720 | Configuration Guide - Page 62
"Removing and Installing the Cable-Management System" section on page 5-68. For cable and connection specifications, refer to the Cisco 10720 Internet Router Uplink Cards Installation and Configuration publication. 3-12 Cisco 10720 Internet Router Installation and Configuration Guide 78-13062-10 - Cisco 10720 | Configuration Guide - Page 63
Chapter 3 Installing the Cisco 10720 Internet Router Connecting Ports on the Uplink Cards To connect the ports on the DPT or POS uplink card, or the RPR/SRP uplink card, follow these instructions: Step 1 Step 2 Attach an ESD-preventive wrist strap to your wrist, and to the router or to a bare - Cisco 10720 | Configuration Guide - Page 64
DPT Ring Chapter 3 Installing the Cisco 10720 Internet Router Figure 3-14 Installing the Bale Clasp SFP Module in the RPR/SRP Uplink Card 1 10720-RPR-SFP 1 PPRRCAAXOSACTPSRTEIKTRIVCTHETERRU 122091 10003B0-a1s2e9-L9X-01 2 1 RPR/SRP uplink card 2 OC48 SFP module Step 4 Step 5 Close the bale - Cisco 10720 | Configuration Guide - Page 65
TX port on the next uplink card. (See Figure 3-15.) Use Figure 3-15 and Table 3-1 to help organize the cable connections for a four-node DPT ring. Figure 3-16 provides a view of the network when a four-node DPT ring is created. 78-13062-10 Cisco 10720 Internet Router Installation and Configuration - Cisco 10720 | Configuration Guide - Page 66
TX side A Node 3 / TX side A Node 2 / TX side A To Node / Connector Node 2 / RX side A Node 3 / RX side A Node 4 / RX side A Node 1 / RX side A Node 4 / RX side B Node 3 / RX side B Node 2 / RX side B Node 1 / RX side B 57877 3-16 Cisco 10720 Internet Router Installation and Configuration Guide - Cisco 10720 | Configuration Guide - Page 67
card. 78-13062-10 Table 3-2 Cable Connections for a Four-Node IEEE 802.17 RPR Mode Ring Cable Connections From Node / Connector Node 1 / TX span East Node 2 / TX span East To Node / Connector Node 2 / RX span West Node 3 / RX span West Cisco 10720 Internet Router Installation and Configuration - Cisco 10720 | Configuration Guide - Page 68
RPR Mode Ring RX 1 TX West TX East RX TX East RX 4 RX West TX 5 6 1 Node 1 2 Node 2 3 Node 3 802.17 Mode TX West RX 2 RX East TX 121184 RX TX East West TX 3 RX 4 Node 4 5 Inner Ring-Ringlet 1 6 Outer Ring-Ringlet 0 3-18 Cisco 10720 Internet Router Installation and Configuration Guide - Cisco 10720 | Configuration Guide - Page 69
Chapter 3 Installing the Cisco 10720 Internet Router Creating a Four-Node IEEE 802.17 RPR Mode Ring Additional Ports on the Uplink Cards You can connect the console or serial (AUX) port on the uplink cards to any of the following: • Terminal server • Access server • Modem • Desktop computer • - Cisco 10720 | Configuration Guide - Page 70
Creating a Four-Node IEEE 802.17 RPR Mode Ring Chapter 3 Installing the Cisco 10720 Internet Router Attaching a Modem to the Console or AUX Port To connect a modem to the AUX port on the router, do the following: Note Attaching a modem to the AUX port is a default setting. Step 1 Step 2 Step 3 - Cisco 10720 | Configuration Guide - Page 71
AUX port. (See Table 3-3.) Table 3-3 Cisco 10720 Internet Router Default Port Configurations Function Speed Data bit Stop bit Parity Flow control Default Settings 9600 8 2 - - Step 6 Configure the desktop computer, laptop, or terminal serial port with the same port configuration values required - Cisco 10720 | Configuration Guide - Page 72
Ethernet port or to an SFP module on the Gigabit Ethernet port on the access card. For more information, see the "Removing the Cable-Management System" section on page 5-68. For cable and connection specifications, refer to the Cisco 10720 Internet Router Access Card Installation and Configuration - Cisco 10720 | Configuration Guide - Page 73
the Cisco 10720 Internet Router Connecting Ethernet Ports on the Access Card Figure 19 Installing the Bale Clasp SFP Module in the Access Card 10720-GE-FE-TX 1 LIENRKROARC (TIRV)E (G) 70188 10003B0-a1s2e9-9L-X01 2 1 4-Port Gigabit Ethernet 8-Port 10/100BASE-TX access card 2 SFP module - Cisco 10720 | Configuration Guide - Page 74
Note For specific cabling specifications, refer to the Cisco 10720 Internet Router Access Card Installation and Configuration publication. Figure 3-21 Connecting the Interface Cable (Typical) PWARCSRAXASACPRPTTIKRIHTVEERRU 1 CONSOLE AUX RESET PSCOYOASWVRTEEDERRFMTAEISLMTPAUS AC OK DC OK OTF - Cisco 10720 | Configuration Guide - Page 75
AC OK DC OK OTF INPUT 100-200- 50/60Hz 2-5A Step 3 Separate cables and lead them out the sides of the cable-management tray. Use a cable tie to keep the cables together. (See Figure 3-23.) 78-13062-10 Cisco 10720 Internet Router Installation and Configuration Guide - Cisco 10720 | Configuration Guide - Page 76
to the equipment mounting rack to keep the wires from accidental bends or breaks. (See Figure 3-24.) Figure 3-25 Installing the Cable-Management Cover PWARCSRAXASACPRPTTIKRIHTVEERRU 66298 CISCO 10720 INTERNET ROUTER CONSOLE AUX RESET PSCOYOASWVRTEEDERRFMTAEISLMTPAUS AC OK DC OK OTF LINK - Cisco 10720 | Configuration Guide - Page 77
before you connect the system to its power source. Statement 1004 Note For additional information, refer to the Cisco 10720 Internet Router AC and DC Power Supply Replacement Instructions. This configuration note is available on Cisco.com or ordered as a printed document. Field replacement - Cisco 10720 | Configuration Guide - Page 78
)AIL PCOAWREDRFAIL WODITROHNINTNSHOEERTPTROCEWAMEBORLVEOESN AC OK DC OK OTF INPUT 100-200- 50/60Hz 2-5A 57870 Step 4 Connect the other end of the AC power cord to the AC power source outlet. (See Figure 3-28.) 3-28 Cisco 10720 Internet Router Installation and Configuration Guide 78-13062-10 - Cisco 10720 | Configuration Guide - Page 79
size supported on the DC dual power supply is 17 American Wire Gauge (AWG), which has a 1.5mm wire diameter. The maximum wire gauge size supported on the DC dual power supply is 10 AWG, which has a 6mm wire diameter. 78-13062-10 Cisco 10720 Internet Router Installation and Configuration Guide - Cisco 10720 | Configuration Guide - Page 80
On Power to the Router Chapter 3 Installing the Cisco 10720 Internet Router Connect the DC power supply by performing the following steps: Step 1 Step 2 Verify that the -48V and +48V leads are disconnected from the power source. Attach an ESD-preventive strap to your wrist, and to the router or - Cisco 10720 | Configuration Guide - Page 81
the Cisco 10720 Internet Router Figure 3-32 1 Connecting the DC Power Leads 2 Turning On Power to the Router 3 122049 6 5 5 4 4 4 1 Ground lead connected 2 Positive lead connected 3 Negative lead connected 4 Ground lead 5 Positive lead 6 Negative lead Step 5 Connect the power leads - Cisco 10720 | Configuration Guide - Page 82
Configuration Chapter 3 Installing the Cisco 10720 Internet Router Note Leave a small service loop in the ground lead to ensure that the ground lead is the last lead to disconnect from the power supply if a great deal of strain is placed on the DC-input leads. It is important that the ground power - Cisco 10720 | Configuration Guide - Page 83
sets of LEDs: • System LEDs • Status LEDs The system LEDs inform the user of the condition of the router, while the uplink or access card status LEDs inform the user of the condition or status of the card itself. 78-13062-10 Cisco 10720 Internet Router Installation and Configuration Guide 3-33 - Cisco 10720 | Configuration Guide - Page 84
The color of the LEDs is green/red on the DPT and POS/DPT uplink cards, and green/amber on the RPR/SRP uplink card. Note Table 3-4 and Table 3-5 also indicate the system status of the uplink card as it initializes. 3-34 Cisco 10720 Internet Router Installation and Configuration Guide 78-13062-10 - Cisco 10720 | Configuration Guide - Page 85
3-35 RPR/SRP Uplink System LEDs PPACRAXRCASTORIPSTRVKIETETECHRTRU 10720-SR-LC 1 2 RESET CONSOLE AUX SPCOYVAOSERWTRDEETRFEMAIMSLPTATUS 116786 PSCOYAVOSERWTRDEETFREMAIMSLPTATUS PPACRXARCATSROIPSTRVKIETETECHRTRU 78-13062-10 Cisco 10720 Internet Router Installation and Configuration Guide - Cisco 10720 | Configuration Guide - Page 86
status LEDs to ensure the card is functioning properly and is receiving power from the system. For more specific information on these and other uplink card LEDs, refer to the Cisco 10720 Internet Router Uplink Cards Installation and Configuration publication. Uplink Card Status LEDs Warning Avoid - Cisco 10720 | Configuration Guide - Page 87
Cisco 10720 Internet Router Verifying the Cisco 10720 Internet Router LEDs Note The color of the LEDs is green/red on the DPT and POS/DPT uplink cards, and green/amber on the RPR/SRP uplink card. Table 3-6 DPT Uplink Card -10 Cisco 10720 Internet Router Installation and Configuration Guide 3-37 - Cisco 10720 | Configuration Guide - Page 88
wrap. Remote steer. Local steer. For more specific information on these and other uplink card LEDs, refer to the Cisco 10720 Internet Router Uplink Cards Installation and Configuration publication. For additional information about laser safety requirements, see the "Laser Safety" section on page - Cisco 10720 | Configuration Guide - Page 89
Chapter 3 Installing the Cisco 10720 Internet Router Verifying the Cisco 10720 Internet Router LEDs Figure 3-36 Access Card Status LEDs (Top) and System LEDs (Bottom) LINK/AE1CR0T0RIVOMERB((PRG)S) LINK/AE1CR0T0RIVOMERB((PRGS)) 57684 10720-FE-TX 1 3 5 7 9 11 2 4 6 8 10 12 13 15 - Cisco 10720 | Configuration Guide - Page 90
Verifying the Cisco 10720 Internet Router LEDs Chapter 3 Installing the Cisco 10720 Internet Router Table 3-10 Access Card Status LEDs Port Type Gigabit Ethernet LED ERROR (R)/LINK (G) Fast Ethernet 10/100BASE-TX ACTIVE ERROR (R)/LINK ACTIVE (G) 100 MBPS Activity Description Red Error - Cisco 10720 | Configuration Guide - Page 91
access card LEDs, refer to the Cisco 10720 Internet Router Access Card Installation and Configuration publication. For additional information about laser safety requirements, see the "Laser Safety" section on page 2-4. 78-13062-10 Cisco 10720 Internet Router Installation and Configuration Guide - Cisco 10720 | Configuration Guide - Page 92
verify the router's configuration. router# show running-configuration Building configuration... Current configuration : 3791 bytes ! version 12.0 no service pad service timestamps debug uptime service timestamps log uptime 3-42 Cisco 10720 Internet Router Installation and Configuration Guide 78 - Cisco 10720 | Configuration Guide - Page 93
Chapter 3 Installing the Cisco 10720 Internet Router Additional Configuration Features no service password-encryption ! hostname Router ! boot system flash:c10700-p-mz.120-18.ST ! ip subnet-zero ! ! interface SRP1/1 ip address 48.1.1.10 255.255.255.0 no ip directed-broadcast ! interface - Cisco 10720 | Configuration Guide - Page 94
reset from power-on Toaster processor tmc0 is running. Toaster processor tmc1 is running. 1 one-port OC48 SONET based SRP controller. 1 24 Port 100 Mbps Fast Ethernet TX controller. 24 FastEthernet/IEEE 802.3 interface(s) 3-44 Cisco 10720 Internet Router Installation and Configuration Guide 78 - Cisco 10720 | Configuration Guide - Page 95
specifications - Cisco 10720 | Configuration Guide - Page 96
Configuration Features Chapter 3 Installing the Cisco 10720 Internet Router Alarm reporting enabled for: SLOS SLOF PLOP Framing : SONET Rx SONET/SDH bytes: (K1/K2) = 0/0 S1S0 = 0 C2 = 0x16 Tx B (Inner RX, Outer TX) OPTICS RX readout values: -15 dBm - Within specifications - Cisco 10720 | Configuration Guide - Page 97
on 10/100BASE-TX and 4-Port Gigabit Ethernet 8-Port 10/100 Ethernet TX access cards. For information about how to use the TDR, refer to "Testing for a Cable Problem on a Fast Ethernet Interface" in the Cisco IOS Software Configuration for the Cisco 10720 Internet Router publication. Assigning IP - Cisco 10720 | Configuration Guide - Page 98
Configuration Features Chapter 3 Installing the Cisco 10720 Internet Router Note The router does not have an available Ethernet Out of Bound Controller (EOBC) management interface. Cisco The following commands are presently not supported on a Cisco 10720 Internet Router: boot system tftp < - Cisco 10720 | Configuration Guide - Page 99
Chapter 3 Installing the Cisco 10720 Internet Router Additional Configuration Features The following steps are an example ROMmon update procedure: Step 1 Step 2 Step 3 Step 4 View ROMmon information using the show rom-monitor command. Router(boot)# show rom-monitor Region region1:INVALID Region - Cisco 10720 | Configuration Guide - Page 100
Additional Configuration Features Chapter 3 Installing the Cisco 10720 Internet Router 3-50 Cisco 10720 Internet Router Installation and Configuration Guide 78-13062-10 - Cisco 10720 | Configuration Guide - Page 101
for the Cisco 10720 Internet Router and components. • Basic Troubleshooting RPR-IEEE for the Uplink Card, page 4-1 • Basic Troubleshooting SRP for the Uplink Card, page 4-7 • Alarm Messages, page 4-11 • Basic Troubleshooting Ethernet for the Access Card, page 4-19 Basic Troubleshooting RPR-IEEE for - Cisco 10720 | Configuration Guide - Page 102
Framing : SONET Rx SONET/SDH bytes: (K1/K2) = 0/0 S1S0 = 0 C2 = 0x16 Tx SONET/SDH bytes: (K1/K2) = 0/0 S1S0 = 0 C2 = 0x16 J0 = 0x1 Clock source : Internal Framer loopback : None Path trace buffer : Stable Cisco 10720 Internet Router Installation and Configuration Guide 4-2 78-13062-10 - Cisco 10720 | Configuration Guide - Page 103
: high Temperature 91 C Voltage 3600000 uV TX bias 60000 uA TX power 630900 nW / -2 dBm RX power 1008300 nW / 0 dBm Show Transceiver: East Span low - 9 C 3000000 uV 0 uA 79400 nW / -11 dBm unspecified 78-13062-10 Cisco 10720 Internet Router Installation and Configuration Guide 4-3 - Cisco 10720 | Configuration Guide - Page 104
Internet 200.1.1.1 Router# Age (min) 154 155 - Hardware 0001.0001.0001 0003.0003.0003 0002.0002.0002 0001.64ff.0601 Addr Type RPR-IEEE-W RPR-IEEE-E RPR-IEEE ARPA Interface RPR-IEEE1/1 RPR-IEEE1/1 RPR-IEEE1/1 GigabitEthernet2/1 Cisco 10720 Internet Router Installation and Configuration Guide - Cisco 10720 | Configuration Guide - Page 105
in PASS-THRU mode, which occurs when the interface is administratively down. The following example shows sample output from this command: Router# show rpr-ieee protection RPR-IEEE1/1 is administratively down Router# 78-13062-10 Cisco 10720 Internet Router Installation and Configuration Guide 4-5 - Cisco 10720 | Configuration Guide - Page 106
the ring, the details in the ringlet indices will pinpoint the failure location by indicating the Edge location and the Request (reason) for the Edge. Cisco 10720 Internet Router Installation and Configuration Guide 4-6 78-13062-10 - Cisco 10720 | Configuration Guide - Page 107
for SRP on the DPT, POS/DPT, and RPR/SRP uplink cards. For additional information about SRP configurations, refer to the Cisco IOS Software Configuration for the Cisco 10720 Internet Router publication. For additional Cisco SRP-related documentation, see the "Related Documentation" section - Cisco 10720 | Configuration Guide - Page 108
SRP for the Uplink Card Chapter 4 Troubleshooting OPTICS RX readout values: -11 dBm - Within specifications SECTION LOF = 0 LINE AIS = 0 PATH AIS = 0 LOP bytes: (K1/K2) = 0/0 Tx SONET/SDH bytes: (K1/K2) Router# Cisco 10720 Internet Router Installation and Configuration Guide 4-8 78-13062-10 - Cisco 10720 | Configuration Guide - Page 109
CONFIG_I: Configured from console by console 23:42:27: %LINK-5-CHANGED: Interface SRP1/1, changed state to administratively down 23:42:28: %LINEPROTO-5-UPDOWN: Line protocol on Interface SRP1/1, changed state to down 78-13062-10 Cisco 10720 Internet Router Installation and Configuration Guide 4-9 - Cisco 10720 | Configuration Guide - Page 110
Side A (Inner ring TX) IPS pkt. sent every 1 sec. (next pkt. after 1 sec.) Side B (Outer ring TX) IPS pkt. sent every 1 sec. (next pkt. after 1 sec.) inter card bus enabled IPS WTR period that errors are present. 4-10 Cisco 10720 Internet Router Installation and Configuration Guide 78-13062-10 - Cisco 10720 | Configuration Guide - Page 111
connection, creating this error. Check fiber for breaks, power level, and connectivity. This is a SONET layer 1 issue with fiber. Check the fiber for degradation in (power level) or clocking (internal versus line). 78-13062-10 Cisco 10720 Internet Router Installation and Configuration Guide 4-11 - Cisco 10720 | Configuration Guide - Page 112
. Check transport span for problems. Typically RPR ring traverses a SONET layer connection, creating this error. Check fiber for breaks, power level, and connectivity. This or regenerator) forwarding an AIS. None. 4-12 Cisco 10720 Internet Router Installation and Configuration Guide 78-13062-10 - Cisco 10720 | Configuration Guide - Page 113
by user; Node wrap to protect failed span; Secondary problem on the short path Investigate why the short path request was not received. Check other problems on the short span as indicated on the neighbor node. 78-13062-10 Cisco 10720 Internet Router Installation and Configuration Guide 4-13 - Cisco 10720 | Configuration Guide - Page 114
-SLOS, SLOF, LSF, or LAIS. RPR-IEEE1/1 protected on span EAST (span WEST Span Neighbor Signal Degrade) SONET Layer 1 signal fail detected Investigate Keepalive failure. Wrap occurred. Keepalive failure-LSD. 4-14 Cisco 10720 Internet Router Installation and Configuration Guide 78-13062-10 - Cisco 10720 | Configuration Guide - Page 115
received. Check other problems on the short span as indicated on the neighbor node. Investigate why the short path request was not received. Check other problems on the short span as indicated on the neighbor node. 78-13062-10 Cisco 10720 Internet Router Installation and Configuration Guide 4-15 - Cisco 10720 | Configuration Guide - Page 116
the ring. All stations on the ring now support jumbo frame preference, MTU for the ring has been changed to JUMBO MTU (9100 bytes). None. Remove jumbo preference on stations to revert to REGULAR MTU (1500 bytes) 4-16 Cisco 10720 Internet Router Installation and Configuration Guide 78-13062-10 - Cisco 10720 | Configuration Guide - Page 117
side Wrap cleared, node initiated B (side A Self Detect Wait to Restore (WTR) state Wait to Restore [WTR]) WTR period is 10 to 360 seconds (user configured), node will unwrap at end of WTR. None. Cisco 10720 Internet Router Installation and Configuration Guide 4-17 - Cisco 10720 | Configuration Guide - Page 118
B (side A Long Request Manual Switch) Neighbor node Manual Switch initiated by user; Node wrap to protect failed span; Secondary problem on the short path Investigate why expired Wrap cause cleared) Solution None. 4-18 Cisco 10720 Internet Router Installation and Configuration Guide 78-13062-10 - Cisco 10720 | Configuration Guide - Page 119
troubleshooting guidelines for Fast Ethernet and Gigabit Ethernet interfaces on the access card. For additional information about troubleshooting Ethernet configurations, refer to the Cisco IOS Software Configuration for the Cisco 10720 Internet Router publication. For additional Cisco Ethernet - Cisco 10720 | Configuration Guide - Page 120
: • The line protocol software processes determine that the line is unusable. Swap the cable. • Check local or remote interface for misconfiguration. • Swap interface module when there is a hardware failure. 4-20 Cisco 10720 Internet Router Installation and Configuration Guide 78-13062-10 - Cisco 10720 | Configuration Guide - Page 121
damage. • Verify that the correct cables are being used for the appropriate access card. For cabling specifications, refer to the Cisco 10720 Internet Router Access Card Installation and Configuration publication. Late Collision The console will display the following message when late collisions are - Cisco 10720 | Configuration Guide - Page 122
Troubleshooting See the "Verifying Interface Configuration the interface for malfunction. • Check for a cable problem. • Carrier signal resets can occur when an interface is required to properly clean fiber-optic connections. 4-22 Cisco 10720 Internet Router Installation and Configuration Guide - Cisco 10720 | Configuration Guide - Page 123
Cover, page 5-13 • Removing and Installing the Router Fan Assembly, page 5-16 • Removing and Installing the Route Processor Memory, page 5-26 • Removing and Installing the AC or Dual DC Power Supply, page 5-34 • Removing and Installing an Uplink Card, page 5-49 • Removing and Installing an Access - Cisco 10720 | Configuration Guide - Page 124
power supply (10720-AC-RPS=) • Replacement access card (For access card versions and product numbers, refer to the Cisco 10720 Internet Router Access Card Installation and Configuration publication.) • Replacement cable-management system and rack mount brackets • Replacement DC router (CISCO10720-DC - Cisco 10720 | Configuration Guide - Page 125
risk of electric shock, disconnect the two power supply cords before servicing the unit. Statement 14 Warning A readily accessible two-poled disconnect device must be incorporated in the fixed wiring. Statement 91 78-13062-10 Cisco 10720 Internet Router Installation and Configuration Guide 5-3 - Cisco 10720 | Configuration Guide - Page 126
OK DC OTF IN OK DC OTF IN OK DC OTF 57855 12 3 4 1 - indicates power is on 2 O indicates power is off 3 AC power switch 4 DC power switch Step 1 Press the power switch on the router to the off position (O). (See Figure 5-1.) Cisco 10720 Internet Router Installation and Configuration Guide - Cisco 10720 | Configuration Guide - Page 127
Chapter 5 Maintaining the Cisco 10720 Internet Router Disconnecting Power from the Router Figure 5-2 Removing the Router from the Power Source PWARCSRAXASACPRPTTIKRIHTVEERRU CONSOLE AUX RESET PSCOYOASWVRTEEDERRFMTAEISLMTPAUS AC OK DC OK OTF LINK/A1C00TCIAVMREB (DPGSF)AIL PCOAWREDRFAIL - Cisco 10720 | Configuration Guide - Page 128
Disconnecting Power from the Router Chapter 5 Maintaining the Cisco 10720 Internet Router Figure 5-3 1 Removing the DC Power Leads from the Terminal Block 2 3 122050 6 5 5 4 4 4 1 Negative lead disconnected 2 Positive lead disconnected 3 Ground lead disconnected 4 Ground lead 5 - Cisco 10720 | Configuration Guide - Page 129
America or a 10A electrical power service for international specifications. To connect the AC power supply, perform the following steps: Step 1 Verify that the power switch on the router is off (O). (See Figure 5-1.) 78-13062-10 Cisco 10720 Internet Router Installation and Configuration Guide 5-7 - Cisco 10720 | Configuration Guide - Page 130
plug. (See Figure 5-5.) Figure 5-5 Securing the Power Cord with the Wire Bracket IN OK DC OTF IN OK DC OTF 57858 Step 5 Connect the other end of the AC power cord to the AC source receptacle. (See Figure 5-6.) Cisco 10720 Internet Router Installation and Configuration Guide 5-8 78-13062-10 - Cisco 10720 | Configuration Guide - Page 131
Chapter 5 Maintaining the Cisco 10720 Internet Router Figure 5-6 Connecting the Router to the AC Receptacle Connecting Power to the Router PWARCSRAXASACPRPTTIKRIHTVEERRU CONSOLE AUX RESET PSCOYOASWVRTEEDERRFMTAEISLMTPAUS AC OK DC OK OTF LINK/A1C00TCIAVMREB (DPGSF)AIL PCOAWREDRFAIL - Cisco 10720 | Configuration Guide - Page 132
Chapter 5 Maintaining the Cisco 10720 Internet Router Connecting the DC Power Supply Note The minimum wire gauge size supported on the DC dual power supply is 17 American Wire Gauge (AWG), which has a 1.5mm wire diameter. The maximum wire gauge size supported on the DC dual power supply is 10 AWG - Cisco 10720 | Configuration Guide - Page 133
Chapter 5 Maintaining the Cisco 10720 Internet Router Figure 5-10 Power Switch in the Off (O) Position IN OK DC OTF IN OK DC OTF Connecting Power to the Router 57872 Step 5 Locate the ground, positive, and negative terminals. (See Figure 5-10.) Caution Leave a small service loop in the - Cisco 10720 | Configuration Guide - Page 134
wiring the DC power supply, remove the tape from the circuit breaker switch handle and reinstate power by moving the handle of the circuit breaker to the on position. Press the power switch on (-). (See Figure 5-1.) 5-12 Cisco 10720 Internet Router Installation and Configuration Guide 78-13062 - Cisco 10720 | Configuration Guide - Page 135
68.) Caution Do not remove the cable-management tray until all cables are removed from the cards and power supply. Step 2 Power down the router. (See the "Disconnecting Power from the Router" section on page 5-3.) 78-13062-10 Cisco 10720 Internet Router Installation and Configuration Guide 5-13 - Cisco 10720 | Configuration Guide - Page 136
until the cover disengages from the front of the router chassis. Lift the cover up and away from the router chassis and store it in a safe place until it is installed back on the router chassis. (See Figure 5-15.) 5-14 Cisco 10720 Internet Router Installation and Configuration Guide 78-13062-10 - Cisco 10720 | Configuration Guide - Page 137
Maintaining the Cisco 10720 Internet Router Removing and Installing the Router Chassis Cover Caution Replace the cover after completing any maintenance task on the router. This reduces the chance of damage to the router components while the router is not in service. Installing the Router Cover To - Cisco 10720 | Configuration Guide - Page 138
the Cisco 10720 Internet Router 57672 Step 3 Step 4 Step 5 Step 6 Step 7 Step 8 Using a Number 1 Phillips screwdriver, secure the router cover with four screws. (See Figure 5-17.) Reinstall the router on a rack, wall, or desktop. Reinstall all interface cables. Reconnect the AC power cord - Cisco 10720 | Configuration Guide - Page 139
Chapter 5 Maintaining the Cisco 10720 Internet Router Removing and Installing the Router Fan Assembly Required Tools and Equipment You Router 57817 4 3 2 1 1 Fan Number 1 2 Fan Number 2 3 Fan Number 3 4 Fan Number 4 78-13062-10 Cisco 10720 Internet Router Installation and Configuration Guide - Cisco 10720 | Configuration Guide - Page 140
c 2-pin +/-12V connector Step 4 Disconnect the 4-jack harness (main power supply unit output cable) from the main board and move it behind the power supply unit in order to access Fan Number 4. (See Figure 5-19.) 5-18 Cisco 10720 Internet Router Installation and Configuration Guide 78-13062-10 - Cisco 10720 | Configuration Guide - Page 141
Maintaining the Cisco 10720 Internet Router Removing and Installing the Router Fan Assembly Figure 5-20 Removing Power Connection from the Main Board 57812 Step 5 Remove the power connection for the fan from the main board. (See Figure 5-20.) Figure 5-21 Removing Fan Assembly Mounting Screws - Cisco 10720 | Configuration Guide - Page 142
Removing and Installing the Router Fan Assembly Chapter 5 Maintaining the Cisco 10720 Internet Router Figure 5-22 Sliding Fan Out from the Router Chassis 57838 Note Fan Number 4 has a guard mounted on it and should remain that way at all times when installed in the router. Step 7 After the fan - Cisco 10720 | Configuration Guide - Page 143
57839 Installing the Fan Assembly To install the fan assembly, perform the following steps: Step 1 Verify that the router is powered down. (See the "Disconnecting Power from the Router" section on page 5-3.) 78-13062-10 Cisco 10720 Internet Router Installation and Configuration Guide 5-21 - Cisco 10720 | Configuration Guide - Page 144
Fan Assembly Chapter 5 Maintaining the Cisco 10720 Internet Router Step 2 Attach an ESD-preventive strap to your wrist, and to the router or to a bare metal surface. (See the "Preventing Electrostatic Discharge" section on page 2-3.) Note Step 3 is only required when installing Fan Number 4. To - Cisco 10720 | Configuration Guide - Page 145
Figure 5-25 Placing Fan in the Router Chassis 57839 Step 4 Carefully place the fan between the main board and the back of the router chassis and slide the fan into position. (See Figure 5-25 and Figure 5-26.) 78-13062-10 Cisco 10720 Internet Router Installation and Configuration Guide 5-23 - Cisco 10720 | Configuration Guide - Page 146
Assembly to the Router Chassis 57813 Step 5 Using a Number 1 Phillips screwdriver, secure the fan to the router chassis with two screws. (See Figure 5-27.) The fan assembly is now installed in the back of the router. 5-24 Cisco 10720 Internet Router Installation and Configuration Guide 78-13062 - Cisco 10720 | Configuration Guide - Page 147
power supply unit and reconnect it to the main board. (See Figure 5-28.) Figure 5-29 Connecting the Fan Power Cable to the Main Board 57815 Step 7 Connect the fan power connection to the main board. (See Figure 5-29.) 78-13062-10 Cisco 10720 Internet Router Installation and Configuration Guide - Cisco 10720 | Configuration Guide - Page 148
Processor Memory Chapter 5 Maintaining the Cisco 10720 Internet Router Step 8 Step 9 Step 10 Reinstall the chassis cover. (See the "Removing and Installing the Router Chassis Cover" section on page 5-13.) Reconnect all interface cables to the uplink card and access card. Power up the router. (See - Cisco 10720 | Configuration Guide - Page 149
Memory Size - Column 8:32 MB Main FPGA ver:0x0003 With a FPGA version 3, you will need to upgrade the FPGA to version 4 before you can upgrade the golden ROMmon. Only FPGA version 4 supports the golden ROMmon upgrade. 78-13062-10 Cisco 10720 Internet Router Installation and Configuration Guide - Cisco 10720 | Configuration Guide - Page 150
the Route Processor Memory Chapter 5 Maintaining the Cisco 10720 Internet Router Step 2 Step 3 Step 4 Step 5 Download Cisco IOS Release 12.0(28)S or later releases of 12.0 S. Use the upgrade hw-mnodule slot 0 command to upgrade the main FPGA. C10720# upgrade hw-module slot 0 The upgrade - Cisco 10720 | Configuration Guide - Page 151
the router on an antistatic mat so that the front of the router is facing you. Locate the RP memory module on the router motherboard. (See Figure 5-30 for the location of the RP memory module on the motherboard. 78-13062-10 Cisco 10720 Internet Router Installation and Configuration Guide 5-29 - Cisco 10720 | Configuration Guide - Page 152
Removing and Installing the Route Processor Memory Chapter 5 Maintaining the Cisco 10720 Internet Router Figure 5-30 RP Memory Module on the Router Motherboard IN OK DC OTF IN OK DC OTF Step 4 Remove the RP memory module by gently moving the latches in an outward direction, parallel to and away - Cisco 10720 | Configuration Guide - Page 153
Removing the RP Memory Module a b 45º 66100 a Inserting the RP memory module b Locking the RP memory module Step 6 Immediately place the RP memory module in an antistatic bag to protect it from ESD damage. 78-13062-10 Cisco 10720 Internet Router Installation and Configuration Guide 5-31 - Cisco 10720 | Configuration Guide - Page 154
to guide the memory module in to the socket until it is fully seated. Ensure that your index fingers are located on the outer corners of the RP memory module to maintain even pressure when the module is seating in the socket. 5-32 Cisco 10720 Internet Router Installation and Configuration Guide - Cisco 10720 | Configuration Guide - Page 155
Chapter 5 Maintaining the Cisco 10720 Internet Router Removing and Installing the Route Processor Memory Figure 5-34 Installing the RP Memory Module a b 45º 66100 a Inserting the RP memory module b Locking the RP memory module Step 8 Gently press the RP memory module down using your index - Cisco 10720 | Configuration Guide - Page 156
the AC or Dual DC Power Supply Chapter 5 Maintaining the Cisco 10720 Internet Router See the following show version command example to locate the RP memory. Line 17 of the example is in italic print to indicate where the RP memory is listed. Router# show version Cisco Internetwork Operating - Cisco 10720 | Configuration Guide - Page 157
Maintaining the Cisco 10720 Internet Router Removing and Installing the AC or Dual DC Power Supply Caution This router is equipped with a dual power supply. Ensure that both power supply connections are disconnected before beginning any procedure. Warning Read the installation instructions before - Cisco 10720 | Configuration Guide - Page 158
Removing and Installing the AC or Dual DC Power Supply Chapter 5 Maintaining the Cisco 10720 Internet Router Figure 5-35 Removing Router from the Power Source PWARCSRAXASACPRPTTIKRIHTVEERRU CONSOLE AUX RESET PSCOYOASWVRTEEDERRFMTAEISLMTPAUS AC OK DC OK OTF LINK/A1C00TCIAVMREB (DPGSF)AIL - Cisco 10720 | Configuration Guide - Page 159
(DPGSF)AIL PCOAWREDRFAIL WODITROHNINTNSHOEERTPTROCEWAMEBORLVEOESN AC OK DC OK OTF INPUT 100-200- 50/60Hz 2-5A 57880 Step 6 Remove all interface cables from the uplink and access cards. (See Figure 5-37.) 78-13062-10 Cisco 10720 Internet Router Installation and Configuration Guide 5-37 - Cisco 10720 | Configuration Guide - Page 160
a Number 1 Phillips screwdriver and remove the chassis cover. Figure 5-39 AC Power Supply Mounting Screws ACAC OK 2 DC OK OTF AC OK DC OK OTF 1 1 AC power supply unit 57842 2 Power supply mounting screws 5-38 Cisco 10720 Internet Router Installation and Configuration Guide 78-13062-10 - Cisco 10720 | Configuration Guide - Page 161
OK DC OTF 57852 1 1 DC power supply unit 2 Power supply mounting screws Figure 5-41 Disconnecting the Power Connectors from the Main Board a c b 57991 a 4-jack harness b 6-pin connector 78-13062-10 c 2-pin +/-12V connector Cisco 10720 Internet Router Installation and Configuration Guide - Cisco 10720 | Configuration Guide - Page 162
Removing and Installing the AC or Dual DC Power Supply Chapter 5 Maintaining the Cisco 10720 Internet Router Step 10 Disconnect the following power connectors from the main board: (See Figure 5-41.) a. 4-jack harness b. 6-pin connector c. 2-pin +/-12V connector Figure 5-42 Removing the Air - Cisco 10720 | Configuration Guide - Page 163
Cisco 10720 Internet Router Removing and Installing the AC or Dual DC Power Supply Figure 5-43 Lifting the Power Supply Out of the Router 57840 Step 13 Step 14 Slide the power supply away from the front panel to disengage the power supply hook from the router hook and remove the power supply - Cisco 10720 | Configuration Guide - Page 164
Dual DC Power Supply Caution Only install the same type of AC or DC power supply that was originally installed in the Cisco 10720 Internet Router that was shipped to you from Cisco. Installing a different type of power supply (AC or DC) than was originally installed in the router is not supported - Cisco 10720 | Configuration Guide - Page 165
5 Maintaining the Cisco 10720 Internet Router Removing and Installing the AC or Dual DC Power Supply Figure 5-45 Installing the Air Baffle Separator 57816 Step 3 Replace the air baffle separator in the router. (See Figure 5-45.) Caution Observe the proper keying of the DC output connector to - Cisco 10720 | Configuration Guide - Page 166
block negative connector (-) and tighten the locking screw. Ensure that no bare wire is exposed. (See Figure 5-47.) Note Verify that the power supply leads are secured with a cable tie on the DC power supply. 5-44 Cisco 10720 Internet Router Installation and Configuration Guide 78-13062-10 - Cisco 10720 | Configuration Guide - Page 167
the ON position. Statement 8 Figure 5-48 Attaching the AC Power Cord to the Router AC OK DC OK OTF AC OK DC OK OTF 57869 Step 8 Connect the AC power supply by connecting the AC power cord. (See Figure 5-48.) 78-13062-10 Cisco 10720 Internet Router Installation and Configuration Guide 5-45 - Cisco 10720 | Configuration Guide - Page 168
power supply LED status messages in Table 5-1 for AC power supply status LEDs and Table 5-2 for DC power supply status LEDs . (See Figure 5-50 for AC power supply status LEDs and Figure 5-51 for DC power supply status LEDs.) 5-46 Cisco 10720 Internet Router Installation and Configuration Guide - Cisco 10720 | Configuration Guide - Page 169
Cisco 10720 Internet Router Figure 5-50 AC Power Supply LEDs AC OK AC OK DC OK DC OK OTF OTF AC OK DC OK OTF Removing and Installing the AC or Dual DC Power Supply 66445 The AC power supply LEDS provide status information. (See Table 5-1.) Table 5-1 AC Power Supply Status LEDs LED AC - Cisco 10720 | Configuration Guide - Page 170
the AC or Dual DC Power Supply Figure 5-51 Dual DC Power Supply LEDs IN OK IN OK DC DC OTF OTF IN OK DC OTF Chapter 5 Maintaining the Cisco 10720 Internet Router 57668 The dual DC power supply status LEDs provide status information. (See Table 5-2.) Table 5-2 Dual DC Power Supply - Cisco 10720 | Configuration Guide - Page 171
1027 Required Tools and Equipment You will need the following tools and equipment: • ESD-preventive strap • Number 1 Phillips screwdriver • Cable ties • 1/8-inch flat-blade screwdriver • Replacement uplink card 78-13062-10 Cisco 10720 Internet Router Installation and Configuration Guide 5-49 - Cisco 10720 | Configuration Guide - Page 172
1 laser product. Statement 1008 Warning Class 1 LED product. Statement 1027 Note You do not need to power down the router before you remove an SFP module. The router may remain powered up during this procedure. 5-50 Cisco 10720 Internet Router Installation and Configuration Guide 78-13062-10 - Cisco 10720 | Configuration Guide - Page 173
PSCOYOASWVRTEEDERRFMTAEISLMTPAUS 66301 CONSOLE AUX RESET 1 1 Optical interface cable connector Step 2 Remove all optical interface cables from the card if the card has optical interface ports. (See Figure 5-52.) 78-13062-10 Cisco 10720 Internet Router Installation and Configuration Guide 5-51 - Cisco 10720 | Configuration Guide - Page 174
and Installing an Uplink Card Chapter 5 Maintaining the Cisco 10720 Internet Router Figure 5-53 Removing a Bale Clasp SFP Module 10720-GE-FE-TX LIENRKROARC (TIRV)E (G) 70189 10720-GE-FE-TX LIENRKROARC (TIRV)E (G) Step 3 Step 4 Open the bale clasp on the SFP module by pressing the clasp - Cisco 10720 | Configuration Guide - Page 175
Chapter 5 Maintaining the Cisco 10720 Internet Router Figure 5-54 Installing an SFP Cage Cover 10720-GE-FE-TX Removing and Installing an Uplink Card LIENRKROARC (TIRV)E (G) 75786 1 1 SFP cage cover Step 5 Protect your uplink card by inserting clean SFP cage covers into the SFP cage when there - Cisco 10720 | Configuration Guide - Page 176
the Cisco 10720 Internet Router Step 8 Grasp the spring-loaded screws and using your hold on the screws, gently move the card back and forth until it disengages from the midplane. Figure 5-56 Removing Uplink Card from the Router Chassis PWARCSRAXASACPRPTTIKRIHTVEERRU 57747 CONSOLE AUX RESET - Cisco 10720 | Configuration Guide - Page 177
the Cisco 10720 Internet Router Removing and Installing an Uplink Card Installing an Uplink Card To install an uplink card, perform the following steps: Step 1 Step 2 Confirm that the router is powered down before installing the uplink card. (See the "Disconnecting Power from the Router" section - Cisco 10720 | Configuration Guide - Page 178
Cisco 10720 Internet Router Installing the OC48 SFP Modules in the RPR/SRP Uplink Card Use the information in this section to install OC48 SFP modules in the RPR/SRP uplink card. Note Use only OC48 SFP modules purchased from Cisco Systems. To install a bale clasp OC48 SFP module in the uplink card - Cisco 10720 | Configuration Guide - Page 179
that the card is fully seated against the midplane. • Verify that all cables are connected properly. • Check that the power switch is turned to the on position. • Confirm that the power supply connection is secure. 78-13062-10 Cisco 10720 Internet Router Installation and Configuration Guide 5-57 - Cisco 10720 | Configuration Guide - Page 180
strap to your wrist, and to the router or to a bare metal surface. (See the "Preventing Electrostatic Discharge" section on page 2-3.) Remove all Ethernet interface cables from the access card. (See Figure 5-37.) 5-58 Cisco 10720 Internet Router Installation and Configuration Guide 78-13062-10 - Cisco 10720 | Configuration Guide - Page 181
SFP module by pressing the clasp downward until it is in a horizontal position as shown in Figure 5-53. Grasp the SFP module by the bale clasp and gently pull it out of the Gigabit Ethernet slot as shown in Figure 5-53. 78-13062-10 Cisco 10720 Internet Router Installation and Configuration Guide - Cisco 10720 | Configuration Guide - Page 182
Removing and Installing an Access Card Chapter 5 Maintaining the Cisco 10720 Internet Router Figure 61 Removing a Bale Clasp SFP Module 10720-GE-FE-TX LIENRKROARC (TIRV)E (G) 70189 10720-GE-FE-TX LIENRKROARC (TIRV)E (G) Step 5 Protect your access card by inserting clean SFP cage covers into - Cisco 10720 | Configuration Guide - Page 183
Chapter 5 Maintaining the Cisco 10720 Internet Router Figure 62 Installing an SFP Cage Cover 10720-GE-FE-TX Removing and Installing an Access Card LIENRKROARC (TIRV)E (G) 75786 1 1 SFP cage cover Removing a Latch SFP To remove a latch SFP module from the access card, perform the following - Cisco 10720 | Configuration Guide - Page 184
and Installing an Access Card Chapter 5 Maintaining the Cisco 10720 Internet Router Removing the Access Card Figure 5-63 Spring-Loaded Screws on the Access Card PWARCSRAXASACPRPTTIKRIHTVEERRU 57682 1 CONSOLE AUX RESET PSCOYOASWVRTEEDERRFMTAEISLMTPAUS AC OK DC OK OTF LINK/A1C00TCIAVMREB - Cisco 10720 | Configuration Guide - Page 185
.) Note For instructions on removing small form-factor pluggable (SFP) optical interface modules from the access card, refer to the Cisco 10720 Internet Router Access Card Installation and Configuration publication. 78-13062-10 Cisco 10720 Internet Router Installation and Configuration Guide 5-63 - Cisco 10720 | Configuration Guide - Page 186
Installing an Access Card Chapter 5 Maintaining the Cisco 10720 Internet Router Installing an Access Card To install an access card in the router, perform the following steps: Step 1 Step 2 Step 3 Verify that the router is powered down. (See the "Disconnecting Power from the Router" section on - Cisco 10720 | Configuration Guide - Page 187
the Cisco 10720 Internet Router Removing and Installing an Access Card Installing the SFP Modules on the Access Card Use the information in this section to install Gigabit Ethernet (GE) SFP modules in the access card. Note Use only SFP modules purchased from Cisco Systems. Note The Cisco 10720 is - Cisco 10720 | Configuration Guide - Page 188
3 Step 4 Insert the SFP into the appropriate RPR/SRP uplink card slot and gently push on it until the module snaps into the slot tightly. (See Figure 5-69.) Close the latch to lock the SFP module into the slot. 5-66 Cisco 10720 Internet Router Installation and Configuration Guide 78-13062-10 - Cisco 10720 | Configuration Guide - Page 189
that the card is fully seated against the midplane. • Verify that all cables are connected properly. • Check that the power switch is turned to the on position. • Confirm that the power supply connection is secure. 78-13062-10 Cisco 10720 Internet Router Installation and Configuration Guide 5-67 - Cisco 10720 | Configuration Guide - Page 190
removing and installing the Cisco 10720 Internet Router cable-management system: • Safety, page 5-68 • Required Tools and Equipment, page 5-68 • Removing the Cable-Management System, page 5-68 • Installing the Cable-Management System, page 5-70 Safety Power down the router before performing any - Cisco 10720 | Configuration Guide - Page 191
Removing the Cable-Management Cover PWARCSRAXASACPRPTTIKRIHTVEERRU 66299 CISCO 10720 INTERNET ROUTER CONSOLE AUX RESET PSCOYOASWVRTEEDERRFMTAEISLMTPAUS AC OK DC OK OTF LINK/A1C00TCIAVMREB (DPGSF)AIL PCOAWREDRFAIL WODITROHNINTNSHOEERTPTROCEWAMEBORLVEOESN AC OK DC OK OTF INPUT 100-200- 50 - Cisco 10720 | Configuration Guide - Page 192
AC OK DC OK OTF INPUT 100-200- 50/60Hz 2-5A Step 5 Separate the cables and lead them out the sides of the cable-management system. Use a cable tie to keep the cables together. (See Figure 5-74.) Note To avoid damage to the cables, avoid excessive bending. 5-70 Cisco 10720 Internet Router - Cisco 10720 | Configuration Guide - Page 193
Chapter 5 Maintaining the Cisco 10720 Internet Router Removing and Installing the Cable-Management System Figure 5-75 Cable-Management System Installed in a Rack PWARCSRAXASACPRPTTIKRIHTVEERRU CONSOLE AUX RESET PSCOYOASWVRTEEDERRFMTAEISLMTPAUS AC OK DC OK OTF LINK/A1C00TCIAVMREB (DPGSF)AIL - Cisco 10720 | Configuration Guide - Page 194
Removing and Installing the Cable-Management System Chapter 5 Maintaining the Cisco 10720 Internet Router 5-72 Cisco 10720 Internet Router Installation and Configuration Guide 78-13062-10 - Cisco 10720 | Configuration Guide - Page 195
Cisco 10720 Internet Router Specifications Physical Router Chassis Weight-34 lb (15.3 kg) Dimensions-3.5 in. x 17.50 in. x 18.25 in. (8.9 cm x 44.45 cm x 46.35cm) H x W x D Mounting options-19-, 23-/24-in. EIA, ETSI, front, mid-, or rear rack mounting, wall mounting, table mounting Environmental - Cisco 10720 | Configuration Guide - Page 196
square value of acceleration. 3. The minimum Cisco IOS software required to use the 512 MB of RP memory on a Cisco 10720 Internet Router is Cisco IOS Release 12.0(27)S. Power Specifications Table A-2 Dual AC Power Supply Description Total AC Input Power Heat Dissipation Input Voltage Input Line - Cisco 10720 | Configuration Guide - Page 197
1-1 tools and equipment 5-49, 5-58 troubleshooting, See troubleshooting, Fast Ethernet troubleshooting installation 5-67 verifying functionality 5-67 AC power supply 3-27 Advanced Research Projects Agency See ARPA MAC encapsulation alarm messages 4-11 IEEE.802.17 RPR unwrap messages 4-14 IEEE 802.17 - Cisco 10720 | Configuration Guide - Page 198
Gigabit Ethernet 3-47 global parameters 3-33 host name 3-33 passwords 3-33 router, basic configuration 3-32 TDR on TX access card 3-47 connectors fiber-optic, cleaning procedures xx, 4-22 creating a four-node ring RPR/SRP uplink card 3-17 D DC-input power supply safety codes 2-2 DC power supply 3-29 - Cisco 10720 | Configuration Guide - Page 199
1-3 L LEDs 3-33 See also access card and uplink card M MAC addresses 1-6 maintenance FRU 5-2 multiple routers in a rack 2-6 to 2-7 tools required 5-2 MDVT 1-9 Mechanical Design Validation and Test See MDVT Media Access Control Cisco 10720 Internet Router Installation and Configuration Guide IN-3 - Cisco 10720 | Configuration Guide - Page 200
2-6 removing fan assembly 5-17 to 5-21 removing router cover 5-13 to 5-16 ROMmon, upgrading 5-27 router design specifications 1-9 mounting options 1-7 physical description 1-2 product specifications A-1 to A-2 IN-4 Cisco 10720 Internet Router Installation and Configuration Guide 78-13062-10 - Cisco 10720 | Configuration Guide - Page 201
up 4-20 interface configuration 4-19 late collision 4-21 line protocol is up 4-20 output hang 4-21 speed mode 4-21 IEEE 802.17 RPR other alarm messages 4-16 IEEE 802.17 RPR unwrap messages 4-14 IEEE 802.17 RPR wrap messages 4-13 Cisco 10720 Internet Router Installation and Configuration Guide IN-5 - Cisco 10720 | Configuration Guide - Page 202
AUX 3-19 RX 3-15 TX 3-15 removing 5-50 to 5-54 safety 5-49 slot 1-1 troubleshooting installation 5-57 troubleshooting srp, See troubleshooting, srp verifying functionality 5-57 V verifying clocking 4-5 W warnings disconnect device 5-3 translated 2-1 IN-6 Cisco 10720 Internet Router Installation
-
 1
1 -
 2
2 -
 3
3 -
 4
4 -
 5
5 -
 6
6 -
 7
7 -
8
-
9
-
10
-
11
-
12
-
13
-
14
-
15
-
16
-
17
-
18
-
19
-
20
-
21
-
22
-
23
-
24
-
25
-
26
-
27
-
28
-
29
-
30
-
31
-
32
-
33
-
34
-
35
-
36
-
37
-
38
-
39
-
40
-
41
-
42
-
43
-
44
-
45
-
46
-
47
-
48
-
49
-
50
-
51
-
52
-
53
-
54
-
55
-
56
-
57
-
58
-
59
-
60
-
61
-
62
-
63
-
64
-
65
-
66
-
67
-
68
-
69
-
70
-
71
-
72
-
73
-
74
-
75
-
76
-
77
-
78
-
79
-
80
-
81
-
82
-
83
-
84
-
85
-
86
-
87
-
88
-
89
-
90
-
91
-
92
-
93
-
94
-
95
-
96
-
97
-
98
-
99
-
100
-
101
-
102
-
103
-
104
-
105
-
106
-
107
-
108
-
109
-
110
-
111
-
112
-
113
-
114
-
115
-
116
-
117
-
118
-
119
-
120
-
121
-
122
-
123
-
124
-
125
-
126
-
127
-
128
-
129
-
130
-
131
-
132
-
133
-
134
-
135
-
136
-
137
-
138
-
139
-
140
-
141
-
142
-
143
-
144
-
145
-
146
-
147
-
148
-
149
-
150
-
151
-
152
-
153
-
154
-
155
-
156
-
157
-
158
-
159
-
160
-
161
-
162
-
163
-
164
-
165
-
166
-
167
-
168
-
169
-
170
-
171
-
172
-
173
-
174
-
175
-
176
-
177
-
178
-
179
-
180
-
181
-
182
-
183
-
184
-
185
-
186
-
187
-
188
-
189
-
190
-
191
-
192
-
193
-
194
-
195
-
196
-
197
-
198
-
199
-
200
-
201
-
202
 |
 |

Americas Headquarters
Cisco Systems, Inc.
170 West Tasman Drive
San Jose, CA 95134-1706
USA
Tel: 408 526-4000
800 553-NETS (6387)
Fax: 408 527-0883
Cisco 10720 Internet Router Installation
and Configuration Guide
Customer Order Number: DOC-7813062=
Text Part Number: 78-13062-10