Cisco 10720 Configuration Guide - Page 57
Attaching Wall-Mounting Brackets to the Router Chassis, Step 3
 |
View all Cisco 10720 manuals
Add to My Manuals
Save this manual to your list of manuals |
Page 57 highlights
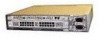
Chapter 3 Installing the Cisco 10720 Internet Router Setting up the Cisco 10720 Internet Router Figure 3-6 Attaching Wall-Mounting Brackets to the Router Chassis 57853 IN OK DC OTF IN OK DC OTF Note When the rack is mounted on the wall, make sure that the power receptacles are at the bottom of the router, as shown in Figure 3-6. Step 3 Step 4 Attach an ESD-preventive strap to your wrist, and to the router chassis or to a bare metal surface. (See the "Preventing Electrostatic Discharge" section on page 2-3.) Attach the wall-mounting brackets to the side of each chassis using five screws on each side. (See Figure 3-6.) 78-13062-10 Cisco 10720 Internet Router Installation and Configuration Guide 3-7
-
 1
1 -
2
-
3
-
4
-
5
-
6
-
7
-
8
-
9
-
10
-
11
-
12
-
13
-
14
-
15
-
16
-
17
-
18
-
19
-
20
-
21
-
22
-
23
-
24
-
25
-
26
-
27
-
28
-
29
-
30
-
31
-
32
-
33
-
34
-
35
-
36
-
37
-
38
-
39
-
40
-
41
-
42
-
43
-
44
-
45
-
46
-
47
-
48
-
49
-
50
-
51
-
 52
52 -
 53
53 -
 54
54 -
 55
55 -
 56
56 -
 57
57 -
 58
58 -
 59
59 -
 60
60 -
 61
61 -
 62
62 -
63
-
64
-
65
-
66
-
67
-
68
-
69
-
70
-
71
-
72
-
73
-
74
-
75
-
76
-
77
-
78
-
79
-
80
-
81
-
82
-
83
-
84
-
85
-
86
-
87
-
88
-
89
-
90
-
91
-
92
-
93
-
94
-
95
-
96
-
97
-
98
-
99
-
100
-
101
-
102
-
103
-
104
-
105
-
106
-
107
-
108
-
109
-
110
-
111
-
112
-
113
-
114
-
115
-
116
-
117
-
118
-
119
-
120
-
121
-
122
-
123
-
124
-
125
-
126
-
127
-
128
-
129
-
130
-
131
-
132
-
133
-
134
-
135
-
136
-
137
-
138
-
139
-
140
-
141
-
142
-
143
-
144
-
145
-
146
-
147
-
148
-
149
-
150
-
151
-
152
-
153
-
154
-
155
-
156
-
157
-
158
-
159
-
160
-
161
-
162
-
163
-
164
-
165
-
166
-
167
-
168
-
169
-
170
-
171
-
172
-
173
-
174
-
175
-
176
-
177
-
178
-
179
-
180
-
181
-
182
-
183
-
184
-
185
-
186
-
187
-
188
-
189
-
190
-
191
-
192
-
193
-
194
-
195
-
196
-
197
-
198
-
199
-
200
-
201
-
202
 |
 |

3-7
Cisco 10720 Internet Router Installation and Configuration Guide
78-13062-10
Chapter 3
Installing the Cisco 10720 Internet Router
Setting up the Cisco 10720 Internet Router
Figure 3-6
Attaching Wall-Mounting Brackets to the Router Chassis
Note
When the rack is mounted on the wall, make sure that the power receptacles are at the bottom of the
router, as shown in
Figure 3-6
.
Step 3
Attach an ESD-preventive strap to your wrist, and to the router chassis or to a bare metal surface. (See
the
“Preventing Electrostatic Discharge” section on page 2-3
.)
Step 4
Attach the wall-mounting brackets to the side of each chassis using five screws on each side. (See
Figure 3-6
.)
IN
O
K
D
C
O
T
F
IN
O
K
D
C
O
T
F
57853