Cisco 10720 Configuration Guide - Page 164
Installing an AC or Dual DC Power Supply
 |
View all Cisco 10720 manuals
Add to My Manuals
Save this manual to your list of manuals |
Page 164 highlights
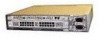
Removing and Installing the AC or Dual DC Power Supply Chapter 5 Maintaining the Cisco 10720 Internet Router Installing an AC or Dual DC Power Supply Caution Only install the same type of AC or DC power supply that was originally installed in the Cisco 10720 Internet Router that was shipped to you from Cisco. Installing a different type of power supply (AC or DC) than was originally installed in the router is not supported. Note The minimum wire gauge size supported on the DC dual power supply is 17 American Wire Gauge (AWG), which has a 1.5mm wire diameter. The maximum wire gauge size supported on the DC dual power supply is 10 AWG, which has a 6mm wire diameter. Perform the following steps to install an AC or DC dual power supply: Step 1 Attach an ESD-preventive strap to your wrist, and to the router or to a bare metal surface. See the "Preventing Electrostatic Discharge" section on page 2-3. Figure 5-44 Inserting the Power Supply in the Router 57841 Step 2 Place the power supply into the router and slide it toward the front panel. (See Figure 5-44.) You should feel the hook engage. 5-42 Cisco 10720 Internet Router Installation and Configuration Guide 78-13062-10
-
 1
1 -
2
-
3
-
4
-
5
-
6
-
7
-
8
-
9
-
10
-
11
-
12
-
13
-
14
-
15
-
16
-
17
-
18
-
19
-
20
-
21
-
22
-
23
-
24
-
25
-
26
-
27
-
28
-
29
-
30
-
31
-
32
-
33
-
34
-
35
-
36
-
37
-
38
-
39
-
40
-
41
-
42
-
43
-
44
-
45
-
46
-
47
-
48
-
49
-
50
-
51
-
52
-
53
-
54
-
55
-
56
-
57
-
58
-
59
-
60
-
61
-
62
-
63
-
64
-
65
-
66
-
67
-
68
-
69
-
70
-
71
-
72
-
73
-
74
-
75
-
76
-
77
-
78
-
79
-
80
-
81
-
82
-
83
-
84
-
85
-
86
-
87
-
88
-
89
-
90
-
91
-
92
-
93
-
94
-
95
-
96
-
97
-
98
-
99
-
100
-
101
-
102
-
103
-
104
-
105
-
106
-
107
-
108
-
109
-
110
-
111
-
112
-
113
-
114
-
115
-
116
-
117
-
118
-
119
-
120
-
121
-
122
-
123
-
124
-
125
-
126
-
127
-
128
-
129
-
130
-
131
-
132
-
133
-
134
-
135
-
136
-
137
-
138
-
139
-
140
-
141
-
142
-
143
-
144
-
145
-
146
-
147
-
148
-
149
-
150
-
151
-
152
-
153
-
154
-
155
-
156
-
157
-
158
-
 159
159 -
 160
160 -
 161
161 -
 162
162 -
 163
163 -
 164
164 -
 165
165 -
 166
166 -
 167
167 -
 168
168 -
 169
169 -
170
-
171
-
172
-
173
-
174
-
175
-
176
-
177
-
178
-
179
-
180
-
181
-
182
-
183
-
184
-
185
-
186
-
187
-
188
-
189
-
190
-
191
-
192
-
193
-
194
-
195
-
196
-
197
-
198
-
199
-
200
-
201
-
202
 |
 |
