Cisco RV042 Administration Guide - Page 184
Configuration of Router A, VPN > Gateway to Gateway, Enable, IP Only, Subnet, Advanced Settings
 |
UPC - 745883560530
View all Cisco RV042 manuals
Add to My Manuals
Save this manual to your list of manuals |
Page 184 highlights
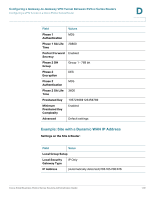
IPSec NAT Traversal Overview E NOTE Both the IPSec initiator and responder must support the mechanism for detecting the NAT router in the path and changing to a new port, as defined in RFC 3947. Configuration of Router A Follow these instructions for Router A. STEP 1 Launch the web browser for a networked computer, designated PC 1. STEP 2 Access the configuration utility of Router A. STEP 3 Click VPN > Gateway to Gateway in the navigation tree. STEP 4 Enter a name in the Tunnel Name field. STEP 5 For the VPN Tunnel setting, select Enable. STEP 6 For the Local Security Gateway Type, select IP Only. The WAN IP address of Router A will be automatically detected. For the Local Security Group Type, select Subnet. Enter Router A's local network settings in the IP Address and Subnet Mask fields. STEP 7 For the Remote Security Gateway Type, select IP Only. Enter Router B's WAN IP address in the IP Address field. STEP 8 For the Remote Security Group Type, select Subnet. Enter Router B's local network settings in the IP Address and Subnet Mask fields. STEP 9 In the IPSec Setup section, select the appropriate encryption, authentication, and other key management settings. STEP 10 In the Preshared Key field, enter a string for this key, for example, 13572468. STEP 11 Click Advanced Settings. STEP 12 Check the NAT Traversal box to enable this feature. STEP 13 Click Save. STEP 14 Proceed to the next section, Configuration of Router B, page 185. Cisco Small Business RV0xx Series Routers Administration Guide 184
-
 1
1 -
2
-
3
-
4
-
5
-
6
-
7
-
8
-
9
-
10
-
11
-
12
-
13
-
14
-
15
-
16
-
17
-
18
-
19
-
20
-
21
-
22
-
23
-
24
-
25
-
26
-
27
-
28
-
29
-
30
-
31
-
32
-
33
-
34
-
35
-
36
-
37
-
38
-
39
-
40
-
41
-
42
-
43
-
44
-
45
-
46
-
47
-
48
-
49
-
50
-
51
-
52
-
53
-
54
-
55
-
56
-
57
-
58
-
59
-
60
-
61
-
62
-
63
-
64
-
65
-
66
-
67
-
68
-
69
-
70
-
71
-
72
-
73
-
74
-
75
-
76
-
77
-
78
-
79
-
80
-
81
-
82
-
83
-
84
-
85
-
86
-
87
-
88
-
89
-
90
-
91
-
92
-
93
-
94
-
95
-
96
-
97
-
98
-
99
-
100
-
101
-
102
-
103
-
104
-
105
-
106
-
107
-
108
-
109
-
110
-
111
-
112
-
113
-
114
-
115
-
116
-
117
-
118
-
119
-
120
-
121
-
122
-
123
-
124
-
125
-
126
-
127
-
128
-
129
-
130
-
131
-
132
-
133
-
134
-
135
-
136
-
137
-
138
-
139
-
140
-
141
-
142
-
143
-
144
-
145
-
146
-
147
-
148
-
149
-
150
-
151
-
152
-
153
-
154
-
155
-
156
-
157
-
158
-
159
-
160
-
161
-
162
-
163
-
164
-
165
-
166
-
167
-
168
-
169
-
170
-
171
-
172
-
173
-
174
-
175
-
176
-
177
-
178
-
 179
179 -
 180
180 -
 181
181 -
 182
182 -
 183
183 -
 184
184 -
 185
185 -
 186
186 -
 187
187 -
 188
188 -
 189
189 -
190
-
191
-
192
-
193
-
194
-
195
-
196
-
197
-
198
-
199
 |
 |
