Cisco RV042 Administration Guide - Page 52
Add to List, Enable One-to-One NAT
 |
UPC - 745883560530
View all Cisco RV042 manuals
Add to My Manuals
Save this manual to your list of manuals |
Page 52 highlights
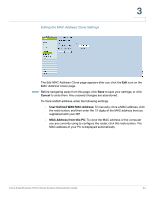
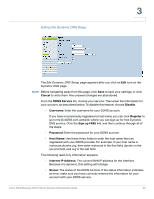
Setup Setting Up One-to-One NAT 3 NOTE Before navigating away from this page, click Save to save your settings, or click Cancel to undo them. Any unsaved changes are abandoned. To enable this feature, check the Enable One-to-One NAT box. Add or edit entries as needed. • To add an entry to the list: Enter the following information, and then click Add to List. - Private Range Begin: Enter the starting IP address of the internal IP address range that you want to map to the public range. Do not include the router's LAN IP address in this range. - Public Range Begin: Enter the starting IP address of the public IP address range provided by the ISP. Do not include the router's WAN IP address in this range. - Range Length: Enter the number of IP addresses in the range. The range length cannot exceed the number of valid IP addresses. To map a single address, enter 1. • To add another new entry: Enter the information, and then click Add to list. • To modify an entry in the list: Click the entry that you want to modify. The information appears in the text fields. Make the changes, and then click Update. If you do not need to make changes, you can click Add New to deselect the entry and clear the text fields. • To delete an entry from the list: Click the entry that you want to delete, and then click Delete. To select a block of entries, click the first entry, hold down the Shift key, and then click the final entry in the block. To select individual entries, press the Ctrl key while clicking each entry. To de-select an entry, press the Ctrl key while clicking the entry. Cisco Small Business RV0xx Series Routers Administration Guide 52
-
 1
1 -
2
-
3
-
4
-
5
-
6
-
7
-
8
-
9
-
10
-
11
-
12
-
13
-
14
-
15
-
16
-
17
-
18
-
19
-
20
-
21
-
22
-
23
-
24
-
25
-
26
-
27
-
28
-
29
-
30
-
31
-
32
-
33
-
34
-
35
-
36
-
37
-
38
-
39
-
40
-
41
-
42
-
43
-
44
-
45
-
46
-
 47
47 -
 48
48 -
 49
49 -
 50
50 -
 51
51 -
 52
52 -
 53
53 -
 54
54 -
 55
55 -
 56
56 -
 57
57 -
58
-
59
-
60
-
61
-
62
-
63
-
64
-
65
-
66
-
67
-
68
-
69
-
70
-
71
-
72
-
73
-
74
-
75
-
76
-
77
-
78
-
79
-
80
-
81
-
82
-
83
-
84
-
85
-
86
-
87
-
88
-
89
-
90
-
91
-
92
-
93
-
94
-
95
-
96
-
97
-
98
-
99
-
100
-
101
-
102
-
103
-
104
-
105
-
106
-
107
-
108
-
109
-
110
-
111
-
112
-
113
-
114
-
115
-
116
-
117
-
118
-
119
-
120
-
121
-
122
-
123
-
124
-
125
-
126
-
127
-
128
-
129
-
130
-
131
-
132
-
133
-
134
-
135
-
136
-
137
-
138
-
139
-
140
-
141
-
142
-
143
-
144
-
145
-
146
-
147
-
148
-
149
-
150
-
151
-
152
-
153
-
154
-
155
-
156
-
157
-
158
-
159
-
160
-
161
-
162
-
163
-
164
-
165
-
166
-
167
-
168
-
169
-
170
-
171
-
172
-
173
-
174
-
175
-
176
-
177
-
178
-
179
-
180
-
181
-
182
-
183
-
184
-
185
-
186
-
187
-
188
-
189
-
190
-
191
-
192
-
193
-
194
-
195
-
196
-
197
-
198
-
199
 |
 |
