Cisco WRV210 Administration Guide - Page 20
Setting Up the Internet Connection, Primary DNS Required and Secondary DNS Optional - default ip
 |
View all Cisco WRV210 manuals
Add to My Manuals
Save this manual to your list of manuals |
Page 20 highlights
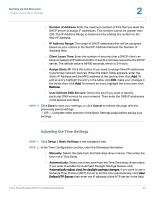
Setting Up the Network Configuring the Basic Settings 2 STEP 3 Click Save to save your settings, or click Cancel to refresh the page with the previously saved settings. -OR- Complete other sections of the Basic Settings page before saving your settings. Setting Up the Internet Connection Use the information provided by your ISP to configure your Internet Connection. STEP 1 Click Setup > Basic Settings in the navigation tree. STEP 2 In the Internet Setup section, choose the Internet Connection Type required by your ISP. Then enter the required information for the selected connection. The Router supports six types of connections, as described below. • Automatic Configuration - DHCP: Select this option if your ISP supports DHCP or you are connecting through a dynamic IP address. This option is selected by default. • Static IP: If your ISP provided you with a permanent (public) IP address, then select Static IP. Also enter the following information, as provided by your ISP: - IP Address: Enter the IP address that your ISP provided to you. - Subnet Mask: Enter the Router's Subnet Mask, as seen by external users on the Internet (including your ISP). - Default Gateway: Enter the Default Gateway Address, which is the ISP server's IP address. - Primary DNS (Required) and Secondary DNS (Optional): Enter at least one DNS (Domain Name System) Server IP Address. • PPPoE: This type of connection is required by some DSL-based ISPs. Enter the following information, as provided by your ISP: - Account to be Used: You can have dual PPPoE profiles to allow easy switching between two separate PPPoE accounts. Select either Primary (default) or Secondary. Then configure the settings for the selected profile. Cisco Small Business WRV210 Administration Guide 20
-
 1
1 -
2
-
3
-
4
-
5
-
6
-
7
-
8
-
9
-
10
-
11
-
12
-
13
-
14
-
 15
15 -
 16
16 -
 17
17 -
 18
18 -
 19
19 -
 20
20 -
 21
21 -
 22
22 -
 23
23 -
 24
24 -
 25
25 -
26
-
27
-
28
-
29
-
30
-
31
-
32
-
33
-
34
-
35
-
36
-
37
-
38
-
39
-
40
-
41
-
42
-
43
-
44
-
45
-
46
-
47
-
48
-
49
-
50
-
51
-
52
-
53
-
54
-
55
-
56
-
57
-
58
-
59
-
60
-
61
-
62
-
63
-
64
-
65
-
66
-
67
-
68
-
69
-
70
-
71
-
72
-
73
-
74
-
75
-
76
-
77
-
78
-
79
-
80
-
81
-
82
-
83
-
84
-
85
-
86
-
87
-
88
-
89
-
90
-
91
-
92
-
93
-
94
-
95
-
96
-
97
-
98
-
99
-
100
-
101
-
102
-
103
-
104
-
105
-
106
-
107
 |
 |
