Cisco WRV210 Administration Guide - Page 33
Show Routing Table, Cancel, route, the Destination LAN IP address, Subnet Mask, Gateway, and Interface
 |
View all Cisco WRV210 manuals
Add to My Manuals
Save this manual to your list of manuals |
Page 33 highlights
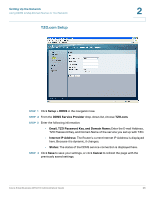
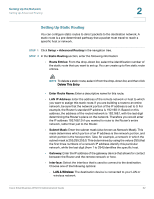
Setting Up the Network Setting Up Advanced Routing 2 - Internet: The destination device is on a network that you reach through your Internet connection. • Show Routing Table: Click the Show Routing Table button to open a screen displaying how packets are routed through your local network. For each route, the Destination LAN IP address, Subnet Mask, Gateway, and Interface are displayed. Click Refresh to update the information. Click Close to exit this screen. STEP 3 Click Save to save your settings, or click Cancel to refresh the page with the previously saved settings. Cisco Small Business WRV210 Administration Guide 33
-
 1
1 -
2
-
3
-
4
-
5
-
6
-
7
-
8
-
9
-
10
-
11
-
12
-
13
-
14
-
15
-
16
-
17
-
18
-
19
-
20
-
21
-
22
-
23
-
24
-
25
-
26
-
27
-
 28
28 -
 29
29 -
 30
30 -
 31
31 -
 32
32 -
 33
33 -
 34
34 -
 35
35 -
 36
36 -
 37
37 -
 38
38 -
39
-
40
-
41
-
42
-
43
-
44
-
45
-
46
-
47
-
48
-
49
-
50
-
51
-
52
-
53
-
54
-
55
-
56
-
57
-
58
-
59
-
60
-
61
-
62
-
63
-
64
-
65
-
66
-
67
-
68
-
69
-
70
-
71
-
72
-
73
-
74
-
75
-
76
-
77
-
78
-
79
-
80
-
81
-
82
-
83
-
84
-
85
-
86
-
87
-
88
-
89
-
90
-
91
-
92
-
93
-
94
-
95
-
96
-
97
-
98
-
99
-
100
-
101
-
102
-
103
-
104
-
105
-
106
-
107
 |
 |

Setting Up the Network
Setting Up Advanced Routing
Cisco Small Business WRV210 Administration Guide
33
2
-
Internet
: The destination device is on a network that you reach through
your Internet connection.
•
Show Routing Table:
Click the
Show Routing Table
button to open a screen
displaying how packets are routed through your local network. For each
route, the Destination LAN IP address, Subnet Mask, Gateway, and Interface
are displayed. Click
Refresh
to update the information. Click
Close
to exit
this screen.
STEP
3
Click
Save
to save your settings, or click
Cancel
to refresh the page with the
previously saved settings.