Cisco WRV210 Administration Guide - Page 32
Setting Up Static Routing, Setup > Advanced Routing, Static Routing, Route Entries
 |
View all Cisco WRV210 manuals
Add to My Manuals
Save this manual to your list of manuals |
Page 32 highlights
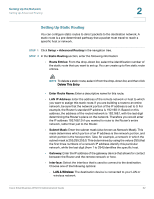
Setting Up the Network Setting Up Advanced Routing 2 Setting Up Static Routing You can configure static routes to direct packets to the destination network. A static route is a pre-determined pathway that a packet must travel to reach a specific host or network. STEP 1 Click Setup > Advanced Routing in the navigation tree. STEP 2 In the Static Routing section, enter the following information: • Route Entries: From the drop-down list, select the identification number of the static route that you want to set up. You can create up to five static route entries. NOTE To delete a static route, select it from the drop-down list, and then click Delete This Entry. • Enter Route Name: Enter a descriptive name for this route. • LAN IP Address: Enter the address of the remote network or host to which you want to assign this static route. If you are building a route to an entire network, be sure that the network portion of the IP address is set to 0. For example, the Router's standard IP address is 192.168.1.1. Based on this address, the address of the routed network is 192.168.1, with the last digit determining the Router's place on the network. Therefore you would enter the IP address 192.168.1.0 if you wanted to route to the Router's entire network, rather than just to the Router. • Subnet Mask: Enter the subnet mask (also known as Network Mask). This mask determines which portion of an IP address is the network portion, and which portion is the host portion. Take, for example, a network in which the subnet mask is 255.255.255.0. This determines (by using the values 255) that the first three numbers of a network IP address identify this particular network, while the last digit (from 1 to 254) identifies the specific host. • Gateway: Enter the IP address of the gateway device that allows for contact between the Router and the remote network or host. • Interface: Select the interface that is used to connect to the destination. Choose one of the following options: - LAN & Wireless: The destination device is connected to your LAN or wireless network. Cisco Small Business WRV210 Administration Guide 32
-
 1
1 -
2
-
3
-
4
-
5
-
6
-
7
-
8
-
9
-
10
-
11
-
12
-
13
-
14
-
15
-
16
-
17
-
18
-
19
-
20
-
21
-
22
-
23
-
24
-
25
-
26
-
 27
27 -
 28
28 -
 29
29 -
 30
30 -
 31
31 -
 32
32 -
 33
33 -
 34
34 -
 35
35 -
 36
36 -
 37
37 -
38
-
39
-
40
-
41
-
42
-
43
-
44
-
45
-
46
-
47
-
48
-
49
-
50
-
51
-
52
-
53
-
54
-
55
-
56
-
57
-
58
-
59
-
60
-
61
-
62
-
63
-
64
-
65
-
66
-
67
-
68
-
69
-
70
-
71
-
72
-
73
-
74
-
75
-
76
-
77
-
78
-
79
-
80
-
81
-
82
-
83
-
84
-
85
-
86
-
87
-
88
-
89
-
90
-
91
-
92
-
93
-
94
-
95
-
96
-
97
-
98
-
99
-
100
-
101
-
102
-
103
-
104
-
105
-
106
-
107
 |
 |
