Cisco WRV210 Administration Guide - Page 69
Local Secure Group, Tunnel Name - remote access
 |
View all Cisco WRV210 manuals
Add to My Manuals
Save this manual to your list of manuals |
Page 69 highlights
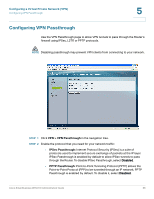
Configuring a Virtual Private Network (VPN) VPN > IPSec VPN 5 NOTE Repeat this procedure for each tunnel that you want to configure. STEP 1 Click VPN > IPSec VPN in the navigation tree. STEP 2 In the VPN Tunnel section, enter the following settings: • Tunnel Entry: From the drop-down list, select the tunnel that you want to configure. You can configure up to 5 tunnels, indicated by the letters A through E. • VPN Tunnel: Click Enabled to enable this tunnel, or click Disabled to disable this tunnel • Tunnel Name: Enter a name for this tunnel, such as "Anaheim Office." NAT-Traversal: Click Enabled if you need to establish a VPN tunnel with a device that is behind an NAT firewall. NAT-T must be enabled for another private network to be able set up a site-to-site IPSec tunnel with your WRV210. Click Disabled if the remote device is not behind an NAT firewall. NOTE If NAT traversal is enabled, the Remote Secure Group and Remote Secure Gateway must be set to Any. If you want to limit access to specified IP addresses, click the Advanced Settings button. IPSec communication will be interrupted while you configure the NAT settings. Click OK to acknowledge the warning message that appears. In the NAT-Traversal Advanced Settings window, click By Manual Setting. Then enter each IP address and mask. Click the Enabled box to enable. Finally, click Save to save your settings in this window, or click Cancel to close the window without saving the settings. STEP 3 In the Local Secure Group section, identify the computer(s) on your LAN that can access the tunnel. Choose a Type, and then enter the required information: • IP Addr.: Allows a specified computer to access the tunnel. Enter the IP Address of the local VPN Router. The Mask appears. • Subnet: Allows the entire network to access the tunnel. Enter the IP Address and Mask of the local VPN Router in the fields provided. To allow access to the entire IP subnet, enter 0 for the last octet of the IP Address, as in the following example: 192.168.1.0. Cisco Small Business WRV210 Administration Guide 69
-
 1
1 -
2
-
3
-
4
-
5
-
6
-
7
-
8
-
9
-
10
-
11
-
12
-
13
-
14
-
15
-
16
-
17
-
18
-
19
-
20
-
21
-
22
-
23
-
24
-
25
-
26
-
27
-
28
-
29
-
30
-
31
-
32
-
33
-
34
-
35
-
36
-
37
-
38
-
39
-
40
-
41
-
42
-
43
-
44
-
45
-
46
-
47
-
48
-
49
-
50
-
51
-
52
-
53
-
54
-
55
-
56
-
57
-
58
-
59
-
60
-
61
-
62
-
63
-
 64
64 -
 65
65 -
 66
66 -
 67
67 -
 68
68 -
 69
69 -
 70
70 -
 71
71 -
 72
72 -
 73
73 -
 74
74 -
75
-
76
-
77
-
78
-
79
-
80
-
81
-
82
-
83
-
84
-
85
-
86
-
87
-
88
-
89
-
90
-
91
-
92
-
93
-
94
-
95
-
96
-
97
-
98
-
99
-
100
-
101
-
102
-
103
-
104
-
105
-
106
-
107
 |
 |
