Cisco WRV210 Administration Guide - Page 23
Setting Up the Local Network, The MTU Maximum Transmission Unit setting specifies the largest - user guide
 |
View all Cisco WRV210 manuals
Add to My Manuals
Save this manual to your list of manuals |
Page 23 highlights
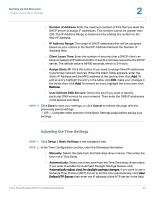
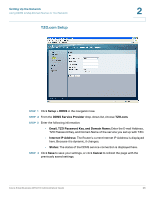
Setting Up the Network Configuring the Basic Settings 2 • MTU: The MTU (Maximum Transmission Unit) setting specifies the largest packet size permitted for network transmission. Select Enabled and enter the value desired. It is recommended that you leave this value in the 1200 to 1500 range. For most DSL users, it is recommended to use the value 1492. By default, MTU is set at 1500 when disabled. • MTU Size: When Manual is selected in the MTU field, this option is enabled. It is recommended that you set this value within the range of 1200 to 1500, but the value can be defined between 128 and 1500. STEP 4 Click Save to save your settings, or click Cancel to refresh the page with the previously saved settings. -OR- Complete other sections of the Basic Settings page before saving your settings. Setting Up the Local Network STEP 1 Click Setup > Basic Settings in the navigation tree. STEP 2 In the LAN Setup section, configure the Router's local network settings. In most cases, you can keep the defaults. • Local IP Address: Enter the IP address for the router on your network. The default address is 192.168.1.1. • Subnet Mask: Enter the subnet mask for your network. The default value is 255.255.255.0. • Local DHCP Server: The Router can be used as your network's DHCP (Dynamic Host Configuration Protocol) server, which automatically assigns an IP address to each connected device. Unless you already have a DHCP server, it is highly recommended that you enable the DHCP server. This is the default setting. If you already have a DHCP server on your network, choose Disabled. If you disable DHCP, use the other router's configuration utility to assign a static IP address to the WRV210. • Start IP Address: Enter the first IP address in the range of addresses that are assigned by the DHCP server. Assuming that you are using the default router IP address of 192.168.1.1, the Start IP address must be greater than 192.168.1.1 but smaller than 192.168.1.255, which is reserved as the broadcast IP address. Cisco Small Business WRV210 Administration Guide 23
-
 1
1 -
2
-
3
-
4
-
5
-
6
-
7
-
8
-
9
-
10
-
11
-
12
-
13
-
14
-
15
-
16
-
17
-
 18
18 -
 19
19 -
 20
20 -
 21
21 -
 22
22 -
 23
23 -
 24
24 -
 25
25 -
 26
26 -
 27
27 -
 28
28 -
29
-
30
-
31
-
32
-
33
-
34
-
35
-
36
-
37
-
38
-
39
-
40
-
41
-
42
-
43
-
44
-
45
-
46
-
47
-
48
-
49
-
50
-
51
-
52
-
53
-
54
-
55
-
56
-
57
-
58
-
59
-
60
-
61
-
62
-
63
-
64
-
65
-
66
-
67
-
68
-
69
-
70
-
71
-
72
-
73
-
74
-
75
-
76
-
77
-
78
-
79
-
80
-
81
-
82
-
83
-
84
-
85
-
86
-
87
-
88
-
89
-
90
-
91
-
92
-
93
-
94
-
95
-
96
-
97
-
98
-
99
-
100
-
101
-
102
-
103
-
104
-
105
-
106
-
107
 |
 |
