Cisco WS-C2960S-24TS-S Hardware Installation Guide - Page 37
Box Contents, Tools and Equipment, Verifying Switch Operation - technical specification
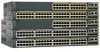 |
View all Cisco WS-C2960S-24TS-S manuals
Add to My Manuals
Save this manual to your list of manuals |
Page 37 highlights
Chapter 2 Switch Installation (24- and 48-Port Switches) Verifying Switch Operation When you use shorter lengths of single-mode fiber cable, you might need to insert an inline optical attenuator in the link to avoid overloading the receiver. When the fiber-optic cable span is less than 15.43 miles (25 km), you should insert a 5-decibel (dB) or 10-dB inline optical attenuator between the fiber-optic cable plant and the receiving port on the 1000BASE-ZX SFP module at each end of the link. • The operating environment must be within the ranges listed in Appendix A, "Technical Specifications." • Clearance to front and rear panels meets these conditions: - You can easily read the front-panel indicators. - Access to ports is sufficient for unrestricted cabling. - The rear-panel power connector is within reach of an AC power receptacle. • Cabling is away from sources of electrical noise, such as radios, power lines, and fluorescent lighting fixtures. Make sure the cabling is safely away from other devices that might damage the cables. • Airflow around the switch and through the vents is unrestricted. • Temperature around the unit does not exceed 113°F (45°C). If the switch is installed in a closed or multirack assembly, the temperature around it might be greater than normal room temperature. Box Contents The switch getting started guide on Cisco.com describes the box contents. If any item is missing or damaged, contact your Cisco representative or reseller for support. Tools and Equipment You need to supply a number-2 Phillips screwdriver to rack-mount the switch. Verifying Switch Operation Before you install the switch in a rack, on a wall, or on a table or shelf, you should power on the switch and verify that the switch passes POST. If your configuration has an RPS, connect the switch and the RPS to the same AC power source. See Chapter 3, "Switch Installation (8-Port Switches)," and see the Cisco RPS documentation for more information. Note When you connect the RPS to the switch, put the RPS in standby mode. Set the RPS to active mode during normal operation. To power on the switch, connect one end of the AC power cord to the AC power connector on the switch, and connect the other end of the power cord to an AC power outlet. OL-7075-09 Catalyst 2960 Switch Hardware Installation Guide 2-5
-
 1
1 -
2
-
3
-
4
-
5
-
6
-
7
-
8
-
9
-
10
-
11
-
12
-
13
-
14
-
15
-
16
-
17
-
18
-
19
-
20
-
21
-
22
-
23
-
24
-
25
-
26
-
27
-
28
-
29
-
30
-
31
-
 32
32 -
 33
33 -
 34
34 -
 35
35 -
 36
36 -
 37
37 -
 38
38 -
 39
39 -
 40
40 -
 41
41 -
 42
42 -
43
-
44
-
45
-
46
-
47
-
48
-
49
-
50
-
51
-
52
-
53
-
54
-
55
-
56
-
57
-
58
-
59
-
60
-
61
-
62
-
63
-
64
-
65
-
66
-
67
-
68
-
69
-
70
-
71
-
72
-
73
-
74
-
75
-
76
-
77
-
78
-
79
-
80
-
81
-
82
-
83
-
84
-
85
-
86
-
87
-
88
-
89
-
90
-
91
-
92
-
93
-
94
-
95
-
96
-
97
-
98
-
99
-
100
-
101
-
102
-
103
-
104
-
105
-
106
-
107
-
108
 |
 |