Cisco WS-C2960S-24TS-S Hardware Installation Guide - Page 98
Connecting to a Power Source, Entering the Initial Configuration Information
 |
View all Cisco WS-C2960S-24TS-S manuals
Add to My Manuals
Save this manual to your list of manuals |
Page 98 highlights
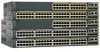
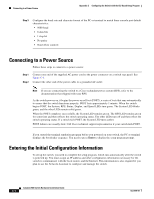
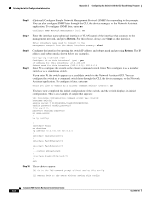
Connecting to a Power Source Appendix C Configuring the Switch with the CLI-Based Setup Program Step 3 Configure the baud rate and character format of the PC or terminal to match these console port default characteristics: • 9600 baud • 8 data bits • 1 stop bit • No parity • None (flow control) Connecting to a Power Source Follow these steps to connect to a power source: Step 1 Step 2 Connect one end of the supplied AC power cord to the power connector on a switch rear panel. See Figure C-1. Connect the other end of the power cable to a grounded AC outlet. Note If you are connecting the switch to a Cisco redundant power system (RPS), refer to the documentation that shipped with your RPS. As the switch powers on, it begins the power-on self test (POST), a series of tests that runs automatically to ensure that the switch functions properly. POST lasts approximately 1 minute. When the switch begins POST, the System, RPS, Status, Duplex, and Speed LEDs turn green. The System LED blinks green, and the other LEDs remain solid green. When the POST completes successfully, the System LED remains green. The RPS LED remains green for some time and then reflects the switch operating status. The other LEDs turn off and then reflect the switch operating status. If a switch fails POST, the System LED turns amber. POST failures are usually fatal. Call Cisco technical support representative if your switch fails POST. If you started the terminal emulation program before you powered on your switch, the PC or terminal displays the bootloader sequence. You need to press Enter to display the setup program prompt. Entering the Initial Configuration Information To set up the switch, you need to complete the setup program, which runs automatically after the switch is powered up. You must assign an IP address and other configuration information necessary for the switch to communicate with the local routers and the Internet. This information is also required if you plan to use the Network Assistant to configure and manage the switch. Catalyst 2960 Switch Hardware Installation Guide C-4 OL-7075-09
-
 1
1 -
2
-
3
-
4
-
5
-
6
-
7
-
8
-
9
-
10
-
11
-
12
-
13
-
14
-
15
-
16
-
17
-
18
-
19
-
20
-
21
-
22
-
23
-
24
-
25
-
26
-
27
-
28
-
29
-
30
-
31
-
32
-
33
-
34
-
35
-
36
-
37
-
38
-
39
-
40
-
41
-
42
-
43
-
44
-
45
-
46
-
47
-
48
-
49
-
50
-
51
-
52
-
53
-
54
-
55
-
56
-
57
-
58
-
59
-
60
-
61
-
62
-
63
-
64
-
65
-
66
-
67
-
68
-
69
-
70
-
71
-
72
-
73
-
74
-
75
-
76
-
77
-
78
-
79
-
80
-
81
-
82
-
83
-
84
-
85
-
86
-
87
-
88
-
89
-
90
-
91
-
92
-
 93
93 -
 94
94 -
 95
95 -
 96
96 -
 97
97 -
 98
98 -
 99
99 -
 100
100 -
 101
101 -
 102
102 -
 103
103 -
104
-
105
-
106
-
107
-
108
 |
 |