Cisco WS-C2960S-24TS-S Hardware Installation Guide - Page 46
Table- or Shelf-Mounting, Connecting to the 10/100 and 10/100/1000 Ports - manual
 |
View all Cisco WS-C2960S-24TS-S manuals
Add to My Manuals
Save this manual to your list of manuals |
Page 46 highlights
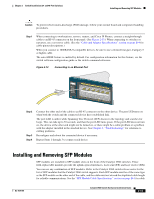
Connecting to the 10/100 and 10/100/1000 Ports Chapter 2 Switch Installation (24- and 48-Port Switches) After the switch is mounted on the wall, do these tasks to complete the installation: • Power on the switch. See the "Verifying Switch Operation" section on page 2-5. • Connect to a 10/100 or 10/100/1000 port, and run Express Setup. See the Catalyst 2960 Switch Getting Started Guide for instructions. • Connect to the front-panel ports. See the "Connecting to the 10/100 and 10/100/1000 Ports" section on page 2-14, the "Connecting to SFP Modules" section on page 2-18, and the "Connecting to a Dual-Purpose Port" section on page 2-20 to complete the installation. For configuration instructions about using the CLI setup program, go to Appendix C, "Configuring the Switch with the CLI-Based Setup Program." Table- or Shelf-Mounting This section applies to all switches except the Catalyst 2960-8TC-L, 2960-8TC-S, 2960G-8TC-L, and 2960PD-8TT-L switches. For information applicable to those switches, see Chapter 3, "Switch Installation (8-Port Switches)." Step 1 Step 2 Locate the adhesive strip with the rubber feet in the mounting-kit envelope. Attach the four rubber feet to the recessed areas on the bottom of the unit. Place the switch on the table or shelf near an AC power source. After the switch is mounted on the table, do these tasks to complete the installation: • Power on the switch. See the "Verifying Switch Operation" section on page 2-5. • Connect to a 10/100 or 10/100/1000 port, and run Express Setup. See the Catalyst 2960 Switch Getting Started Guide for instructions. • Connect to the front-panel ports. See the "Connecting to the 10/100 and 10/100/1000 Ports" section on page 2-14, "Connecting to SFP Modules" section on page 2-18 and the "Connecting to a Dual-Purpose Port" section on page 2-20 to complete the installation. For configuration instructions about using the CLI setup program, go to Appendix C, "Configuring the Switch with the CLI-Based Setup Program." Note When the connectors are not being used, replace the dust covers on them for protection. Connecting to the 10/100 and 10/100/1000 Ports The switch 10/100/1000 ports configure themselves to operate at the speed of attached devices. If the attached ports do not support autonegotiation, you can explicitly set the speed and duplex parameters. Connecting devices that do not autonegotiate or that have their speed and duplex parameters manually set can reduce performance or result in no linkage. To maximize performance, choose one of these methods for configuring the Ethernet ports: • Let the ports autonegotiate both speed and duplex. • Set the port speed and duplex parameters on both ends of the connection. 2-14 Catalyst 2960 Switch Hardware Installation Guide OL-7075-09
-
 1
1 -
2
-
3
-
4
-
5
-
6
-
7
-
8
-
9
-
10
-
11
-
12
-
13
-
14
-
15
-
16
-
17
-
18
-
19
-
20
-
21
-
22
-
23
-
24
-
25
-
26
-
27
-
28
-
29
-
30
-
31
-
32
-
33
-
34
-
35
-
36
-
37
-
38
-
39
-
40
-
 41
41 -
 42
42 -
 43
43 -
 44
44 -
 45
45 -
 46
46 -
 47
47 -
 48
48 -
 49
49 -
 50
50 -
 51
51 -
52
-
53
-
54
-
55
-
56
-
57
-
58
-
59
-
60
-
61
-
62
-
63
-
64
-
65
-
66
-
67
-
68
-
69
-
70
-
71
-
72
-
73
-
74
-
75
-
76
-
77
-
78
-
79
-
80
-
81
-
82
-
83
-
84
-
85
-
86
-
87
-
88
-
89
-
90
-
91
-
92
-
93
-
94
-
95
-
96
-
97
-
98
-
99
-
100
-
101
-
102
-
103
-
104
-
105
-
106
-
107
-
108
 |
 |
