Cisco WS-C2960S-24TS-S Hardware Installation Guide - Page 39
Removing Screws from the Switch, Attaching Brackets to the Catalyst 2960 Switch,
 |
View all Cisco WS-C2960S-24TS-S manuals
Add to My Manuals
Save this manual to your list of manuals |
Page 39 highlights
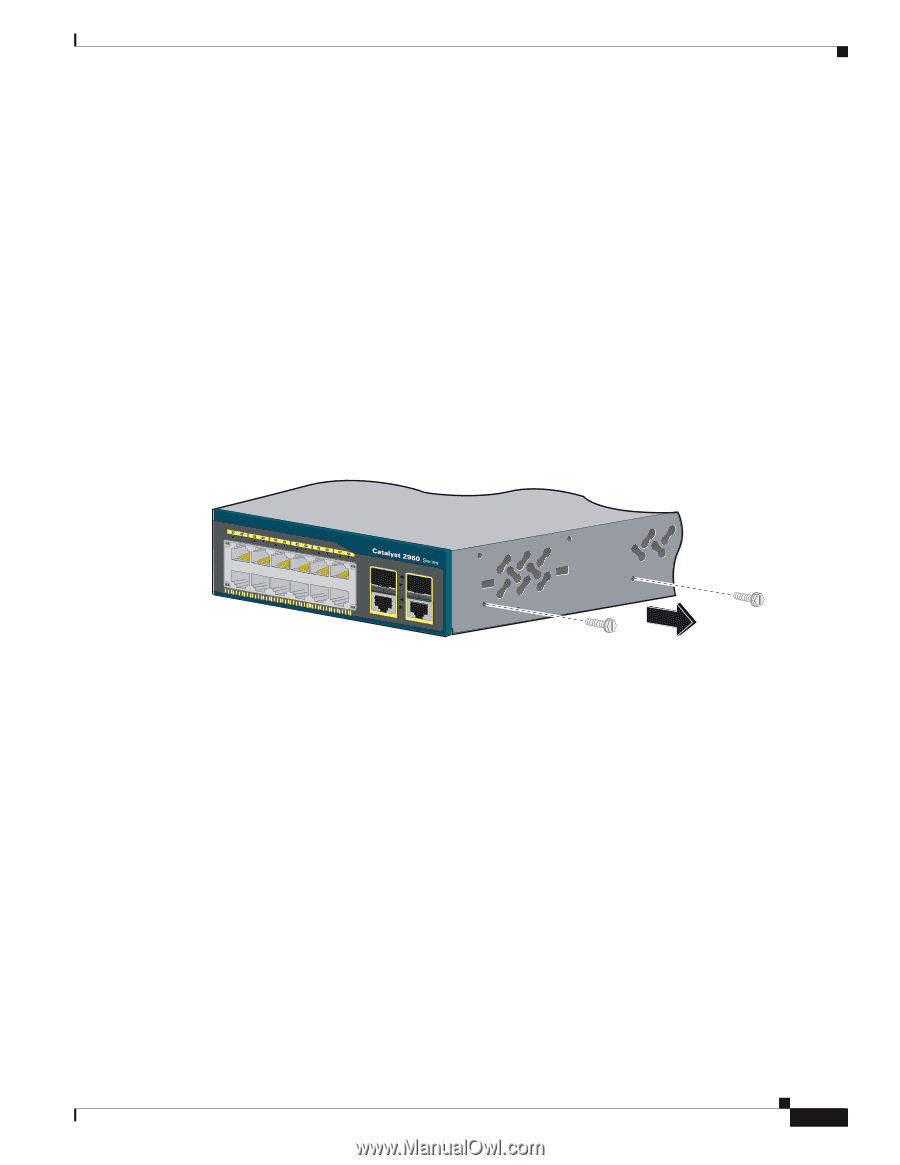
Chapter 2 Switch Installation (24- and 48-Port Switches) Installing the Switch To install the switch in a 19-inch or 24-inch rack (24-inch racks require optional mounting hardware), follow the instructions described in these sections: • Removing Screws from the Switch, page 2-7 • Attaching Brackets to the Catalyst 2960 Switch, page 2-7 • Mounting the Switch in a Rack, page 2-10 • Attaching the Cable Guide, page 2-11 An optional bracket kit that is not included with the switch is required to install the switch in a 24-inch rack. You can order a kit that contains the 24-inch rack-mounting brackets and hardware from Cisco by using part number RCKMNT-1RU=. Removing Screws from the Switch If you plan to install the switch in a rack, you must first remove screws in the switch chassis so that you can attach the mounting brackets. Figure 2-1 shows how to remove the chassis screws in a Catalyst 2960 switch. Figure 2-1 Removing Screws from the Catalyst 2960 Switch 1X 11X 204613 Attaching Brackets to the Catalyst 2960 Switch The bracket orientation and the brackets that you use depend on whether you are attaching the brackets for a 19-inch or a 24-inch rack. Figure 2-2 to Figure 2-7 show how to attach each type of bracket to one side of the switch. Follow the same steps to attach the second bracket to the opposite side. OL-7075-09 Catalyst 2960 Switch Hardware Installation Guide 2-7
-
 1
1 -
2
-
3
-
4
-
5
-
6
-
7
-
8
-
9
-
10
-
11
-
12
-
13
-
14
-
15
-
16
-
17
-
18
-
19
-
20
-
21
-
22
-
23
-
24
-
25
-
26
-
27
-
28
-
29
-
30
-
31
-
32
-
33
-
 34
34 -
 35
35 -
 36
36 -
 37
37 -
 38
38 -
 39
39 -
 40
40 -
 41
41 -
 42
42 -
 43
43 -
 44
44 -
45
-
46
-
47
-
48
-
49
-
50
-
51
-
52
-
53
-
54
-
55
-
56
-
57
-
58
-
59
-
60
-
61
-
62
-
63
-
64
-
65
-
66
-
67
-
68
-
69
-
70
-
71
-
72
-
73
-
74
-
75
-
76
-
77
-
78
-
79
-
80
-
81
-
82
-
83
-
84
-
85
-
86
-
87
-
88
-
89
-
90
-
91
-
92
-
93
-
94
-
95
-
96
-
97
-
98
-
99
-
100
-
101
-
102
-
103
-
104
-
105
-
106
-
107
-
108
 |
 |