Cisco WS-C2960S-24TS-S Hardware Installation Guide - Page 62
Under the Desk- or Shelf-Mounting (with Mounting Screws
 |
View all Cisco WS-C2960S-24TS-S manuals
Add to My Manuals
Save this manual to your list of manuals |
Page 62 highlights
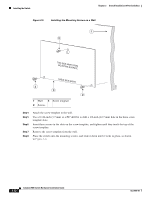
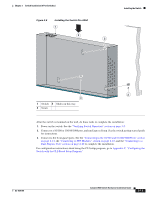
Installing the Switch Chapter 3 Switch Installation (8-Port Switches) Figure 3-2 Mounting the Switch on Top of a Desk or Shelf SYST STAT DPLX SPD MODE CONSOLE 1x 2x 3x 4x 5x 6x 7x 8x Catalyst 296S0eries 1 1 3 204626 2 1 Slides on this way 3 Desk or shelf 2 Screws After the switch is mounted on the desk or shelf, do these tasks to complete the installation: 1. Power on the switch. See the "Verifying Switch Operation" section on page 3-5. 2. Connect to a 10/100 or 10/100/1000 port, and run Express Setup. See the switch getting started guide for instructions. 3. Connect to the front-panel ports. See the "Connecting to the 10/100 and 10/100/1000 Ports" section on page 2-14, the "Connecting to SFP Modules" section on page 2-18, and the "Connecting to a Dual-Purpose Port" section on page 2-20 to complete the installation. For configuration instructions about using the CLI setup program, go to Appendix C, "Configuring the Switch with the CLI-Based Setup Program." Under the Desk- or Shelf-Mounting (with Mounting Screws) This section is specific to the Catalyst 2960 8-port switches. For information applicable to the other Catalyst 2960 switches, see Chapter 2, "Switch Installation (24- and 48-Port Switches)." Step 1 Step 2 Step 3 Locate the screw template. The template is used to align the mounting screw holes and is also used as a guide to make sure the screws are installed under the desk or shelf with proper clearance. Position the screw template underneath the desk or shelf so that the two side-by-side slots face the front of the desk or shelf, as shown in Figure 3-3. This ensures that the power cord faces the rear of the desk or shelf after the switch is installed. Peel the adhesive strip off the bottom of the screw template, and attach it to the underside of the desk or shelf. Catalyst 2960 Switch Hardware Installation Guide 3-8 OL-7075-09
-
 1
1 -
2
-
3
-
4
-
5
-
6
-
7
-
8
-
9
-
10
-
11
-
12
-
13
-
14
-
15
-
16
-
17
-
18
-
19
-
20
-
21
-
22
-
23
-
24
-
25
-
26
-
27
-
28
-
29
-
30
-
31
-
32
-
33
-
34
-
35
-
36
-
37
-
38
-
39
-
40
-
41
-
42
-
43
-
44
-
45
-
46
-
47
-
48
-
49
-
50
-
51
-
52
-
53
-
54
-
55
-
56
-
 57
57 -
 58
58 -
 59
59 -
 60
60 -
 61
61 -
 62
62 -
 63
63 -
 64
64 -
 65
65 -
 66
66 -
 67
67 -
68
-
69
-
70
-
71
-
72
-
73
-
74
-
75
-
76
-
77
-
78
-
79
-
80
-
81
-
82
-
83
-
84
-
85
-
86
-
87
-
88
-
89
-
90
-
91
-
92
-
93
-
94
-
95
-
96
-
97
-
98
-
99
-
100
-
101
-
102
-
103
-
104
-
105
-
106
-
107
-
108
 |
 |
