D-Link DES-3226SM Product Manual - Page 45
Saving Changes, Admin and User Privileges
 |
UPC - 790069247118
View all D-Link DES-3226SM manuals
Add to My Manuals
Save this manual to your list of manuals |
Page 45 highlights
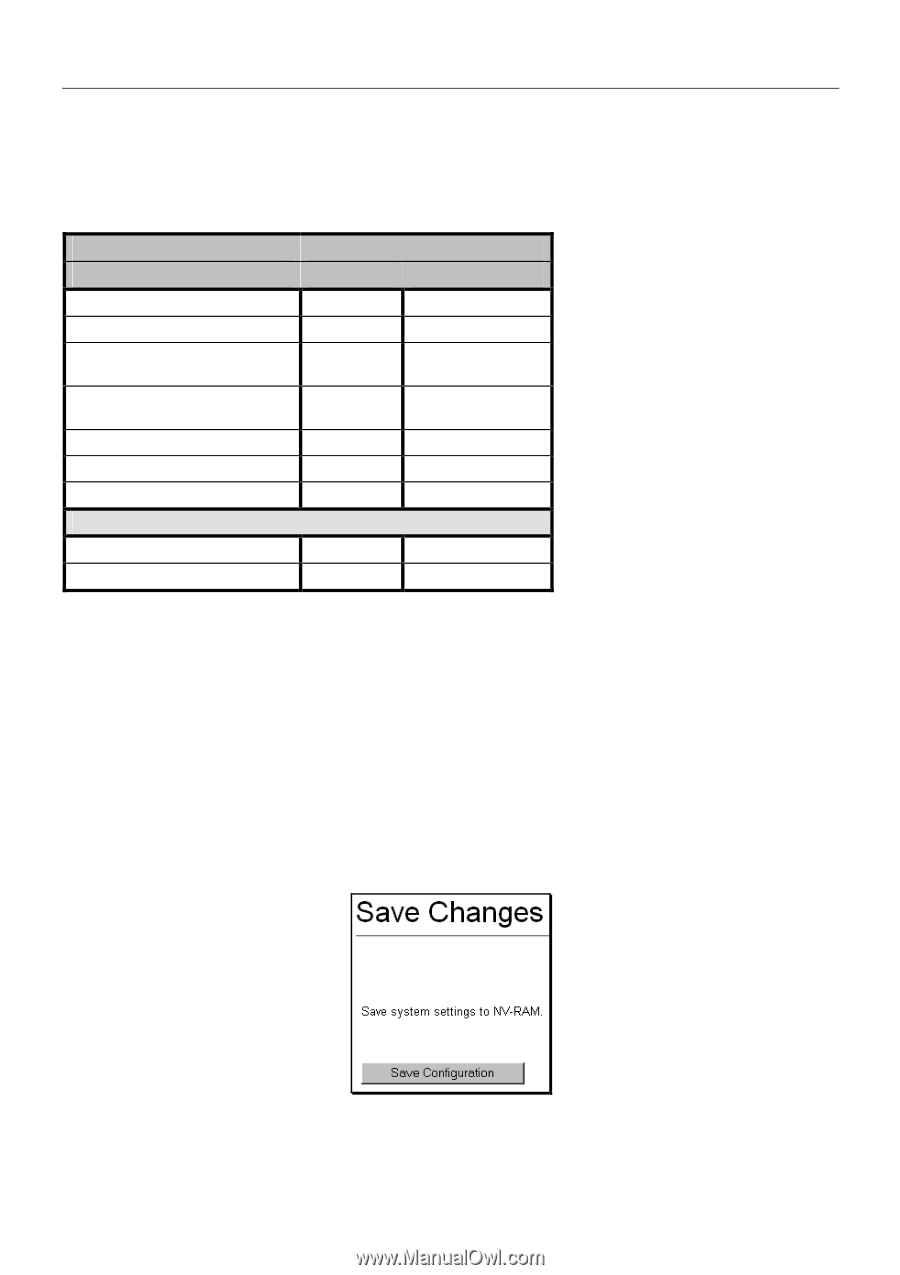
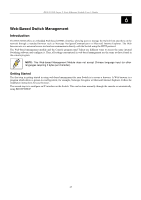
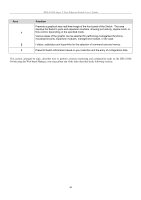
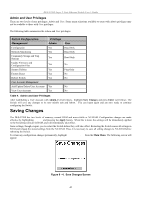
DES-3226S Layer 2 Fast Ethernet Switch User's Guide Admin and User Privileges There are two levels of user privileges: Admin and User. Some menu selections available to users with Admin privileges may not be available to those with User privileges. The following table summarizes the Admin and User privileges: Switch Configuration Management Privilege Admin User Configuration Yes Network Monitoring Yes Community Strings and Trap Stations Yes Update Firmware and Configuration Files Yes System Utilities Yes Factory Reset Yes Reboot Switch Yes User Account Management Add/Update/Delete User Accounts Yes View User Accounts Yes Read Only Read Only Read Only No Ping Only No No No No Table 4. Admin and User Privileges After establishing a User Account with Admin-level privileges, highlight Save Changes and press Enter (see below). The Switch will save any changes to its non-volatile ram and reboot. You can logon again and are now ready to continue configuring the Switch. Saving Changes The DES-3226S has two levels of memory; normal RAM and non-volatile or NV-RAM. Configuration changes are made effective by highlighting Apply and pressing the Apply button. When this is done, the settings will be immediately applied to the Switching software in RAM, and will immediately take effect. Some settings, though, require you to restart the Switch before they will take effect. Restarting the Switch erases all settings in RAM and reloads the stored settings from the NV-RAM. Thus, it is necessary to save all setting changes to NV-RAM before rebooting the Switch. To retain any configuration changes permanently, highlight Save Changes from the Main Menu. The following screen will appear: Figure 6 - 4. Save Changes Screen 42
-
 1
1 -
2
-
3
-
4
-
5
-
6
-
7
-
8
-
9
-
10
-
11
-
12
-
13
-
14
-
15
-
16
-
17
-
18
-
19
-
20
-
21
-
22
-
23
-
24
-
25
-
26
-
27
-
28
-
29
-
30
-
31
-
32
-
33
-
34
-
35
-
36
-
37
-
38
-
39
-
 40
40 -
 41
41 -
 42
42 -
 43
43 -
 44
44 -
 45
45 -
 46
46 -
 47
47 -
 48
48 -
 49
49 -
 50
50 -
51
-
52
-
53
-
54
-
55
-
56
-
57
-
58
-
59
-
60
-
61
-
62
-
63
-
64
-
65
-
66
-
67
-
68
-
69
-
70
-
71
-
72
-
73
-
74
-
75
-
76
-
77
-
78
-
79
-
80
-
81
-
82
-
83
-
84
-
85
-
86
-
87
-
88
-
89
-
90
-
91
-
92
-
93
-
94
-
95
-
96
-
97
-
98
-
99
-
100
-
101
-
102
-
103
-
104
-
105
-
106
-
107
-
108
-
109
-
110
-
111
-
112
-
113
-
114
-
115
-
116
-
117
-
118
-
119
-
120
-
121
-
122
-
123
-
124
 |
 |