D-Link DES-3226SM Product Manual - Page 48
Switch Information, Configuring the Switch's IP Address,
 |
UPC - 790069247118
View all D-Link DES-3226SM manuals
Add to My Manuals
Save this manual to your list of manuals |
Page 48 highlights
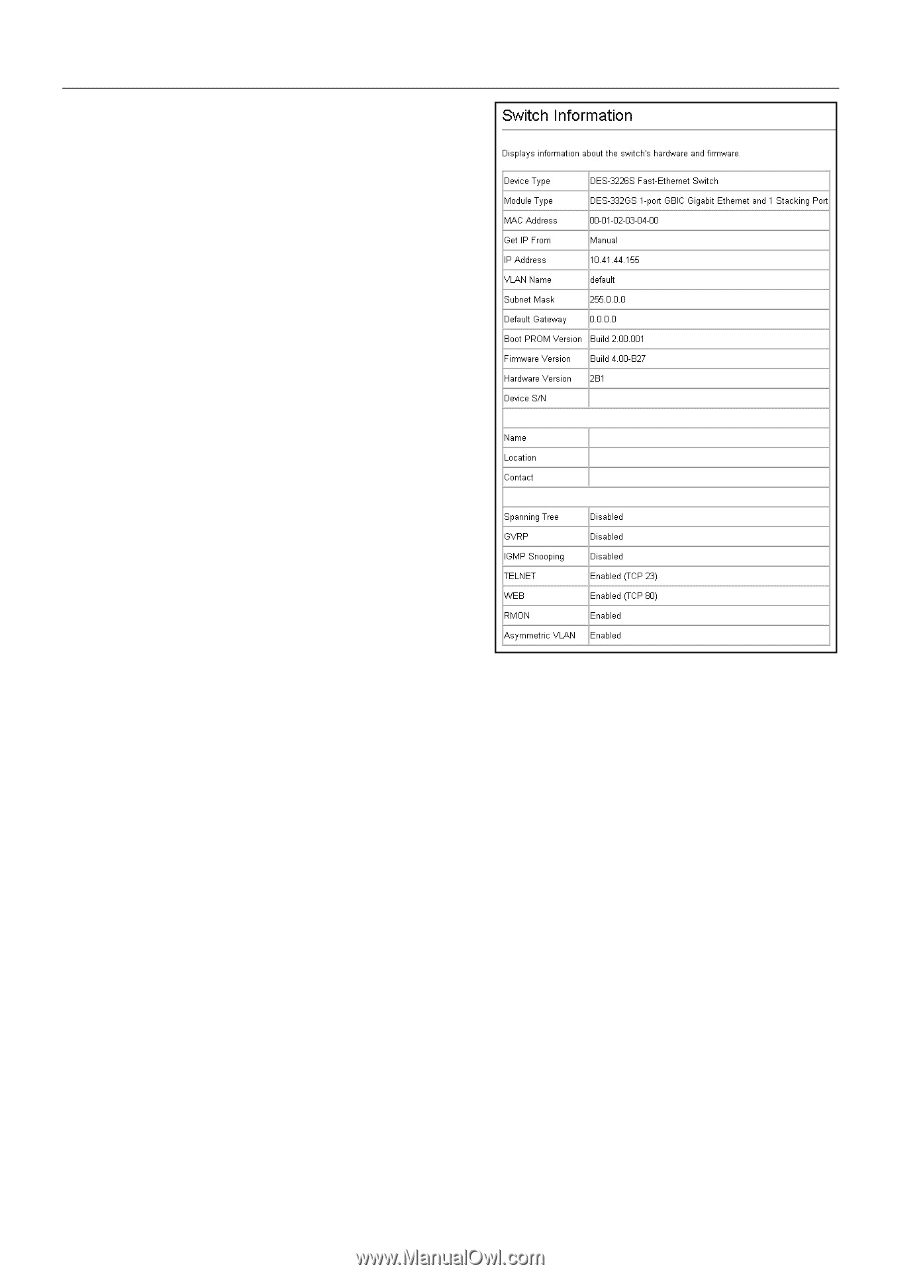
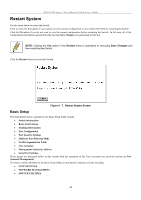
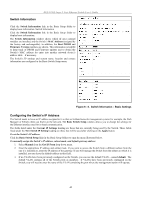
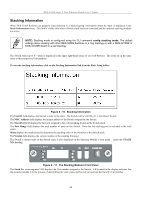
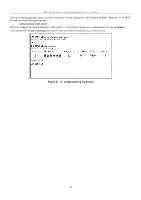
DES-3226S Layer 2 Fast Ethernet Switch User's Guide Switch Information Click the Switch Information link in the Basic Setup folder to display basic information. Switch Information Click the Switch Information link in the Basic Setup folder to display basic information. The Switch Information window shows which (if any) external modules are installed, and the Switch's MAC Address (assigned by the factory and unchangeable). In addition, the Boot PROM and Firmware Version numbers are shown. This information is helpful to keep track of PROM and Firmware updates and to obtain the Switch's MAC address for entry into another network device's address table - if necessary. The Switch's IP settings and system name, location and contact information are configured in the Basic Switch Setup menu. Figure 6 - 8. Switch Information - Basic Settings Configuring the Switch's IP Address The Switch needs to have an IP address assigned to it so that an In-Band network management system (for example, the Web Manager or Telnet) client can find it on the network. The Basic Switch Setup window allows you to change the settings for the Ethernet interface used for in-band communication. The fields listed under the Current IP Settings heading are those that are currently being used by the Switch. Those fields listed under the New Switch IP Setting heading are those that will be used after clicking on the Apply button. To set the Switch's IP address: Click the Basic Switch Setup link (in the Basic Setup folder) to open the menu illustrated below. To manually assign the Switch's IP address, subnet mask, and default gateway address: 1. Select Manual from the Get IP From drop-down menu. 2. Enter the appropriate IP address and subnet mask. If you want to access the Switch from a different subnet from the one it is installed on, enter the IP address of the gateway. If you will manage the Switch from the subnet on which it is installed, you can leave the default address in this field. 3. If no VLANs have been previously configured on the Switch, you can use the default VLAN − named default. The default VLAN contains all of the Switch ports as members. If VLANs have been previously configured on the Switch, you will need to enter the name of the VLAN containing the port where the management station will operate. 45
-
 1
1 -
2
-
3
-
4
-
5
-
6
-
7
-
8
-
9
-
10
-
11
-
12
-
13
-
14
-
15
-
16
-
17
-
18
-
19
-
20
-
21
-
22
-
23
-
24
-
25
-
26
-
27
-
28
-
29
-
30
-
31
-
32
-
33
-
34
-
35
-
36
-
37
-
38
-
39
-
40
-
41
-
42
-
 43
43 -
 44
44 -
 45
45 -
 46
46 -
 47
47 -
 48
48 -
 49
49 -
 50
50 -
 51
51 -
 52
52 -
 53
53 -
54
-
55
-
56
-
57
-
58
-
59
-
60
-
61
-
62
-
63
-
64
-
65
-
66
-
67
-
68
-
69
-
70
-
71
-
72
-
73
-
74
-
75
-
76
-
77
-
78
-
79
-
80
-
81
-
82
-
83
-
84
-
85
-
86
-
87
-
88
-
89
-
90
-
91
-
92
-
93
-
94
-
95
-
96
-
97
-
98
-
99
-
100
-
101
-
102
-
103
-
104
-
105
-
106
-
107
-
108
-
109
-
110
-
111
-
112
-
113
-
114
-
115
-
116
-
117
-
118
-
119
-
120
-
121
-
122
-
123
-
124
 |
 |