DIRECTV HR24 System Manual - Page 149
Door Panel, Usb Port, Power, Remote Sensor, Guide, Record, Select, Res Resolution, Resolution - 200 usb
 |
View all DIRECTV HR24 manuals
Add to My Manuals
Save this manual to your list of manuals |
Page 149 highlights
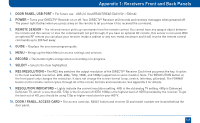
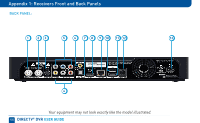
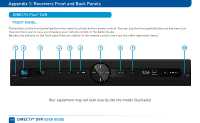
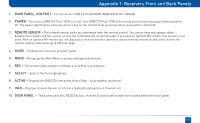
Appendix 1: Receivers Front and Back Panels 1. DOOR PANEL, USB PORT - For future use. USB 2.0 Host(FRONT/REAR EACH 5V = 500mA) 2. POWER - Turns your DIRECTV® Receiver on or off. Your DIRECTV® Receiver still records and receives messages when powered off. The power light flashes when you press a key on the remote to let you know it has received the command. 3. REMOTE SENSOR - The infrared sensor picks up commands from the remote control. You cannot have any opaque object between the remote and this sensor or else the command will not get through. If you have an optional RF remote, this sensor is not used. With an optional RF remote you can place your receiver inside a cabinet or any non-metal enclosure and it will receive the remote control commands up to 200 feet away. 4. GUIDE - Displays the onscreen program guide. 5. MENU - Brings up the Main Menu to access settings and services. 6. RECORD - This button lights orange when a recording is in progress. 7. SELECT - Selects the item highlighted. 8. RES (RESOLUTION) - The RES key switches the output resolution of the DIRECTV® Receiver. Each time you press the key, it cycles to the next available resolution: 480i, 480p, 720p, 1080i, and 1080p (supported on some models). Note: The RESOLUTION button on the front panel only changes the resolution. It does not change the screen format (crop, stretch, letterbox, pillarbox). The FORMAT button on the remote control cycles through all of the screen formats and resolutions. See Appendix 3 for details. 9. RESOLUTION INDICATORS - Lights indicate the current resolution setting. 480i is the old analog TV setting. 480p is Enhanced Definition TV, which is less than HD. 720p is the first level of HDTV. 1080p is the highest level of HDTV provided by the receiver. To get the best out of HD, you should be using 720p or higher resolution for your HDTV. 10. DOOR / PANEL, ACCESS CARD - The access card slot, RESET button and receiver ID and model number are located behind the door panel. 149
-
 1
1 -
2
-
3
-
4
-
5
-
6
-
7
-
8
-
9
-
10
-
11
-
12
-
13
-
14
-
15
-
16
-
17
-
18
-
19
-
20
-
21
-
22
-
23
-
24
-
25
-
26
-
27
-
28
-
29
-
30
-
31
-
32
-
33
-
34
-
35
-
36
-
37
-
38
-
39
-
40
-
41
-
42
-
43
-
44
-
45
-
46
-
47
-
48
-
49
-
50
-
51
-
52
-
53
-
54
-
55
-
56
-
57
-
58
-
59
-
60
-
61
-
62
-
63
-
64
-
65
-
66
-
67
-
68
-
69
-
70
-
71
-
72
-
73
-
74
-
75
-
76
-
77
-
78
-
79
-
80
-
81
-
82
-
83
-
84
-
85
-
86
-
87
-
88
-
89
-
90
-
91
-
92
-
93
-
94
-
95
-
96
-
97
-
98
-
99
-
100
-
101
-
102
-
103
-
104
-
105
-
106
-
107
-
108
-
109
-
110
-
111
-
112
-
113
-
114
-
115
-
116
-
117
-
118
-
119
-
120
-
121
-
122
-
123
-
124
-
125
-
126
-
127
-
128
-
129
-
130
-
131
-
132
-
133
-
134
-
135
-
136
-
137
-
138
-
139
-
140
-
141
-
142
-
143
-
 144
144 -
 145
145 -
 146
146 -
 147
147 -
 148
148 -
 149
149 -
 150
150 -
 151
151 -
 152
152 -
 153
153 -
 154
154 -
155
-
156
-
157
-
158
-
159
-
160
-
161
-
162
-
163
-
164
-
165
-
166
-
167
-
168
-
169
-
170
-
171
-
172
-
173
-
174
-
175
-
176
-
177
-
178
 |
 |