Dell 1815dn Owners Manual - Page 47
Setting the Paper Size and Type
 |
UPC - 000061100008
View all Dell 1815dn manuals
Add to My Manuals
Save this manual to your list of manuals |
Page 47 highlights
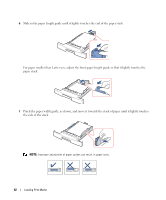
You can load up to: Make sure: 5 sheets of custom sized paper Your paper size should fit within these dimensions: in the bypass tray Width Length 3.0-8.5 in. (76-216 mm) 5.0-14.0 in. (127-356 mm) Your printer has two output locations; the rear output slot and the front output tray. Before you begin copying, printing, or printing received faxes, refer to the table below about how much paper the printer output trays can hold: Output Location front output tray (face down) rear output slot (face up) Capacity 150 sheets of plain paper 1 sheet of paper Setting the Paper Size and Type Setting the Paper Size After loading paper in the paper tray or the bypass tray, you need to set the paper size using the operator panel buttons. This setting will apply to Fax and Copy modes. For PC-printing, you need to select the paper type in the application program you use. 1 Press Scroll ( or ) to highlight Menu and press Select ( ). 2 Press Select ( ) to access Paper Setting. 3 Press Select ( ) to access Paper Size. 4 Press Scroll ( or ) to select the paper tray you want to use and press Select ( ). 5 Press Scroll ( or ) to find the paper size you are using and press Select ( ). 6 Press Cancel ( ) to return to Standby mode. Setting the Paper Type After loading paper in the paper tray or the bypass tray, you need to set the paper type using the operator panel buttons. This setting will apply to Fax and Copy modes. For faxing, you can only set the paper type to the Plain Paper. For PC-printing, you need to select the paper type in the application program you use. 1 Press Scroll ( or ) to highlight Menu and press Select ( ). 2 Press Select ( ) to access Paper Setting. 3 Press Scroll ( or ) to highlight Paper Type and press Select ( ). 4 Press Scroll ( or ) to find the paper type you are using and press Select ( ). 5 Press Cancel ( ) to return to Standby mode. Loading Print Media 47
-
 1
1 -
2
-
3
-
4
-
5
-
6
-
7
-
8
-
9
-
10
-
11
-
12
-
13
-
14
-
15
-
16
-
17
-
18
-
19
-
20
-
21
-
22
-
23
-
24
-
25
-
26
-
27
-
28
-
29
-
30
-
31
-
32
-
33
-
34
-
35
-
36
-
37
-
38
-
39
-
40
-
41
-
 42
42 -
 43
43 -
 44
44 -
 45
45 -
 46
46 -
 47
47 -
 48
48 -
 49
49 -
 50
50 -
 51
51 -
 52
52 -
53
-
54
-
55
-
56
-
57
-
58
-
59
-
60
-
61
-
62
-
63
-
64
-
65
-
66
-
67
-
68
-
69
-
70
-
71
-
72
-
73
-
74
-
75
-
76
-
77
-
78
-
79
-
80
-
81
-
82
-
83
-
84
-
85
-
86
-
87
-
88
-
89
-
90
-
91
-
92
-
93
-
94
-
95
-
96
-
97
-
98
-
99
-
100
-
101
-
102
-
103
-
104
-
105
-
106
-
107
-
108
-
109
-
110
-
111
-
112
-
113
-
114
-
115
-
116
-
117
-
118
-
119
-
120
-
121
-
122
-
123
-
124
-
125
-
126
-
127
-
128
-
129
-
130
-
131
-
132
-
133
-
134
-
135
-
136
-
137
-
138
-
139
-
140
-
141
-
142
-
143
-
144
-
145
-
146
-
147
-
148
-
149
-
150
 |
 |
