Dell 1815dn Owners Manual - Page 54
Making Copies, Special Copy Features, Text & Photo, Photo, Cancel, Start, Layout
 |
UPC - 000061100008
View all Dell 1815dn manuals
Add to My Manuals
Save this manual to your list of manuals |
Page 54 highlights
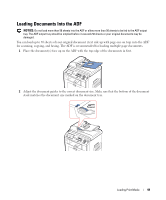
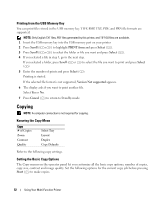
• Text: Use for documents with fine details, such as fine text. • Text & Photo: Use for documents with both text and photo/gray tones. • Photo: Use for documents with photo or gray tones. Making Copies NOTE: A computer connection is not required for copying. NOTE: Contaminates on the ADF glass or the document glass may cause black vertical lines or black spots on the printout. For best results, clean the ADF glass and the document glass before use. See "Cleaning the Scanner" on page 81. 1 Load the document(s) face up with top edge in first into the ADF. OR Place a single document face down on the document glass. For details about loading a document, see "Placing Documents on the Scanner Glass" on page 48 or "Loading Documents Into the ADF" on page 49. 2 Customize the copy settings including the number of copies, copy size, the contrast, and the image quality by selecting the copy menu and using the operator panel buttons. To clear the settings, use Cancel ( ) button. 3 If necessary, you can use special copy features, such as Auto Fit, Clone, Poster, and ID copying, referring to "Special Copy Features" on page 54. 4 Press Start ( ) to begin copying. The display shows the copy processing. NOTE: You can cancel the copy job at any time. Press Cancel ( ) to stop copying. Special Copy Features Access the following copy features using Layout of copy menu. Auto Fit Copying (available via scanner glass only): Automatically reduces or enlarges the A original image to fit on the paper loaded in the printer. Clone Copying (available via scanner glass only): Prints multiple image copies from the original document on a single page. The number of images is automatically determined by the original image and paper size. NOTE: You cannot adjust the copy size using the Zoom menu. 54 Using Your Multi-Function Printer
-
 1
1 -
2
-
3
-
4
-
5
-
6
-
7
-
8
-
9
-
10
-
11
-
12
-
13
-
14
-
15
-
16
-
17
-
18
-
19
-
20
-
21
-
22
-
23
-
24
-
25
-
26
-
27
-
28
-
29
-
30
-
31
-
32
-
33
-
34
-
35
-
36
-
37
-
38
-
39
-
40
-
41
-
42
-
43
-
44
-
45
-
46
-
47
-
48
-
 49
49 -
 50
50 -
 51
51 -
 52
52 -
 53
53 -
 54
54 -
 55
55 -
 56
56 -
 57
57 -
 58
58 -
 59
59 -
60
-
61
-
62
-
63
-
64
-
65
-
66
-
67
-
68
-
69
-
70
-
71
-
72
-
73
-
74
-
75
-
76
-
77
-
78
-
79
-
80
-
81
-
82
-
83
-
84
-
85
-
86
-
87
-
88
-
89
-
90
-
91
-
92
-
93
-
94
-
95
-
96
-
97
-
98
-
99
-
100
-
101
-
102
-
103
-
104
-
105
-
106
-
107
-
108
-
109
-
110
-
111
-
112
-
113
-
114
-
115
-
116
-
117
-
118
-
119
-
120
-
121
-
122
-
123
-
124
-
125
-
126
-
127
-
128
-
129
-
130
-
131
-
132
-
133
-
134
-
135
-
136
-
137
-
138
-
139
-
140
-
141
-
142
-
143
-
144
-
145
-
146
-
147
-
148
-
149
-
150
 |
 |
