Dell 1815dn Owners Manual - Page 97
Activating the Added Memory in the PS Printer Properties, Dell Laser MFP 1815 PS - laser mfp driver
 |
UPC - 000061100008
View all Dell 1815dn manuals
Add to My Manuals
Save this manual to your list of manuals |
Page 97 highlights
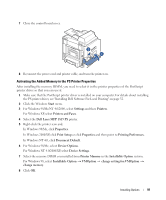
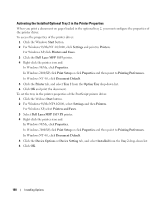
7 Close the control board cover. 8 Reconnect the power cord and printer cable, and turn the printer on. Activating the Added Memory in the PS Printer Properties After installing the memory DIMM, you need to select it in the printer properties of the PostScript printer driver so that you can use it: 1 Make sure that the PostScript printer driver is installed on your computer. For details about installing the PS printer driver, see "Installing Dell Software For Local Printing" on page 32. 2 Click the Windows Start menu. 3 For Windows 98/Me/NT 4.0/2000, select Settings and then Printers. For Windows XP, select Printers and Faxes. 4 Select the Dell Laser MFP 1815 PS printer. 5 Right-click the printer icon and: In Windows 98/Me, click Properties. In Windows 2000/XP, click Print Setup or click Properties and then point to Printing Preferences. In Windows NT 4.0, click Document Default. 6 For Windows 98/Me, select Device Options. For Windows NT 4.0/2000/XP, select Device Settings. 7 Select the memory DIMM you installed from Printer Memory in the Installable Option section. For Windows 98, select Installable Option → VMOption → change setting for:VMOption → change memory. 8 Click OK. Installing Options 97
-
 1
1 -
2
-
3
-
4
-
5
-
6
-
7
-
8
-
9
-
10
-
11
-
12
-
13
-
14
-
15
-
16
-
17
-
18
-
19
-
20
-
21
-
22
-
23
-
24
-
25
-
26
-
27
-
28
-
29
-
30
-
31
-
32
-
33
-
34
-
35
-
36
-
37
-
38
-
39
-
40
-
41
-
42
-
43
-
44
-
45
-
46
-
47
-
48
-
49
-
50
-
51
-
52
-
53
-
54
-
55
-
56
-
57
-
58
-
59
-
60
-
61
-
62
-
63
-
64
-
65
-
66
-
67
-
68
-
69
-
70
-
71
-
72
-
73
-
74
-
75
-
76
-
77
-
78
-
79
-
80
-
81
-
82
-
83
-
84
-
85
-
86
-
87
-
88
-
89
-
90
-
91
-
 92
92 -
 93
93 -
 94
94 -
 95
95 -
 96
96 -
 97
97 -
 98
98 -
 99
99 -
 100
100 -
 101
101 -
 102
102 -
103
-
104
-
105
-
106
-
107
-
108
-
109
-
110
-
111
-
112
-
113
-
114
-
115
-
116
-
117
-
118
-
119
-
120
-
121
-
122
-
123
-
124
-
125
-
126
-
127
-
128
-
129
-
130
-
131
-
132
-
133
-
134
-
135
-
136
-
137
-
138
-
139
-
140
-
141
-
142
-
143
-
144
-
145
-
146
-
147
-
148
-
149
-
150
 |
 |
