Dell 1815dn Owners Manual - Page 60
Scanning to the USB Memory Key, Scroll, Select, Scan Setting, Black & White, Color JPEG-200 - manual pdf
 |
UPC - 000061100008
View all Dell 1815dn manuals
Add to My Manuals
Save this manual to your list of manuals |
Page 60 highlights
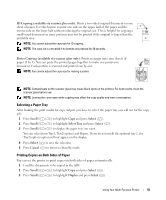
4 Press Scroll ( or ) to highlight PC and press Select ( ). 5 Press Scroll ( or ) to select the registered name you want and press Select ( ). 6 Enter the PIN you have registered and press Select ( ). 7 Press Scroll ( or ) to highlight Scan Setting and press Select ( ). 8 Choose the file type and resolution and then press Select ( ). • Black & White: If you select this option, select file type PDF or TIFF. • Color JPEG-200: If you select this option, 200 dpi resolution and JPEG file type will be automatically selected. • Resolution: Select resolution 100 dpi, 200 dpi or 300 dpi. 9 Press Scroll ( or ) to display Start Scanning and press Select ( ). If you press Select ( ) when the display shows Logout, your printer returns to the upper menu level. 10 The document will be scanned to computer where Network Scan is running. If your file type is TIFF or PDF, the display asks if you want to scan another page. Select Yes using Scroll ( or ) and press Select ( ). The next page is scanned and stored as the second page of the document. Repeat this until all pages are scanned, then select No. 11 After scanning, you will be logged off automatically. Scanning to the USB Memory Key NOTE: A computer connection is not required for scannin to the USB memory key. You can scan a document and save the scanned image on a USB memory key. There are two ways of doing this: you can scan to the USB memory key using the default settings, or you can manually select your own settings. You can also format the USB memory key or check the available memory space. See the User's Guide. 60 Using Your Multi-Function Printer
-
 1
1 -
2
-
3
-
4
-
5
-
6
-
7
-
8
-
9
-
10
-
11
-
12
-
13
-
14
-
15
-
16
-
17
-
18
-
19
-
20
-
21
-
22
-
23
-
24
-
25
-
26
-
27
-
28
-
29
-
30
-
31
-
32
-
33
-
34
-
35
-
36
-
37
-
38
-
39
-
40
-
41
-
42
-
43
-
44
-
45
-
46
-
47
-
48
-
49
-
50
-
51
-
52
-
53
-
54
-
 55
55 -
 56
56 -
 57
57 -
 58
58 -
 59
59 -
 60
60 -
 61
61 -
 62
62 -
 63
63 -
 64
64 -
 65
65 -
66
-
67
-
68
-
69
-
70
-
71
-
72
-
73
-
74
-
75
-
76
-
77
-
78
-
79
-
80
-
81
-
82
-
83
-
84
-
85
-
86
-
87
-
88
-
89
-
90
-
91
-
92
-
93
-
94
-
95
-
96
-
97
-
98
-
99
-
100
-
101
-
102
-
103
-
104
-
105
-
106
-
107
-
108
-
109
-
110
-
111
-
112
-
113
-
114
-
115
-
116
-
117
-
118
-
119
-
120
-
121
-
122
-
123
-
124
-
125
-
126
-
127
-
128
-
129
-
130
-
131
-
132
-
133
-
134
-
135
-
136
-
137
-
138
-
139
-
140
-
141
-
142
-
143
-
144
-
145
-
146
-
147
-
148
-
149
-
150
 |
 |
