Dell 3115cn Color Laser Printer Dell 3115cn User's Guide
Dell 3115cn Color Laser Printer Manual
 |
View all Dell 3115cn Color Laser Printer manuals
Add to My Manuals
Save this manual to your list of manuals |
Dell 3115cn Color Laser Printer manual content summary:
- Dell 3115cn Color Laser Printer | Dell 3115cn User's Guide - Page 1
Dell™ Multifunction Color Laser Printer 3115cn User's Guide Notes, Notices, and Cautions Click the links to the left for information on the features, options, and operation of your multifunction printer. For information on other documentation included with your multifunction printer, see "Finding - Dell 3115cn Color Laser Printer | Dell 3115cn User's Guide - Page 2
1 Optional duplexer 2 Operator panel 7 Transfer belt unit 8 Front cover NOTE: You can open the front cover by pushing the button (right side). 3 Standard 250-sheet tray 4 Optional 550-sheet paper feeder NOTE: Your multifunction printer allows for a maximum of three trays (standard 250-sheet tray, - Dell 3115cn Color Laser Printer | Dell 3115cn User's Guide - Page 3
forbidden. Trademarks used in this text: Dell, the DELL logo and Dell ScanCenter are trademarks of Dell Inc.; Microsoft, Windows, Windows Server, and Windows Vista are either trademarks or registered trademarks of Microsoft Corporation in the United States and/or other countries; Macintosh, MacOS - Dell 3115cn Color Laser Printer | Dell 3115cn User's Guide - Page 4
UNITED STATES GOVERNMENT RESTRICTED RIGHTS This software and documentation are provided in Technical Data and Computer Software clause at DFARS 252.227-7013 and in applicable FAR provisions: Dell Inc., One Dell Way, Round Rock, Texas, 78682, USA. This equipment has been tested and found to comply - Dell 3115cn Color Laser Printer | Dell 3115cn User's Guide - Page 5
looking Find it here for? · Drivers for my multifunction printer · My User's Guide Drivers and Utilities CD The Drivers and Utilities CD contains documentation and drivers for your multifunction printer. You can use the CD to uninstall/reinstall drivers or access your documentation. Readme files - Dell 3115cn Color Laser Printer | Dell 3115cn User's Guide - Page 6
region. Setup diagram Troubleshooting Guide Troubleshooting Guide: - User Settings - Configuration - Troubleshooting Instructions - Others Express Service Code and Service Tag number The Express Service Code and Service Tag numbers are located inside the front door of your multifunction printer. - Dell 3115cn Color Laser Printer | Dell 3115cn User's Guide - Page 7
· Latest drivers for my Dell Support Website multifunction printer · Answers to technical service and support questions · Documentation for my multifunction printer The Dell Support Website provides several online tools, including: · Solutions - Troubleshooting hints and tips, articles from - Dell 3115cn Color Laser Printer | Dell 3115cn User's Guide - Page 8
your Web browser. To launch the Dell Printer Configuration Web Tool , type your network printer's IP address in your Web browser. If you do not know what your printer's IP address is, print a printer settings page, which lists the IP address: 1. Press until >SETUP appears, and then press . 2. 3. - Dell 3115cn Color Laser Printer | Dell 3115cn User's Guide - Page 9
factory default), an IP address has not been assigned. To assign one for your multifunction printer, see "Assign an IP Address ." Use the Dell Printer Configuration Web Tool for: Printer Status Use the Printer Status menu to get immediate feedback on printer supply status. When print cartridge is - Dell 3115cn Color Laser Printer | Dell 3115cn User's Guide - Page 10
feature. Online Help Click Online Help to visit the Dell web page, and see the User's Guide on that page to verify configured settings. Order Supplies at: www.dell.com/supplies Contact Dell Support at: support.dell.com Using the Dell Printer Configuration Web Tool Be sure to activate JavaScript in - Dell 3115cn Color Laser Printer | Dell 3115cn User's Guide - Page 11
NOTE: The Dell Printer Configuration Web Tool pages may be displayed unreadable if you browse the pages that were configured Germany) [de] French (France) [fr] English [en] or English (United States) [en-us] Setting the Printer's IP Address to Non-proxy 1. Select Internet Options from the Tools menu - Dell 3115cn Color Laser Printer | Dell 3115cn User's Guide - Page 12
you select Manual proxy configuration , specify the printer's IP address in the No Proxy for: box. When you have finished setting the language and proxy, type (the printer's IP address) in the URL entry field of the browser to activate the Dell Printer Configuration Web - Dell 3115cn Color Laser Printer | Dell 3115cn User's Guide - Page 13
The interval can be changed in the Basic Information on Print Server Settings page. Help Links to the Dell web page. See the User's Guide on the Dell Support site for help on this product. Printer Bitmap Shows the printer bitmap. The Printer Status menu appears in the Right Frame by clicking the - Dell 3115cn Color Laser Printer | Dell 3115cn User's Guide - Page 14
Print Server Settings menu. Set Password Links to the Other Features menu. Online Help Links to the Dell web page. See the User's Guide on that page. Order Supplies at: Links to the Dell web page. Contact Dell Support at: Links to the Dell support page. Web address: http://support.dell.com - Dell 3115cn Color Laser Printer | Dell 3115cn User's Guide - Page 15
the screen. Type a user name and password for the printer's administrator by following the prompts displayed in the dialog box. The default user name is admin , and the default password is left blank (NULL). You can change only the password in the Set Password page in the Print Server Settings menu - Dell 3115cn Color Laser Printer | Dell 3115cn User's Guide - Page 16
Fuser " "Auto Registration Adjustment " "Color Registration Adjustments " "Adjust Altitude " "Reset Defaults " "Clear Storage "*1 "Non-Dell Toner " "Initialize PrintMeter " "Clock Settings " "Web Link Customization " "Print Server Settings " "Print Server Reports " "Print Server Setup Page - Dell 3115cn Color Laser Printer | Dell 3115cn User's Guide - Page 17
Printer Settings " "Copy Printer Settings " "Copy Printer Settings Report " "Print Volume " "Print Volume " "Dell ColorTrack " "Address Book " "E-Mail Address " "Server Address - Top Page printer adapter is installed. *4 This item is only available with the printer using the PostScript driver - Dell 3115cn Color Laser Printer | Dell 3115cn User's Guide - Page 18
the type of printing for the multifunction printer. Color Laser is displayed normally. Printing Speed Displays the printing speed for the multifunction printer. Printer Events Purpose: When printer faults occur such as running out of paper or running out of print cartridge , the details of - Dell 3115cn Color Laser Printer | Dell 3115cn User's Guide - Page 19
software version. This page can also be displayed by clicking Printer Information in the Left Frame. Values: Dell Service Tag Number Displays Dell's service tag number. Asset Tag Number Displays the printer's asset tag number. Printer Serial Number Displays the printer's serial number. Memory - Dell 3115cn Color Laser Printer | Dell 3115cn User's Guide - Page 20
the status of the host interface. Job Submitted Time Displays the date the print job was submitted. Printer Settings Use the Printer Settings menu to display the printer settings report and to configure printer settings. The following tabbed pages are displayed at the top of the Right Frame - Dell 3115cn Color Laser Printer | Dell 3115cn User's Guide - Page 21
Power Saver Timer Mode 2 Displays the amount of time before the multifunction printer enters the power saver timer mode 2 after it finishes a print job. Auto Reset Displays the amount of time before the printer is reset. Panel Select Tone Displays the selected tone for the panel. Panel Alert - Dell 3115cn Color Laser Printer | Dell 3115cn User's Guide - Page 22
ID Displays a location where the user ID is printed. Print Text Displays whether the multifunction printer outputs PDL (Page Description Language) data, which is not supported by the multifunction printer, as text when the multifunction printer receives it Banner Sheet Displays the position - Dell 3115cn Color Laser Printer | Dell 3115cn User's Guide - Page 23
lock Admin menu with a password. Copy/Scan/Fax Displays whether or not to lock Copy , Scan , or Fax menus with a Set password. Secure Receive Displays whether or not to require the password for printing Set received fax documents. Copy Defaults Color Prints in the Color or Black&White mode - Dell 3115cn Color Laser Printer | Dell 3115cn User's Guide - Page 24
. LongEdgeBinding Uses for long-edge binding when you perform duplex printing. ShortEdgeBinding Uses for short-edge binding when you perform duplex printing. Multiple-Up Off* Does not perform multiple-up printing. Auto Automatically reduces the original pages to fit onto one sheet of paper. - Dell 3115cn Color Laser Printer | Dell 3115cn User's Guide - Page 25
Scan Defaults Send to Client ID Copy Prints the original pages onto one sheet of paper in the original size. Manual Prints the original pages inch) The default is 5 mm. 0-50 mm (0.0-2.0 Displays the size of the middle margin. The inch) default is 10 mm. Server Stores the scanned image on - Dell 3115cn Color Laser Printer | Dell 3115cn User's Guide - Page 26
. TIFF NonComp *3 Saves the scanned copy in TIFF NonComp. Color Color* Prints in the color mode. Black&White Prints in the black and white mode. Resolution 150* Scans an image in 150 dpi. 300 Scans an image in 300 dpi. 400 Scans an image in 400 dpi. 600 Scans an image in 600 dpi - Dell 3115cn Color Laser Printer | Dell 3115cn User's Guide - Page 27
TIFF V6* TTN2 Image Compression Lower Normal* Higher Max E-Mail Size 50-16384 Fax Defaults Resolution Standard* Works well with light print or faint pencil markings. Works well with dark print. Adjusts sharpness of color to make the copy softer than the original. Does not adjust sharpness of - Dell 3115cn Color Laser Printer | Dell 3115cn User's Guide - Page 28
, 0-9. If you enter 0, the multifunction printer will not redial. The default is 3. Interval of Redial Automatically redials a remote fax machine if it was busy. Intervals from 1-15 minutes can be entered. The default is 1min. Answer Select Selects the default fax receiving mode. · TEL Mode - Dell 3115cn Color Laser Printer | Dell 3115cn User's Guide - Page 29
for the incoming faxes. Line Type PSTN* Sets PSTN (Public Switched Telephone Network) as the line type. PBX Sets PBX (Private Branch Exchange) as the line type. Dialing Type PB* Sets PB (Push Button) as the dial type. DP (10PPS) Sets "DP (10PPS)" (Dial Pulse, 10 Pulse Per Second) as the - Dell 3115cn Color Laser Printer | Dell 3115cn User's Guide - Page 30
when an error occurs. Trans. Always. Always forwards the incoming faxes. Not Trans.* Does not forward the incoming faxes. Forward Displays the Forward Settings number. Settings Number Forward Set On Print Prints the ongoing faxes when you can set the multifunction printer to forward the - Dell 3115cn Color Laser Printer | Dell 3115cn User's Guide - Page 31
color or black and white when sending a fax). Off* Faxes are sent and received in black and white only. Extel Hook Thresh Lower Normal* Sets Lower in the threshold value. Sets Normal in the threshold value. Higher Sets Higher in the threshold value. Fwd. Error Print On* Prints documents - Dell 3115cn Color Laser Printer | Dell 3115cn User's Guide - Page 32
Adjust Altitude Adjust Altitude Displays whether to adjust the height of the installation location of the printer. Non-Dell Toner Non-Dell Toner Displays whether to use a refilled print cartridge. Clock Settings Date Format Specifies the date format. Time Format Specifies the time format in - Dell 3115cn Color Laser Printer | Dell 3115cn User's Guide - Page 33
ColorTrack , and Tray Settings menus on the Dell Printer Configuration Web Tool are discarded if they are made while the multifunction printer in power saver mode. Exit the mode to change the settings. *2 This item is only available when the optional duplexer is installed. *3 This item is only - Dell 3115cn Color Laser Printer | Dell 3115cn User's Guide - Page 34
button to print the fax activity report. Fax Pending Click the Start button to print the pending faxes report. Printer Settings The Printer Settings tab includes System Settings , Parallel Settings , Network Settings, USB Settings , PCL Settings , PS Settings , and Secure Settings pages. System - Dell 3115cn Color Laser Printer | Dell 3115cn User's Guide - Page 35
screen. Auto Log Print Specifies whether the multifunction printer outputs logs automatically. Print ID Specifies a location where the user ID is printed. Print Text Specifies whether the multifunction printer outputs PDL data, which is not supported by the multifunction printer, as text when - Dell 3115cn Color Laser Printer | Dell 3115cn User's Guide - Page 36
parallel interface. Adobe Protocol Specifies PostScript communication protocol for each interface. Network Settings Purpose: To Specify the PostScript communication protocol for this multifunction printer. Values: Adobe Protocol Specifies PostScript communication protocol for each interface. USB - Dell 3115cn Color Laser Printer | Dell 3115cn User's Guide - Page 37
sent to the multifunction printer is printed in hexadecimal and character representation. Control codes are not executed. Draft Mode Specifies whether to print in the draft mode. Line Termination Sets the line termination. Default Color Specifies the color mode to Color or Black . This setting - Dell 3115cn Color Laser Printer | Dell 3115cn User's Guide - Page 38
. Set the password of the Dell Printer Configuration Web Tool from Set Password in Print Server Settings . Values: Panel Lock Copy/Scan/Fax Lock Secure Receive Panel Lock Set New Password Re-enter Password Copy/Scan/Fax Set New Password Re-enter Password Secure Receive Set New Password Re-enter - Dell 3115cn Color Laser Printer | Dell 3115cn User's Guide - Page 39
Color Prints in the Color or Black&White mode. Input Tray The paper is fed from the Dell Printer Configuration Web Tool are discarded if they are made while the multifunction printer in power saver mode. Exit the mode to change the settings. Copy Color Balance Purpose: To set the Copy color - Dell 3115cn Color Laser Printer | Dell 3115cn User's Guide - Page 40
Uses for long-edge binding when you perform duplex printing. Uses for short-edge binding when you perform duplex printing. Does not perform multiple-up printing. Automatically reduces the original pages to fit onto one sheet of paper. Prints the original pages onto one sheet of paper in the original - Dell 3115cn Color Laser Printer | Dell 3115cn User's Guide - Page 41
is only available when the optional duplexer is installed. *2 This item is only available when the optional memory card is set to on. Scan Defaults Purpose: To create your own default Scan settings. Values: Send to Client Network Port File Format Server Stores the scanned image on the server by - Dell 3115cn Color Laser Printer | Dell 3115cn User's Guide - Page 42
1 Normal* Darker1 Darker2 Darker3 Lighter3 Lighter2 Lighter1 Softer Normal* Sharper Normal* Prints in the color mode. Prints in the black and white mode. Scans an image in 150 dpi. Scans an image in 300 dpi. Scans an image in 400 dpi. Scans an image in 600 dpi. Uses for documents with both text and - Dell 3115cn Color Laser Printer | Dell 3115cn User's Guide - Page 43
" and Legal documents. Fax Defaults Purpose: To create your own default Fax settings. Values: Resolution Standard* For documents with normal sized characters. Fine For documents containing small characters or thin lines or documents printed using a dot-matrix printer. SuperFine For documents - Dell 3115cn Color Laser Printer | Dell 3115cn User's Guide - Page 44
Fax Settings Purpose: To confirm the Fax settings. Values: Works well with light print or faint pencil markings. Works well with dark print. Saves scanned you enter 0, the multifunction printer will not redial. The default is 3. Interval of Redial Automatically redials a remote fax machine if it - Dell 3115cn Color Laser Printer | Dell 3115cn User's Guide - Page 45
by pressing the remote receive code on the external telephone. Remote Receive Tone Duplex Print* 1 Specifies the tone when Remote Receive is set to On. On Uses duplex printing when you receive a fax. Send Header On Creates cover pages for the faxes. Send Header Name Includes the header name - Dell 3115cn Color Laser Printer | Dell 3115cn User's Guide - Page 46
The Printer Maintenance tab includes Paper Density , Adjust BTR , Adjust Fuser , Auto Registration Adjustment , Color Registration Adjustments , Adjust Altitude , Reset Defaults , Clear Storage , Non-Dell Toner , Initialize PrintMeter , Clock Settings, and Web Link Customization pages. Paper - Dell 3115cn Color Laser Printer | Dell 3115cn User's Guide - Page 47
Thick Sets the temperature settings for the fuser unit for thick coated paper. Envelope Sets the temperature settings for the fuser unit for envelopes. Auto Registration Adjustment Purpose: Specifies whether to adjust the color registration automatically. Values: Auto Registration Adjustment - Dell 3115cn Color Laser Printer | Dell 3115cn User's Guide - Page 48
After executing this function and rebooting the multifunction printer, all the menu parameters are reset to their default values. Values: Reset Defaults and restart printer. Click Start to initialize the non-volatile memory (NVM) memory. Reset Defaults User Section Click Start to initialize the - Dell 3115cn Color Laser Printer | Dell 3115cn User's Guide - Page 49
NonDell Toner Overrides factory print cartridge setting. Non-Dell-brand print cartridges may disable some printer features, reduce print quality and reduce the reliability of your multifunction printer. Dell recommends only new Dell-brand print cartridges for your multifunction printer. Dell does - Dell 3115cn Color Laser Printer | Dell 3115cn User's Guide - Page 50
dell.com Print Server Settings Use the Print Server Settings menu to set the type of printer interface and necessary conditions for communications. The following tabbed pages are displayed in the top of the Right Frame. Print Server Reports The Print Server Reports tab includes Print Server Setup - Dell 3115cn Color Laser Printer | Dell 3115cn User's Guide - Page 51
the stateless addresses. 1-3 Link Local Address Displays the link local address. Manual Gateway Address Displays the gateway address. Auto Configure Gateway Address Displays the gateway WINS Mode Displays the setting of how to get the WINS (Windows Internet Name Service) server address. - Dell 3115cn Color Laser Printer | Dell 3115cn User's Guide - Page 52
number. Connection Time-Out Displays the connection timeout period. Port Status Displays the IPP (Internet Printing Protocol) port status. Printer URI Displays the printer URI (Uniform Resource Identifier). Connection Time-Out Displays the connection timeout period. Port Number Displays - Dell 3115cn Color Laser Printer | Dell 3115cn User's Guide - Page 53
Support Auto Master Mode Encrypt Password Job Time-Out Connection Time-Out AppleTalk * 3 Port Status Printer AppleTalk Zone AppleTalk Type Delay Start Time Bonjour (mDNS) * 3 Port Status Host Name Printer Name SNMP Agent Port Status Trap Notification 1-4 Authenticate Error Trap Scan - Dell 3115cn Color Laser Printer | Dell 3115cn User's Guide - Page 54
to change the settings, go to the pages in the Print Server Settings tab. Values: IPX/SPX Settings NetWare Frame Type Displays the active frame type. Current Frame Displays the current frame type. Type Network Address Displays the IPX/SPX network address. Port Status Displays the port status - Dell 3115cn Color Laser Printer | Dell 3115cn User's Guide - Page 55
Setup Page Purpose: To verify the current settings of SMTP/POP (Simple Mail Transfer Protocol/Post Office Protocol) used for the e-mail feature and E-Mail Alerts feature. In this page, you can only verify the settings of items. If you want to change the settings, go to the pages in the Print EMail - Dell 3115cn Color Laser Printer | Dell 3115cn User's Guide - Page 56
center up to 63 alphanumeric characters. Administrator EMail Address Specifies the contact address of the printer administrator and service center up to 63 alphanumeric characters. Asset Tag Number Enter the asset tag number for the multifunction printer. EWS Settings Auto Refresh On Refreshes - Dell 3115cn Color Laser Printer | Dell 3115cn User's Guide - Page 57
Duplex as the default value. Half-Duplex 100BASE-TX Selects 100Base-T Full-Duplex as the default value. Full-Duplex Current Ethernet Settings Displays the current settings of Ethernet. MAC Address Displays the printer's MAC to enable the SNMP (Simple Network Management Protocol). You can also - Dell 3115cn Color Laser Printer | Dell 3115cn User's Guide - Page 58
be valid only when the multifunction printer is rebooted. When you change or configure the settings, click the Restart printer to apply new settings button to apply new settings. Wireless LAN Purpose: To configure the detailed setting for the wireless network. Wireless Settings SSID Specifies the - Dell 3115cn Color Laser Printer | Dell 3115cn User's Guide - Page 59
or semicolon. IPv4 Get DNS Server Select the check box to get the DNS server address Address from automatically from the DHCP server. DHCP Manual DNS Sets the DNS server address. Server Address IPv6 Get DNS Server Select the check box to get the DNS server address Address from automatically - Dell 3115cn Color Laser Printer | Dell 3115cn User's Guide - Page 60
settings, click IP Filter . The IP Filter page is displayed. IPP * 1 Printer URI Displays the printer URI. Connection Time-Out Sets the connection number of TTL from 1 to 10. Maximum Number of Notification Sets the maximum number of notifications from 10 to 20. HTTP Port Number Sets - Dell 3115cn Color Laser Printer | Dell 3115cn User's Guide - Page 61
whether to enable or disable the password. And also specifies the password value up to 7 characters. Connection Network Address Displays the IPX network address. NetWare Device Name *1 Specifies the printer name up to 47 alphanumeric characters. For PServer Mode, set the Print Server Name (Print - Dell 3115cn Color Laser Printer | Dell 3115cn User's Guide - Page 62
packet burst. Does not use NCP packet burst. Password Sets the print server password up to 32 alphanumeric characters. Configure this item settings in the NetWare page will be valid only when NetWare or the multifunction printer is rebooted. Click the Restart printer to apply new settings button - Dell 3115cn Color Laser Printer | Dell 3115cn User's Guide - Page 63
no input is made. The default name is admin . Administrator Password Specifies the administrator password up to 14 alphanumeric characters. NOTE: The settings in the SMB page will be valid only when the multifunction printer is rebooted. Click the Restart printer to apply new settings button to - Dell 3115cn Color Laser Printer | Dell 3115cn User's Guide - Page 64
Printer Specifies the printer name in the AppleTalk network the AppleTalk page. E-Mail Alert Purpose: To configure detailed settings for E-Mail Alert. This page can also , separate them using commas. POP User Password* 1 Specifies the POP3 account password up to 31 alphanumeric characters. Reply - Dell 3115cn Color Laser Printer | Dell 3115cn User's Guide - Page 65
handling. Service Call Select the check box to receive an E-Mail Alert for Service Calls. printer name up to 63 alphanumeric characters and symbol sets. The original setting will remain valid if no input is made. NOTE: An optional multi-protocol card is required to display the Bonjour (mDNS) page - Dell 3115cn Color Laser Printer | Dell 3115cn User's Guide - Page 66
llll format. IP network nnnnnnnn is a Error Trap. *1 The default value of each items can be changed by using Dell Printer Configuration Web Tool. *2 An optional multi-protocol card is required to display the item. Scan to PC Purpose: To specify the client when scanning data. Values: Scan - Dell 3115cn Color Laser Printer | Dell 3115cn User's Guide - Page 67
printing from specified network address. Permit Permits printing from specified network field. "* " is appended to the current value. Setup Procedure You can set up to a maximum of Printing From a Specified User The following describes the procedure to enable printing only from the "192.168.100.10 - Dell 3115cn Color Laser Printer | Dell 3115cn User's Guide - Page 68
The Other Features tab includes Set Password , Security , IPsec and Reset Print Server pages. Set Password Purpose: To set or change the password that is required to access the printer setup parameters from the Dell Printer Configuration Web Tool . Set the password of the operator panel from Panel - Dell 3115cn Color Laser Printer | Dell 3115cn User's Guide - Page 69
the password up to 10 alphanumeric characters. The password will appear as asterisks (*) in the field when it is entered. Confirm Administrator Enter the password again to confirm it. Password Security Purpose: To specify the settings for the SSL encryption communication to the multifunction printer - Dell 3115cn Color Laser Printer | Dell 3115cn User's Guide - Page 70
and reboot the multifunction printer. You can also initialize the printer's NVRAM from Reset Defaults in the Printer Settings menu. Values: Initialize NIC NVRAM Click the Start button to initialize NVRAM. Network settings will revert to Memory and restart printer the factory default settings and - Dell 3115cn Color Laser Printer | Dell 3115cn User's Guide - Page 71
Scan Defaults Fax Defaults Fax Settings Clock Settings Address Book Copy Printer Settings Purpose: To copy the printer settings to one or more of the same model of the multifunction printer. To copy the settings to another printer, specify the IP address and password of the printer to which the - Dell 3115cn Color Laser Printer | Dell 3115cn User's Guide - Page 72
E-Mail Address, E-Mail Group, and Default Setup. Values: E-Mail Address Registers a new user in E-Mail Address. E-Mail Group Registers a maximum of 10 users in the group. Default Setup Creates your own default settings for E-Mail Address. E-Mail Address - Top Page Purpose: To view your own - Dell 3115cn Color Laser Printer | Dell 3115cn User's Guide - Page 73
address. Press this button to apply the specified settings. Press this button to restore the previous settings. Press this button to return to the top page where the user belongs. Default Setup Purpose: To create your own default settings for E-Mail Address. Values: - Dell 3115cn Color Laser Printer | Dell 3115cn User's Guide - Page 74
Default Subject Enter the subject of e-mail. Body Text Enter the body text of e-mail. Apply New Settings Press this button to apply the specified settings. Restore Settings Press this button to restore the previous settings. Server Address - Top Page user names. Displays user names registered - Dell 3115cn Color Laser Printer | Dell 3115cn User's Guide - Page 75
SMB protocol to store the scanned image on the computer. Server Address Displays the server address. Server Port Number Displays the server port number. If this option is left black, the default is used. Login Name Displays the login name. Login Password Enable Password Check this option to - Dell 3115cn Color Laser Printer | Dell 3115cn User's Guide - Page 76
button to apply the specified settings. Restore Settings Press this button to restore the previous settings. Back Press this button to return to the top page where the user belongs. FAX Group - Top Page Purpose: To displays fax groups. Values: - Dell 3115cn Color Laser Printer | Dell 3115cn User's Guide - Page 77
this button to return to the top page where the user belongs. Print Volume The Printer Volume menu includes the Print Volume and Dell ColorTrack pages. Print Volume Purpose: To verify the number of printed pages. This page can also be displayed by clicking Print Volume in the Left Frame. Values: - Dell 3115cn Color Laser Printer | Dell 3115cn User's Guide - Page 78
total number of pages printed since the multifunction printer was shipped from the factory. Displays the number of pages for each paper size. Dell ColorTrack Purpose: To specify which users have access to color printing and to limit print volume per user. Values: Print User Limitation Select the - Dell 3115cn Color Laser Printer | Dell 3115cn User's Guide - Page 79
the user registration number. User Name Edits the user name. Password Registers the password. Color Mode Limitation Selects the color mode. Upper Limit for Color Print Type the number of pages for color print. Cumulative Color Page Count Counts and displays the color pages cumulatively - Dell 3115cn Color Laser Printer | Dell 3115cn User's Guide - Page 80
About Your Multifunction Printer Automatic Document Feeder (ADF) Operator Panel Power Saver Mode2 The following illustrations show the standard Dell™ Multifunction Color Laser Printer 3115cn, with an optional 550-sheet paper feeder and duplex module. - Dell 3115cn Color Laser Printer | Dell 3115cn User's Guide - Page 81
1 Optional duplexer 5 Optional 550-sheet paper feeder NOTE: Your multifunction printer allows for a maximum of three trays (standard belt unit 9 Automatic Document Feeder (ADF) NOTE: When you use the multifunction printer with the multipurpose feeder opened, do not locate the multifunction printer - Dell 3115cn Color Laser Printer | Dell 3115cn User's Guide - Page 82
2 Document Guides 3 Document Feeder Tray 4 Document Feeder Glass Operator Panel For details on the operator panel, see "Operator Panel" Power Saver Mode2 The scan lamp under time for which the scan lamp waits after a scan job is completed before it switches to the Power Saver Mode2. 1. Press - Dell 3115cn Color Laser Printer | Dell 3115cn User's Guide - Page 83
1. 2. Press until >Admin Menu appears, and then press . 3. Press until System Settings appears, and then press . 4. Press until >Power Saver Mode2 appears, and then press . 5. Press to select - Dell 3115cn Color Laser Printer | Dell 3115cn User's Guide - Page 84
protect the drums of the print cartridges against bright light, close the front cover within five minutes. If the front cover remains open for more than five minutes, print quality may deteriorate. NOTICE: Ensure nothing touches or scratches the surface (black-colored film) of the transfer belt unit - Dell 3115cn Color Laser Printer | Dell 3115cn User's Guide - Page 85
3. Remove the seals over the levers at both ends of the fuser unit, and then pull the tag to remove the seal from the fuser unit. NOTE: Ensure to lock both levers at ends of the fuser unit, after removing the seal. 4. Hold one print cartridge firmly and shake it five or six times to distribute the - Dell 3115cn Color Laser Printer | Dell 3115cn User's Guide - Page 86
from its packaging. NOTE: To protect the drum against bright light, do not remove the orange protective cover of the print cartridge before the cartridge is inserted into its slot in the multifunction printer. 6. Completely remove the seal from the print cartridge by pulling the tab on the end of - Dell 3115cn Color Laser Printer | Dell 3115cn User's Guide - Page 87
8. Repeat steps 4, 5, 6, and 7 to install the other print cartridges. 9. Remove the orange protective covers of the each of the installed print cartridges. 10. After installing all of the print cartridges, close the front cover. - Dell 3115cn Color Laser Printer | Dell 3115cn User's Guide - Page 88
- Dell 3115cn Color Laser Printer | Dell 3115cn User's Guide - Page 89
Choosing the Right Cable Connecting the Multifunction Printer Locally Connecting the Multifunction Printer to the Network Connecting the Telephone Line Choosing the Right Cable Your Dell™ Multifunction Color Laser Printer 3115cn interconnection cable must meet the following requirements: Connection - Dell 3115cn Color Laser Printer | Dell 3115cn User's Guide - Page 90
adapter socket 5 Parallel port 6 USB port Connecting the Multifunction Printer Locally A local printer is a printer attached to your computer using a USB or parallel cable. If your multifunction printer is attached to a network instead of your computer, skip this step and go on to "Connecting - Dell 3115cn Color Laser Printer | Dell 3115cn User's Guide - Page 91
Multifunction Printer to the Network." Microsoft® Windows® 2000, Windows XP, Windows Server® 2003, Windows Server 2008, Windows XP 64-bit Edition, Windows Server 2003 Enterprise x64 Edition, Windows Server 2008 Enterprise x64 Edition, Windows Vista® and Mac® OS X or later operating systems support - Dell 3115cn Color Laser Printer | Dell 3115cn User's Guide - Page 92
, be sure to release the carriage lock of the scanner. NOTE: If you use the optional duplexer, remove the protection film attached to the transfer belt unit of the duplexer. For details, see "Installing a Duplexer". NOTE: When you are moving the multifunction printer or do not intend to use it for - Dell 3115cn Color Laser Printer | Dell 3115cn User's Guide - Page 93
you must install the Multi-Protocol Card first. To install the card, see "Installing the Dell Multi-Protocol Card". 1 Ethernet port 2 Optional wireless printer adapter socket To connect the multifunction printer to the network, plug one end of an Ethernet cable into the Ethernet port on the back of - Dell 3115cn Color Laser Printer | Dell 3115cn User's Guide - Page 94
Press until >SETUP appears, and then press . 2. Press until >Reports appears, and then press . 3. System Settings is displayed. Press . The system settings page is printed. 4. If the IP address shows anything other than 0.0.0.0 (the factory default) or 169.254.xx.xx, the multifunction printer has an - Dell 3115cn Color Laser Printer | Dell 3115cn User's Guide - Page 95
NOTE: When you assign an IP address manually in IPv6 Mode, use the Dell Printer Configuration Web Tool. To open the Dell Printer Configuration Web Tool, use the link local address. (To check a link local address, see "Print and Check the System Settings Page".) An IP address is a unique number that - Dell 3115cn Color Laser Printer | Dell 3115cn User's Guide - Page 96
drivers with installer. When you use the Network Installation feature, and the Get IP Address is set to AutoIP on the operator panel menu, you can set the IP address from 0.0.0.0 to the desired IP address on the printer selection window. Verify the IP Settings 1. Print another system settings page - Dell 3115cn Color Laser Printer | Dell 3115cn User's Guide - Page 97
2. To connect a telephone and/or answering machine to your multifunction printer, plug the telephone or answering machine line cord into the Phone connector ( ). If the phone communication is serial in your country (such as Germany, Sweden, - Dell 3115cn Color Laser Printer | Dell 3115cn User's Guide - Page 98
- Dell 3115cn Color Laser Printer | Dell 3115cn User's Guide - Page 99
Enterprise Console Management Modules The following enterprise console management modules and user's manuals are available on your Drivers and Utilities CD: IBM Tivoli® NetView® CA Unicenter® HP OpenView® To use the modules, go to the following directory on your CD and run each . - Dell 3115cn Color Laser Printer | Dell 3115cn User's Guide - Page 100
Installing a Duplexer Installing a Memory Card Installing the Dell Multi-Protocol Card Installing the Dell Wireless Printer Adapter 3310 USB Installing the Optional 550-Sheet Paper Feeder CAUTION: If you are adding an optional 550-sheet paper feeder after setting up the multifunction printer, be - Dell 3115cn Color Laser Printer | Dell 3115cn User's Guide - Page 101
4. Lift the multifunction printer and align the four guide pins of the 550-sheet paper feeder with the holes at the bottom of the multifunction printer. Gently lower the multifunction printer onto the optional 550sheet paper feeder. CAUTION: To lift the multifunction printer safely, lift it with two - Dell 3115cn Color Laser Printer | Dell 3115cn User's Guide - Page 102
6. Join the optional 550-sheet paper feeder and the multifunction printer by tightening the two screws provided with the feeder with a coin or similar object. 7. Insert the tray into the multifunction printer, and push until it stops. - Dell 3115cn Color Laser Printer | Dell 3115cn User's Guide - Page 103
8. Turn on the multifunction printer. NOTE: The multifunction printer will automatically detect the attached tray but will not detect the paper type. 9. Print a system settings page to verify that the optional 550-sheet paper feeder is installed correctly. a. Press until >SETUP appears, and then - Dell 3115cn Color Laser Printer | Dell 3115cn User's Guide - Page 104
Apply , and then click OK . 5. Close the Printers dialog box. Windows® XP, Windows XP 64-bit Edition, Windows Server® 2003, Windows Server 2003 Enterprise x64 Edition 1. Click Start Printers and Faxes . 2. Right-click the multifunction printer and select Properties . 3. Click the Options tab, and - Dell 3115cn Color Laser Printer | Dell 3115cn User's Guide - Page 105
, and then click OK . 5. Close the Printers dialog box. Windows XP, Windows XP 64-bit Edition, Windows Server 2003, Windows Server 2003 Enterprise x64 Edition 1. Click Start Printers and Faxes . 2. Right-click the multifunction printer that is using the PS driver, and then select Properties from the - Dell 3115cn Color Laser Printer | Dell 3115cn User's Guide - Page 106
Center (or Printer Setup Utility ) menu bar, and select Show Info . 3. Select Installable Options , and select the options that have been installed on the multifunction printer, and then click Apply Changes . Installing a Duplexer NOTICE: To protect the drums of the print cartridges against bright - Dell 3115cn Color Laser Printer | Dell 3115cn User's Guide - Page 107
or scratches the surface (black-colored film) of the transfer belt unit. Scratches, dirt, or oil from your hands on the film of the transfer belt unit may reduce print quality. 1. Ensure that the multifunction printer is turned off. 2. Remove all packaging from duplex module. 3. Push the button - Dell 3115cn Color Laser Printer | Dell 3115cn User's Guide - Page 108
5. Remove the connector cap. NOTE: The connector cap in your printer may look different from illustration. 6. With the connector of the duplexer toward the slot, push the duplexer into the slot. - Dell 3115cn Color Laser Printer | Dell 3115cn User's Guide - Page 109
6. NOTE: Ensure that the duplexer is correctly connected to the multifunction printer with connectors and cannot be moved easily. 7. Close the transfer belt unit by pulling it down. - Dell 3115cn Color Laser Printer | Dell 3115cn User's Guide - Page 110
8. Close the front cover. 9. Turn on the multifunction printer. 10. Print a system settings page to verify that the optional duplexer is installed correctly. a. Press until >SETUP appears, and then press . b. - Dell 3115cn Color Laser Printer | Dell 3115cn User's Guide - Page 111
you installed the optional duplexer after installing the printer driver, update your driver by following the instructions for each operating system. If the multifunction printer is on a network, update the driver for each client. When Using PCL Driver Microsoft® Windows Vista® 1. Click Start Control - Dell 3115cn Color Laser Printer | Dell 3115cn User's Guide - Page 112
tab, and then select Available for the Duplexer item under Installable Options . 4. Click Apply , and then click OK . 5. Close the Printers dialog box. Windows XP, Windows XP 64-bit Edition, Windows Server 2003, Windows Server 2003 Enterprise x64 Edition 1. Click Start Printers and Faxes . 2. 3. - Dell 3115cn Color Laser Printer | Dell 3115cn User's Guide - Page 113
Available for the Duplexer item under Installable Options . 4. Click OK . 5. Close the Printers dialog box. Mac OS X 1. Select the multifunction printer from the Printer List screen in Print Center (or Printer Setup Utility ). 2. Click Printers on the Print Center (or Printer Setup Utility ) menu - Dell 3115cn Color Laser Printer | Dell 3115cn User's Guide - Page 114
Installing a Memory Card Your multifunction printer supports 256 MB, 512 MB, and 1024 MB additional memory cards. 1. Ensure that the multifunction printer is turned off. 2. Turn the screw on the control board cover in a counter-clockwise direction and open the cover. 3. With the connector of the - Dell 3115cn Color Laser Printer | Dell 3115cn User's Guide - Page 115
5. Pivot the memory card downward until it clicks into place. NOTE: Ensure that the memory card is firmly fixed in the slot and cannot be moved easily. 6. Close the control board cover and turn the screw clockwise. - Dell 3115cn Color Laser Printer | Dell 3115cn User's Guide - Page 116
the additional print memory after installing the printer driver, update your driver by following the instructions for the operating system you are using. If the multifunction printer is on a network, update the driver for each client. When Using PCL Driver Microsoft® Windows Vista® 1. Click - Dell 3115cn Color Laser Printer | Dell 3115cn User's Guide - Page 117
4. 5. Windows® XP, Windows XP 64-bit Edition, Windows Server® 2003, Windows Server 2003 Enterprise x64 Edition 1. Click Start Printers and Faxes . 2. Right-click the multifunction printer and select Properties . 3. Click the Options tab, and then select Get Information from Printer . 4. Click Apply - Dell 3115cn Color Laser Printer | Dell 3115cn User's Guide - Page 118
, and then click OK . 5. Close the Printers dialog box. Windows XP, Windows XP 64-bit Edition, Windows Server 2003, Windows Server 2003 Enterprise x64 Edition 1. Click Start Printers and Faxes . 2. Right-click the multifunction printer that is using the PS driver, and then select Properties from the - Dell 3115cn Color Laser Printer | Dell 3115cn User's Guide - Page 119
/2000/ NT 4.0 IPX/SPX NetWare 3.12/3.2/4.1/4.11/4.2/5/6/6.5* AppleTalk Mac OS X 10.2.8/10.3.9/10.4.3 Bonjour Mac OS X 10.2.8/10.3.9/10.4.3 IPv6 Windows Vista *Only compatible with Support Pack 1.1 or later. 1. Ensure that the multifunction printer is turned off and unplug all cables including - Dell 3115cn Color Laser Printer | Dell 3115cn User's Guide - Page 120
3. With the connector of the multi-protocol card aligned over the mating connector on the control board, make connections together by pressing on the back of the MPC card nearest the connecter pins. 4. Press the printed circles with your fingers to secure the multi-protocol card to the connector. - Dell 3115cn Color Laser Printer | Dell 3115cn User's Guide - Page 121
NOTE: Avoid pressing down on the multi-protocol card's connector. NOTE: Ensure that the multi-protocol card is firmly fixed in the connector and cannot be moved easily. 5. Insert the two screws through the control board case and into the Multi-Protocol Card as shown, and tighten the screws. 6. Close - Dell 3115cn Color Laser Printer | Dell 3115cn User's Guide - Page 122
Multi-Protocol Card 1. Print a printer settings page to verify that the optional multi-protocol card is installed correctly. a. Press until >SETUP appears, and then 11b mode: 11, 5.5, 2, 1 Mbps Device Type Wireless Printer Adapter Security 64(40-bit key)/128(104-bit key) WEP Encryption/WPA/WAP2 - Dell 3115cn Color Laser Printer | Dell 3115cn User's Guide - Page 123
card first. To install the card, see "Installing the Dell Multi-Protocol Card ". 1. Ensure that the multifunction printer is turned off and unplug all cables including the power cord from the rear of the multifunction printer. NOTE: Ensure that the multi-protocol card is installed. 2. Remove - Dell 3115cn Color Laser Printer | Dell 3115cn User's Guide - Page 124
you are using Microsoft® Windows® XP, Windows 2000, Windows Server® 2003, Windows Server® 2008, or Windows Vista® Case Installation of the printer driver on an existing wirelessly connected Dell Multifunction Color Laser 2: Printer 3115cn Case Construct new wireless network environment for both - Dell 3115cn Color Laser Printer | Dell 3115cn User's Guide - Page 125
of your network printer. 1. Insert the Drivers and Utilities CD into the computer. NOTE: If the CD does not automatically launch, click Start Run , type D:\Setup.exe (where D is the drive letter of your CD), and then click OK . NOTE: For Windows Vista, click Continue when the User Account Control - Dell 3115cn Color Laser Printer | Dell 3115cn User's Guide - Page 126
3. Connect a USB cable from the Dell MFP Laser 3115cn to your computer. NOTE: When the Found New Hardware Wizard dialog box appears, press Cancel to continue. 4. Select Configure Wireless Printer using a USB connection to setup the wireless protocol on the printer. 5. - Dell 3115cn Color Laser Printer | Dell 3115cn User's Guide - Page 127
5. When this instruction screen appears, follow the instructions to reset the wireless settings on the printer. 6. Click OK when you are done. NOTE: When the Found New Hardware Wizard dialog box appears, press Cancel to continue. 7. - Dell 3115cn Color Laser Printer | Dell 3115cn User's Guide - Page 128
see any printer listed, click on Update to search for the printer. If you are still unable to see a printer listed in the Printer text box, in your wireless router. 10. If you are using WEP or WPA-PSK security in your wireless router, enter the Index , Protocol , and Password information. NOTE: To - Dell 3115cn Color Laser Printer | Dell 3115cn User's Guide - Page 129
12. You can change the Printer Name and driver setup according to your requirement. When you select the Fixed IP option button for IP Address assignment , click Change... and enter the IP address and subnet - Dell 3115cn Color Laser Printer | Dell 3115cn User's Guide - Page 130
14. Select the different printer software to install. 15. Click Install when you are done. 16. When you see the Wireless configuration is now complete screen, you have successfully configured the wireless setting on your printer. 17. - Dell 3115cn Color Laser Printer | Dell 3115cn User's Guide - Page 131
, click Update . 19. Click Install to continue. NOTE: If you are unable to locate an IP Address for your printer, check that you have disabled the Windows Firewall on your computer, and that your computer is properly connected to your wireless access point or wireless router, and that your USB - Dell 3115cn Color Laser Printer | Dell 3115cn User's Guide - Page 132
the wireless settings on your printer and successfully installed the printer software on the computer. 22. Disconnect the USB cable from your computer. 23. Click Print Test Page to test your printer software setup or FAX Initial Setup to setup the fax on your printer or click Finish to exit the - Dell 3115cn Color Laser Printer | Dell 3115cn User's Guide - Page 133
of the printer driver on an existing wirelessly connected Dell Multifunction Color Laser Printer 3115cn NOTE: Ensure that your computer is already connected to your wireless router, and that you have the wireless protocol information about your wireless router before you start the wireless setup. If - Dell 3115cn Color Laser Printer | Dell 3115cn User's Guide - Page 134
NOTE: For Windows Vista, click Continue when the User Account Control dialog box appears. 2. Select Personal Installation . 3. Select Configure New Wired Printer, or Install Driver and Software for existing network printer to install the printer software on your computer. 4. - Dell 3115cn Color Laser Printer | Dell 3115cn User's Guide - Page 135
4. Click Local Installation-Install printer on this computer to install the printer software on your computer. 5. Click on the checkbox next to the printer to select the printer that you want to connect to for this installation. - Dell 3115cn Color Laser Printer | Dell 3115cn User's Guide - Page 136
6. Click Update if you do not see your printer listed or click Add Printer to manually add the IP address. 7. Click Next to continue. 8. You can change the Printer Name and driver setup according to your requirement. 9. 10. - Dell 3115cn Color Laser Printer | Dell 3115cn User's Guide - Page 137
done. 10. Select the different printer software to install. 11. Click Install when you are done. 12. You have now successfully installed the printer software on the computer. 13. Click Print Test Page to test your printer software setup or FAX Initial Setup to setup the fax on your printer or click - Dell 3115cn Color Laser Printer | Dell 3115cn User's Guide - Page 138
the User Account Control dialog box appears. 3. Select the Network Installation option button, and then click Next . 4. Select the Configure Wireless Printer using a USB connection (Recommended) option button, and then click Next . 5. Reset the wireless setting of the multifunction printer following - Dell 3115cn Color Laser Printer | Dell 3115cn User's Guide - Page 139
sent to the multifunction printer. 10. On the Wireless configuration is now complete screen, create the wireless setting sent to the multifunction printer on your computer following the steps below, and then click Next . For Windows XP, Windows Server 2003: a. Select Network Connections from Control - Dell 3115cn Color Laser Printer | Dell 3115cn User's Guide - Page 140
A test page will be printed with the installed printer by clicking the Print Test Page button. Use the Dell Printer Configuration Web Tool to monitor the status of your network printer without leaving your desk. You can view and/or change the printer configuration settings, monitor toner level, and - Dell 3115cn Color Laser Printer | Dell 3115cn User's Guide - Page 141
User Account Control dialog box appears. 2. Select the Network Installation option button, and then click Next . 3. Select the Configure Wireless Printer using a wireless connection (Advanced) option button, and then click Next . 4. Reset the wireless setting of the multifunction printer following - Dell 3115cn Color Laser Printer | Dell 3115cn User's Guide - Page 142
Windows Server 2008: a. Open Control Panel . b. Select Network and Sharing Center. c. Select Connect to a network . 6. On the Enter Wireless Network wireless setting specified on the Enter Wireless Network Settings screen is sent to the multifunction printer. 10. On the Wireless configuration is now - Dell 3115cn Color Laser Printer | Dell 3115cn User's Guide - Page 143
you send to the multifunction printer in the list in Preferred Network group. g. Click Move up to move the setting to the top of the list. h. Click OK to close the Property dialog box. For Windows Vista: a. Open Control Panel . b. Select Network and Internet . c. Select Network and Sharing Center - Dell 3115cn Color Laser Printer | Dell 3115cn User's Guide - Page 144
installation. A test page will be printed with the installed printer by clicking the Print Test Page button. Step 2. Construct new wireless network environment for both computer and multifunction printer (When wireless setting needs to be set to your computer) 1. Insert the Drivers and Utilities CD - Dell 3115cn Color Laser Printer | Dell 3115cn User's Guide - Page 145
to close the Property dialog box. For Windows Vista: a. Open Control Panel . b. Select Network and Internet . c. Select Network and Sharing Center . d. Select Connect to a network . e. Select dell_device from the network items listed in Connect to a network . f. Select Connect Anyway in the warning - Dell 3115cn Color Laser Printer | Dell 3115cn User's Guide - Page 146
to the multifunction printer. 10. On the Wireless configuration is now complete screen, create the wireless setting sent to the multifunction printer on your computer following the steps below, and then click Next . For Windows XP and Windows Server 2003: a. Select Network Connections from Control - Dell 3115cn Color Laser Printer | Dell 3115cn User's Guide - Page 147
address is assigned to the multifunction printer to which the wireless setting is set, and then click Install . NOTE: If your system has any of the following operating systems: - Windows XP x64 - Windows Server® 2003 x64 - Windows Server® 2008 x64 - Windows Vista x64 - Windows Vista x86 ,skip step - Dell 3115cn Color Laser Printer | Dell 3115cn User's Guide - Page 148
A test page will be printed with the installed printer by clicking the Print Test Page button. Use the Dell Printer Configuration Web Tool to monitor the status of your network printer without leaving your desk. You can view and/or change the printer configuration settings, monitor toner level, and - Dell 3115cn Color Laser Printer | Dell 3115cn User's Guide - Page 149
the connection is a success. 2. Check the IP address assigned by AutoIP on the multifunction printer. For example, 168.254.1.1 3. Check that the IP address on your computer is assigned by DHCP. 4. Open Dell Printer Configuration Web Tool using the Web browser. For example, http://168.254.1.1/ 5. 6. - Dell 3115cn Color Laser Printer | Dell 3115cn User's Guide - Page 150
5. Change the wireless setting of the multifunction printer on Dell Printer Configuration Web Tool. 6. Reset the multifunction printer. 7. Restore the wireless setting on your computer. For Windows XP and Windows Server 2003: a. Select Network Connections from Control Panel . b. Right-click Wireless - Dell 3115cn Color Laser Printer | Dell 3115cn User's Guide - Page 151
encryption: Disabled Ad hoc network: checked i. Click the Move up button to move the newly added SSID to the top of the list. j. Click OK to close the Property dialog box. NOTE: When your operating system is earlier than Windows 2000, create settings according to the manual of the wireless setting - Dell 3115cn Color Laser Printer | Dell 3115cn User's Guide - Page 152
Dell Printer Configuration Web Tool using the Web browser. For example, http://1.2.3.5/ 5. Change the wireless setting of the multifunction printer on Dell Printer Configuration Web Tool. 6. Reset the multifunction printer. 7. Restore the wireless setting on your computer. For Windows XP and Windows - Dell 3115cn Color Laser Printer | Dell 3115cn User's Guide - Page 153
send to the multifunction printer in the list in Preferred Network group. g. Click Move up to move the setting to the top of the list. h. Click OK to close the Property dialog box. NOTE: When your operating system is earlier than Windows 2000, create settings according to the manual of the wireless - Dell 3115cn Color Laser Printer | Dell 3115cn User's Guide - Page 154
both computer and multifunction printer (When wireless setting needs to be set to your computer) For Dynamic Host Configuration Protocol network: 1. Create wireless setting of your computer following the steps below: For Windows XP and Windows Server 2003: a. Select Network Connections from Control - Dell 3115cn Color Laser Printer | Dell 3115cn User's Guide - Page 155
://168.254.1.1 5. See "Print Server Settings " in the "Dell Printer Configuration Web Tool " to create a wireless setting. 6. Reset the multifunction printer. 7. Restore the wireless setting on your computer. For Windows XP and Windows Server 2003: a. Select Network Connections from Control Panel - Dell 3115cn Color Laser Printer | Dell 3115cn User's Guide - Page 156
c. d. Ensure that the check box for Use Windows to configure my wireless network settings is checked. e. Click Advanced . f. Do either of the following: When wireless ad-hoc mode is set to the multifunction printer: Select Computer to Computer (ad hoc) networks only and close the Advanced dialog box - Dell 3115cn Color Laser Printer | Dell 3115cn User's Guide - Page 157
encryption: Disabled Ad hoc network: checked i. Click the Move up button to move the newly added SSID to the top of the list. j. Click OK to close the Property dialog box. NOTE: When your operating system is earlier than Windows 2000, create settings according to the manual of the wireless setting - Dell 3115cn Color Laser Printer | Dell 3115cn User's Guide - Page 158
, http://1.2.3.5 5. Change the wireless setting of the multifunction printer on Dell Printer Configuration Web Tool. 6. Reset the multifunction printer. 7. Restore the wireless setting on your computer. For Windows XP and Windows Server 2003: a. Select Network Connections from Control Panel . b. - Dell 3115cn Color Laser Printer | Dell 3115cn User's Guide - Page 159
. d. Ensure that the check box for Use Windows to configure my wireless network settings is checked. e. Click Advanced . f. Do either of the following: When wireless ad-hoc mode is set to the multifunction printer: Select Computer to Computer (ad hoc) networks only and close the Advanced dialog box - Dell 3115cn Color Laser Printer | Dell 3115cn User's Guide - Page 160
connection is a success. Wireless Setting through Dell Printer Configuration Web Tool - Advanced setup Access point (Infrastructure, DHCP network) 1. Create new wireless settings for your computer. For Windows XP and Windows Server 2003: a. Select Network Connections from Control Panel . b. Right - Dell 3115cn Color Laser Printer | Dell 3115cn User's Guide - Page 161
settings for the wireless adapter to the default. i. Press Menu on printer Control Panel . ii. Scroll down and select Admin Menu . iii. Scroll down and select Wireless net . iv. Scroll down and select Reset MPC . v. Restart the multifunction printer. b. Retrieve the wireless adapter IP address on - Dell 3115cn Color Laser Printer | Dell 3115cn User's Guide - Page 162
the typical network printer installation method to complete driver installation. 5. To communicate with the multifunction printer, you need to restore the previous wireless settings on your computer. 6. Restore the previous wireless settings for your computer. For Windows XP and Windows Server 2003 - Dell 3115cn Color Laser Printer | Dell 3115cn User's Guide - Page 163
to the multifunction printer in the list in the Preferred Network group g. Click Move up to move the setting to the top of the list. h. Click OK to close the Property dialog box. NOTE: When your operating system is earlier than Windows 2000, create settings according to the manual of the wireless - Dell 3115cn Color Laser Printer | Dell 3115cn User's Guide - Page 164
NOTE: When your operating system is earlier than Windows 2000, create settings according to the manual of the wireless setting tool provided by your wireless device manufacturer. For Windows Vista: a. Open Control Panel . b. Select Network and Internet . c. Select Network and Sharing Center . d. e. - Dell 3115cn Color Laser Printer | Dell 3115cn User's Guide - Page 165
Windows Server 2008: a. Open Control Panel . b. Select Network and Sharing Center. c. Select Connect to a network . d. Select dell_device from the network items listed in Connect to a network the multifunction printer to your computer settings. a. Press the Menu button. b. Scroll to the Admin menu. - Dell 3115cn Color Laser Printer | Dell 3115cn User's Guide - Page 166
Web browser. For example, http://:192.168.1.2 6. Change wireless settings of the multifunction printer from Dell Printer Configuration Web Tool. a. Click Print server setting on the left navigational bar. b. Click Print server setting tab. c. Click Wireless LAN sub-tab. d. Change the SSID setting - Dell 3115cn Color Laser Printer | Dell 3115cn User's Guide - Page 167
: When your operating system is earlier than Windows 2000, create settings according to the manual of the wireless setting tool provided by your wireless device manufacturer. Confirming the Installation of the Wireless Printer Adapter Print a system settings page to verify that the optional wireless - Dell 3115cn Color Laser Printer | Dell 3115cn User's Guide - Page 168
press . 3. System Settings is displayed. Press . The system settings page is printed. 4. Verify that the Wireless LAN Adapter is listed in the system settings under Printer Options . If it is not listed, turn off the multifunction printer, unplug the power cable, and reinstall the optional wireless - Dell 3115cn Color Laser Printer | Dell 3115cn User's Guide - Page 169
paper among others. Your multifunction printer provides high-quality printing on a variety of print media. Selecting the appropriate print media for your multifunction printer helps avoid printing troubles. This section describes how to select print media, how to care for print media, and how to - Dell 3115cn Color Laser Printer | Dell 3115cn User's Guide - Page 170
for laser printers. Always print several samples before buying large quantities of any type of print media. When choosing any print media, you should consider the weight, fiber content, and color. Unacceptable Paper The following paper types are not recommended for use with the multifunction printer - Dell 3115cn Color Laser Printer | Dell 3115cn User's Guide - Page 171
the temperature in the printer fuser unit Preprinted papers that require a registration (the precise print location on the page) greater than ±0. trouble-free printing. To help avoid jams or poor print quality: Always use new, undamaged paper. Before loading the paper, identify the recommended print - Dell 3115cn Color Laser Printer | Dell 3115cn User's Guide - Page 172
should meet these requirements; latex inks might not. If you are in doubt, contact your paper supplier. Printing on Letterhead Check with the manufacturer or vendor to determine whether the pre-printed letterhead you have selected is acceptable for laser printers. Page orientation is important when - Dell 3115cn Color Laser Printer | Dell 3115cn User's Guide - Page 173
source Standard 250-sheet tray Optional 550-sheet paper feeder Face up Print side Page orientation Letterhead enters the multifunction printer last Multipurpose feeder Face down Letterhead enters the multifunction printer first Selecting Pre-punched Paper Pre-punched paper brands can differ - Dell 3115cn Color Laser Printer | Dell 3115cn User's Guide - Page 174
buying large quantities of any print media, Dell recommends trying a sample first. When printing on transparencies: Set the paper type to Transparency from the printer driver to avoid damaging your multifunction printer. Use transparencies designed specifically for laser printers. Do not use regular - Dell 3115cn Color Laser Printer | Dell 3115cn User's Guide - Page 175
instructions on loading an envelope. Use one envelope size during a print job. Ensure the humidity is low because high humidity (more than 60%) and the high printing temperatures may seal the envelopes. Labels Your multifunction printer can print on many labels designed for use with laser printers - Dell 3115cn Color Laser Printer | Dell 3115cn User's Guide - Page 176
peeling inside the multifunction printer. Portrait orientation is preferred, especially when printing bar codes. Do not use labels that have exposed adhesive. Storing Print Media For proper print media storage, the following guidelines help avoid media feeding problems and uneven print quality. For - Dell 3115cn Color Laser Printer | Dell 3115cn User's Guide - Page 177
10 Envelope Y N N N Monarch Y N N N C5 Y N N N DL Y N N N User-specified print Y*1 Y*2 size Y*2 Y*3 *1 The tray supports user-specified print in.) to 355.6 mm (14.00 in.) long. *3 The duplexer supports user-specified print media that are 148.5 mm (5.85 in.) to 215.9 mm (8. - Dell 3115cn Color Laser Printer | Dell 3115cn User's Guide - Page 178
Multipurpose feeder Standard 250sheet tray Optional 550-sheet paper feeder Optional duplexer Plain Paper (60-80 gsm) Y Y Y Y Plain Paper - Side2 (60-80 Y N gsm) N N Plain Thick Paper (81-105 Y Y gsm) Y Y sheets of paper and ensure that the paper is not curled. Setup Paper Type - Dell 3115cn Color Laser Printer | Dell 3115cn User's Guide - Page 179
Paper 81-105 - Covers 106-163 - Covers Thick 164-216 - Coated 106-163 Inkjet Printer paper cannot be used. Coated Thick 164-216 Inkjet Printer paper cannot be used. Transparency - Inkjet Printer paper cannot be used. Label - Inkjet Printer paper cannot be used. Envelopes - - - Dell 3115cn Color Laser Printer | Dell 3115cn User's Guide - Page 180
NOTE: To avoid paper jams, do not remove trays while a job prints. NOTE: Use only laser print media. Do not use ink jet paper in the multifunction printer. All trays are loaded the same way. 1. Pull the tray out of the multifunction printer until it stops. Hold the tray with both hands, lift the - Dell 3115cn Color Laser Printer | Dell 3115cn User's Guide - Page 181
2. Slide the width guides to the edge of the tray. The width guides should be fully extended. NOTE: For Letter paper, push the lever to the 8.5" position. 3. Slide the tray to the size of the paper to be loaded by using the length guide. - Dell 3115cn Color Laser Printer | Dell 3115cn User's Guide - Page 182
fill line in the tray. Overfilling the tray may cause paper jams. 6. Adjust the width guides until they rest lightly against the edges of the stack of paper. NOTE: When loading user-specified print media, adjust the width guides and slide the extendable part of the tray by squeezing the length - Dell 3115cn Color Laser Printer | Dell 3115cn User's Guide - Page 183
7. Insert the tray into the multifunction printer, and push until it stops. 8. Select the paper type from the operator panel if any print media other than plain print media is loaded. If a user-specified print media is loaded, you must specify the paper size setting by using the operator panel. - Dell 3115cn Color Laser Printer | Dell 3115cn User's Guide - Page 184
standard paper or 15 mm (0.59 in.) or less in height. Print Media Dimensions The multipurpose feeder accepts print media within the following dimensions: Width - 76.2 mm (3.00 in.) other sizes and types of print media such as envelopes, and transparencies. 1. Gently pull open the multipurpose feeder cover. - Dell 3115cn Color Laser Printer | Dell 3115cn User's Guide - Page 185
3. Insert all media face down and top edge first into the multipurpose feeder. NOTE: Do not force the print media. 4. Slide both guides until they rest lightly against the edge of the print media stack. NOTE: Be careful not to bend the print media. - Dell 3115cn Color Laser Printer | Dell 3115cn User's Guide - Page 186
load envelopes in the multipurpose feeder, insert the envelopes with the flaps closed and the short-edge of the envelopes facing into the multifunction printer. Orientate the print side facing down and slide the envelope into the entry slot. You can load envelopes up to the maximum fill line in the - Dell 3115cn Color Laser Printer | Dell 3115cn User's Guide - Page 187
media that is designed for use in laser printers. For more guidelines on print media, see "Print Media Guidelines." Do not add or remove print media when there is still print media in the multipurpose feeder or when the multifunction printer is printing from the multipurpose feeder. This may result - Dell 3115cn Color Laser Printer | Dell 3115cn User's Guide - Page 188
acceptable for duplex printing, see "Print Media Sizes and Support." Duplex printing is only available when the optional duplexer is installed on the multifunction printer. For information on how to install the duplexer, see "Installing a Duplexer." Using Booklet Print To use booklet print, you must - Dell 3115cn Color Laser Printer | Dell 3115cn User's Guide - Page 189
: 250 sheets (20 lb (75 g/m2)) of plain paper Using the Output Tray Extension The output tray extension is designed to prevent print media from falling from the multifunction printer after the print job is complete. Before printing a document, ensure that the output tray extension is fully extended. - Dell 3115cn Color Laser Printer | Dell 3115cn User's Guide - Page 190
- Dell 3115cn Color Laser Printer | Dell 3115cn User's Guide - Page 191
the Operator Panel Buttons Printing a Panel Settings Page Using the Operator Panel Buttons The printer operator panel has a 4-line by 20-character liquid crystal display (LCD), control buttons, and number pad, which allow you to control your multifunction printer. 1. LCD Panel 2. (Back) button - Dell 3115cn Color Laser Printer | Dell 3115cn User's Guide - Page 192
current working job (copy/scan/fax/print) by choosing the available listed job. 9. Number pad Enters the characters and numbers, for example, for the Phone Book, and passwords. 10. (Pause) button Enters a pause. Printing a Panel Settings Page The Panel Settings page shows current settings for the - Dell 3115cn Color Laser Printer | Dell 3115cn User's Guide - Page 193
the Dell Printer Configuration Web Tool makes that setting the user default. Printing a System Settings Page The system settings page lists all the options you purchased or installed. If a feature or an option is not listed, you need to check your installation. 1. Press until >SETUP appears, and - Dell 3115cn Color Laser Printer | Dell 3115cn User's Guide - Page 194
you to change the operator panel defaults. NOTE: To adjust the density to make the scanned copy lighter or darker than the original. Using the Dell Printer Configuration Web Tool to Change System Settings If your multifunction printer is connected to the network, you can change the operator panel - Dell 3115cn Color Laser Printer | Dell 3115cn User's Guide - Page 195
settings page is printed. Resetting Defaults After executing this function and rebooting the multifunction printer, all the menu parameters, except the parameters for the network, are reset to their default values. 1. Press until >SETUP appears, and then press . 2. Press until >Admin Menu appears - Dell 3115cn Color Laser Printer | Dell 3115cn User's Guide - Page 196
1. 2. 3. Press until >Wired Net or Wireless Net appears, and then press . 4. Press until >Reset LAN or >Reset MPC appears, and then press . 5. The Are you sure? message appears on the operator panel. Press . 6. Turn off the multifunction printer, and then on again to apply the settings. - Dell 3115cn Color Laser Printer | Dell 3115cn User's Guide - Page 197
by the administrator. However, you can use your printer driver to override printer user defaults and select settings for individual print jobs. Using the Copy Menus Using the Scan Menus Using the Fax Menus Using the Job Status Menus Using the Setup Menus Setting of Panel Lock Using the Copy Menus - Dell 3115cn Color Laser Printer | Dell 3115cn User's Guide - Page 198
Color* Prints in the color mode. Black&White Prints in the black 550-sheet paper feeder is installed on the multifunction printer. Reduce/Enlarge Purpose: To reduce or enlarge the 154% (in inch), 141% (in mm) 70% (in inch), 64% (in mm) 200% 78% (in inch), 81% (in mm) NOTE: You - Dell 3115cn Color Laser Printer | Dell 3115cn User's Guide - Page 199
or darker than the original. Values: Normal* Works well with standard typed or printed documents. Darker1 Works well with light print or faint pencil markings. Darker2 Darker3 Lighter3 Works well with dark print. Lighter2 Lighter1 Sharpness Purpose: To adjust the sharpness to make the copy sharper - Dell 3115cn Color Laser Printer | Dell 3115cn User's Guide - Page 200
sharper than the original. Softer Makes the copy softer than the original. Color Saturation Purpose: To adjust the amount of color to make the colors higher or lower than the original. Values: Normal* Does not adjust to fit the paper that is currently loaded in the multifunction printer. Values: - Dell 3115cn Color Laser Printer | Dell 3115cn User's Guide - Page 201
onto one sheet of paper. LongEdgeBinding Uses for long-edge binding when you perform duplex printing. ShortEdgeBinding Uses for short-edge binding when you perform duplex printing. Multiple-Up Purpose: To print two original pages to fit onto one sheet of paper. Values: Off* Does not perform - Dell 3115cn Color Laser Printer | Dell 3115cn User's Guide - Page 202
onto 16 sheets of paper (4 by 4). Image Repeat Purpose: To print multiple image copies from the original document on a single page. Values: Off* Does not print multiple image copies from the original document on a single page. On Prints multiple image copies from the original document on a single - Dell 3115cn Color Laser Printer | Dell 3115cn User's Guide - Page 203
Purpose: To use the Copy Defaults to modify the Copy menu defaults. Using the Scan Menus Use the Scan menus to configure a variety of scanner features. NOTE: Values marked by an asterisk (*) are the factory default menu settings. Scan to Email Purpose: To attach the scanned image to an e-mail - Dell 3115cn Color Laser Printer | Dell 3115cn User's Guide - Page 204
. From Enters the sender from either of the following: · Enter E-mail · Address Book Scan to Network Purpose: To store the scanned image in the network server or a computer. Values: Server Stores the scanned image on the server by using the FTP protocol. Search Address Allows you search for - Dell 3115cn Color Laser Printer | Dell 3115cn User's Guide - Page 205
save the scanned copy. Values: PDF* MultiPageTIFF TIFF JPEG MP TIFF NonComp TIFF NonComp NOTE: The MP TIFF NonComp and TIFF NonComp menus are only displayed when 256 MB or more of optional memory card is installed on the multifunction printer. Color Purpose: To select color or black and white - Dell 3115cn Color Laser Printer | Dell 3115cn User's Guide - Page 206
with text. Document Size Purpose: To specify the default paper size. Values: A4 Letter* 1 B5 A5 Executive 8.5"x13" Legal *1 Denotes country-specific factory default values. Lighter/Darker Purpose: To adjust the density to make the scanned copy lighter or darker than the original. Values: - Dell 3115cn Color Laser Printer | Dell 3115cn User's Guide - Page 207
than the original. Contrast Purpose: To adjust the amount of color in a specified hue to make the scanned copy higher or lower than the original. Values: Normal* Does not adjust the amount of color in a specified hue to make the scanned copy higher or lower than the original. Higher Adjusts the - Dell 3115cn Color Laser Printer | Dell 3115cn User's Guide - Page 208
than the original. Scan Defaults To use the Scan Defaults to modify the Scan menu defaults. Using the Fax Menus Use the Fax menus to configure a variety of fax features. NOTE: Values marked by an asterisk (*) are the factory default menu settings. Phone Number Purpose: To enter the FAX number of the - Dell 3115cn Color Laser Printer | Dell 3115cn User's Guide - Page 209
or thin lines or documents printed using a dotmatrix printer. SuperFine For documents containing extremely fine detail. The super fine mode is enabled only if the remote printer also supports the Super Fine resolution. See the notes below. NOTE: Faxes scanned in the SuperFine resolution transmits - Dell 3115cn Color Laser Printer | Dell 3115cn User's Guide - Page 210
or printed documents. Darker1 Works well with light print or faint pencil markings. Darker2 Darker3 Lighter3 Works well with dark print. Lighter2 Lighter1 OnHook Purpose: To send or receive a fax manually. Values: Off* Does not send or receive a fax manually. On Sends or receives a fax manually. - Dell 3115cn Color Laser Printer | Dell 3115cn User's Guide - Page 211
fax at a later time. On Sends a fax at a later time. NOTE: A maximum of 19 delayed fax jobs can be stored in the Dell Multifunction Color Laser Printer 3115cn. Fax Defaults Purpose: To use the Fax Defaults to modify the Fax menu defaults. Using the Job Status Menus Use the Job Status menus to print - Dell 3115cn Color Laser Printer | Dell 3115cn User's Guide - Page 212
memory card is installed on the multifunction printer. Secure Print Purpose: To print confidential jobs. The multifunction printer can hold the job in memory until you arrive at the multifunction printer and type the password on the operator panel. Values: Prints the job, and then deletes it - Dell 3115cn Color Laser Printer | Dell 3115cn User's Guide - Page 213
list pending fax numbers. Using the Setup Menus Defaults Settings To use the Defaults Settings to modify the Copy, Scan, or Fax menu defaults. Tray Settings Use the Tray Settings menu to define the print media loaded in each tray. NOTE: Values marked by an asterisk (*) are the factory default menu - Dell 3115cn Color Laser Printer | Dell 3115cn User's Guide - Page 214
Plain* Paper Type Plain Thick Transparency Covers Covers Thick Label Coated Coated Thick Envelope Plain S2 Plain Thick S2 Covers S2 Covers Thick S2 Coated S2 Coated Thick S2 A4* Paper Size A5 B5 Driver Size Letter 8.5x13" Legal Executive Monarch DL C5 Envelope #10 Custom Size - Dell 3115cn Color Laser Printer | Dell 3115cn User's Guide - Page 215
Panel Specified* Stop printing and show an error on the operation panel if the paper specified from the printer driver does not match the paper configured for the MFP from the operation panel. Driver Specified Continue to print even if the paper specified from the printer driver does not match - Dell 3115cn Color Laser Printer | Dell 3115cn User's Guide - Page 216
various types of reports and lists. System Settings Purpose: To print a list of the current user default values, the installed options, the amount of installed print memory, and the status of printer supplies. Panel Settings Purpose: To print a detailed list of all the settings on the operator panel - Dell 3115cn Color Laser Printer | Dell 3115cn User's Guide - Page 217
"Printing a Font Sample List" Job History Purpose: To print a detailed list of the processed print jobs. This list contains the latest 20 print jobs. Error History Purpose: To print a detailed list of paper jam and fatal errors. Color Test Page Purpose: To print a page for testing colors. Protocol - Dell 3115cn Color Laser Printer | Dell 3115cn User's Guide - Page 218
on the downloaded PCL macro. Stored Documents Purpose: To print a list of all files that are stored as Secure, Store, and Proof Print in the RAM disk. NOTE: Stored Print is only displayed when 256 MB or more of optional memory card is installed on the multifunction printer. Admin Menu Use - Dell 3115cn Color Laser Printer | Dell 3115cn User's Guide - Page 219
using the PCL emulation printer language. NOTE: Values marked by an asterisk (*) are the factory default menu settings. Paper Tray Purpose: To specify the input tray. Values: Auto* Automatically selects a tray according to the paper size and type settings of the printing job. Tray 1 The paper - Dell 3115cn Color Laser Printer | Dell 3115cn User's Guide - Page 220
duplexing as the default for all print jobs. (Select Duplex from the printer driver to duplex only specific jobs.) NOTE: Values marked by an asterisk (*) are the factory default menu settings. NOTE: The 2 Sided Print menu is only available when the optional duplexer is installed on the multifunction - Dell 3115cn Color Laser Printer | Dell 3115cn User's Guide - Page 221
side of the paper. Off* Prints on both sides of the paper. On Binding Edge To select binding along the long or short edge of the page. (Select Duplex from the printer driver to duplex only specific jobs.) NOTE: Values marked by an asterisk (*) are the factory default menu settings. NOTE: The 2 Sided - Dell 3115cn Color Laser Printer | Dell 3115cn User's Guide - Page 222
Coronet Marigold Arial Arial It Arial Bd Arial BdIt Times New Times New It Times New Bd Times New BdIt Symbol Wingdings Line Printer Times Roman Times It Times Bd Times BdIt Helvetica Helvetica Ob Helvetica Bd Helvetica BdOb CourierPS CourierPS Ob CourierPS Bd CourierPS BdOb - Dell 3115cn Color Laser Printer | Dell 3115cn User's Guide - Page 223
N C Schbk It N C Schbk Bd N C Schbk BdIt ITC A G Go Bk ITC A G Go BkOb ITC A G Go Dm ITC A G Go DmOb ZapfC MdIt ZapfDingbats Symbol Set Purpose: To specify a symbol set for a specified font. Values: ROMAN-8* ISO L1 ISO L2 ISO L5 ISO L6 PC-8 PC-8 DN PC-775 PC-850 PC-852 PC-1004 PC-8 - Dell 3115cn Color Laser Printer | Dell 3115cn User's Guide - Page 224
also: "Pitch and Point Size" Font Pitch Purpose: To specify the font pitch for scalable monospaced fonts. Values: The values are in units of 0.01. 6.00 - 24.00 10.00* Font pitch refers to the number of fixed-space characters in a horizontal inch of type. For nonscalable monospaced fonts, the pitch - Dell 3115cn Color Laser Printer | Dell 3115cn User's Guide - Page 225
a page. Values: 5 - 128 The values are in units of 1. 64* or 64*1 *1 Denotes country-specific factory default values. The multifunction printer sets printer default value. (Set the number of copies required for a specific job from the printer driver. Values selected from the printer driver - Dell 3115cn Color Laser Printer | Dell 3115cn User's Guide - Page 226
job problem. With Hex Dump selected, all data sent to the multifunction printer is printed in hexadecimal and character representation. Control codes are not executed. Values: Disables the Hex Dump feature. Disable* Enables the Hex Dump feature. Enable Draft Mode Purpose: To save toner by printing - Dell 3115cn Color Laser Printer | Dell 3115cn User's Guide - Page 227
: Prints in the black and white mode. Black* Prints in the color mode. Color PostScript Use the PostScript menu to change printer settings that only affect jobs using the PostScript emulation printer language. NOTE: Values marked by an asterisk (*) are the factory default menu settings. PS Error - Dell 3115cn Color Laser Printer | Dell 3115cn User's Guide - Page 228
the print job without printing an error message. Off NOTE: This instructions from the PS driver override the settings specified on the operator panel. PS Job Time-Out Purpose: To specify the execution time for one PostScript job. The change becomes effective after the multifunction printer is - Dell 3115cn Color Laser Printer | Dell 3115cn User's Guide - Page 229
Use the Wired Network menu to change printer settings affecting jobs sent to the multifunction printer through the wired network. NOTE: Values marked by an asterisk (*) are the factory default menu settings. Ethernet Purpose: To specify the communication speed and the duplex settings of Ethernet - Dell 3115cn Color Laser Printer | Dell 3115cn User's Guide - Page 230
200706291103 or later and network (MPC) firmware version 16.03 or later are installed. Since you cannot set IPsec in Windows Vista in this mode, use the Dell Printer Configuration Web Tool. The Get Information from Printer function on the Options tab of the printer driver is not available when - Dell 3115cn Color Laser Printer | Dell 3115cn User's Guide - Page 231
LPD Port9100 IPP*1 SMB TCP/IP*1 SMB NetBEUI*1 FTP NetWare IP NetWare IPX WSD SNMP UDP Enables the LPD port. Enable* Disables the LPD port. Disable Enables the Port9100 port. Enable* Disables the Port9100 port. Disable Enables the IPP port. Enable* Disables the IPP port. Disable Uses TCP/IP for SMB. - Dell 3115cn Color Laser Printer | Dell 3115cn User's Guide - Page 232
Dell Printer Configuration Web Tool Enable* embedded in the printer. Disables an access to Dell Printer Configuration Web Tool Disable embedded in the printer configure the IPX/SPX settings for the wired network. The change becomes effective after the printer is turned off and then on again. Values - Dell 3115cn Color Laser Printer | Dell 3115cn User's Guide - Page 233
available for LPD or Port9100. Initialize NVM Purpose: To initialize wired network data stored in NVM. After executing this function and rebooting the printer, all wired network settings are reset to their default values. Adobe Protocol Purpose: To specify PostScript communication protocol for - Dell 3115cn Color Laser Printer | Dell 3115cn User's Guide - Page 234
to switch between them according to the specified control code. Binary Used when no special processing is required for data. Wireless Network Use the Wireless Network menu to change print settings affecting jobs sent to the printer through a wireless network. NOTE: The Wireless Net menu is only - Dell 3115cn Color Laser Printer | Dell 3115cn User's Guide - Page 235
settings. After executing this function and rebooting the printer, all wireless network settings are reset to their default values. TCP/IP Purpose: To specify the TCP/IP settings for the wireless network. The change becomes effective after the printer is turned off and then on again. Values: IP - Dell 3115cn Color Laser Printer | Dell 3115cn User's Guide - Page 236
in Windows Vista in this mode, use the Dell Printer Configuration Web Tool. The Get Information from Printer function on the Options tab of the printer driver is not available when using this mode. Protocol Purpose: To enable or disable each item. The change becomes effective after the multifunction - Dell 3115cn Color Laser Printer | Dell 3115cn User's Guide - Page 237
Dell Printer Configuration Web Tool embedded in Enable* the multifunction printer. Disables an access to Dell Printer Configuration Web Tool embedded in Disable the multifunction printer the wireless network. The change becomes effective after the multifunction printer is turned off and then on - Dell 3115cn Color Laser Printer | Dell 3115cn User's Guide - Page 238
(IPv4) Purpose: To specify that data received from certain IP addresses through the wireless network is blocked. You can set up to five IP addresses. The change becomes effective after the multifunction printer is turned off and then on again. Values: IP Filter*1 No. n/Address (n is 1-5.) Sets - Dell 3115cn Color Laser Printer | Dell 3115cn User's Guide - Page 239
communication protocol supports both ASCII and binary data to switch between them according to the specified control code. Binary factory default menu settings. ECP Purpose: To specify the ECP communication mode of the parallel interface. The change becomes effective after the multifunction printer - Dell 3115cn Color Laser Printer | Dell 3115cn User's Guide - Page 240
to the specified control code. Binary Used when no special processing is required. USB Settings Use the USB Settings menu to change printer settings affecting a USB port. NOTE: Values marked by an asterisk (*) are the factory default menu settings. Fax Settings Use the Fax Settings menu to - Dell 3115cn Color Laser Printer | Dell 3115cn User's Guide - Page 241
then pressing the remote receive code, or by setting OnHook to On (you can hear voice or fax tones from the remote machine) and then pressing Start. FAX Mode* A fax is automatically received. TEL/FAX Mode When the multifunction printer receive an incoming a fax, the external telephone rings for - Dell 3115cn Color Laser Printer | Dell 3115cn User's Guide - Page 242
one telephone line with an external telephone. You can specify the time for incoming call of the external phone in 0-255 seconds. Auto Ans. Ans/FAX Purpose: To share one telephone line with an answering machine. You can specify the time for incoming call of the external phone in 0-255 seconds - Dell 3115cn Color Laser Printer | Dell 3115cn User's Guide - Page 243
Type Purpose: To select the default line type. Values: PSTN* Uses PSTN. PBX Uses PBX. Dialing Type Purpose: To select the dialing type. Values: PB* Uses PB. DP (10PPS) Uses DP (10PPS). DP (20PPS) Uses DP (20PPS). DM Prevention Purpose: To reject faxes sent from unwanted stations. Values - Dell 3115cn Color Laser Printer | Dell 3115cn User's Guide - Page 244
receive code on the external telephone. Remote Rcv Tone Purpose: To specify the tone in two digits to start Remote Receive. Duplex Print Purpose: To use duplex printing when you receive a fax. This option is available only when the optional duplexer is installed on your multifunction printer. Values - Dell 3115cn Color Laser Printer | Dell 3115cn User's Guide - Page 245
the top of each page sent from your multifunction printer. NOTE: Ensure to specify G3ID before using DM Prevention. Local Name Purpose: To contain your name or company name, which is printed on the report sheet. DRPD Pattern Purpose: To provide a separate number for faxing with a distinctive ring - Dell 3115cn Color Laser Printer | Dell 3115cn User's Guide - Page 246
pattern you need to select to use this service. Forward Settings Purpose: To set the multifunction printer to always forward all of the incoming faxes to the specified destination. Values: Trans. at Error Forwards the incoming faxes when an error occurs. Trans. Always Always forwards the incoming - Dell 3115cn Color Laser Printer | Dell 3115cn User's Guide - Page 247
it onto the appropriate sized paper. Color Fax Purpose: To set the multifunction printer to send and receive color faxes. Values: On Allows color faxes to be sent and received (select color or black and white when sending a fax). Off* Faxes are sent and received in black and white only. Extel Hook - Dell 3115cn Color Laser Printer | Dell 3115cn User's Guide - Page 248
value. Country Purpose: To select the country where the multifunction printer is used. Fwd. Error Print Purpose: To print the documents failed to transfer when Forward Set Print is set to Off. Values: On* Prints documents that failed to transfer when Forward Set Print is set to Off. Off Does not - Dell 3115cn Color Laser Printer | Dell 3115cn User's Guide - Page 249
receives data from the computer or remote fax machine. You can also return the multifunction printer to the standby mode by pressing any button on the operator panel. Auto Reset Purpose: To automatically reset the settings for COPY, SCAN, or FAX to the default and return to the standby mode after - Dell 3115cn Color Laser Printer | Dell 3115cn User's Guide - Page 250
Loud Off* Does not sound an alert when you press a wrong button. Machine Ready Soft Sounds an alert when the multifunction printer is ready. Tone Normal* Loud Off Does not sound an alert when the multifunction printer is ready. Copy Job Tone Soft Sounds an alert when copying is completed. - Dell 3115cn Color Laser Printer | Dell 3115cn User's Guide - Page 251
alert when the multifunction printer runs out of paper. Normal* Loud Off Does not sound an alert when the multifunction printer runs out of paper. Low Toner Soft Sounds an alert when toner becomes low. an operator panel display is returned to the default setting by scrolling the loop menu. - Dell 3115cn Color Laser Printer | Dell 3115cn User's Guide - Page 252
one time by this setting. Normal* Loud Off Purpose: To specify the amount of time the multifunction printer waits to receive additional bytes of data from the computer. When this timeout expires, the print job is canceled. Values: Off 5-300 sec Disables the job timeout. Specifies the amount of - Dell 3115cn Color Laser Printer | Dell 3115cn User's Guide - Page 253
displayed after the numeric value on the operator panel. Values: Selects millimeter as the default measurement unit. mm Selects inch as the default measurement unit. inch* Auto Log Print Purpose: To automatically print the Job History report when the number of Job History items reaches the maximum - Dell 3115cn Color Laser Printer | Dell 3115cn User's Guide - Page 254
DL size paper, a part of the user ID may not be printed correctly. Print Text Purpose: To specify whether the multifunction printer outputs PDL data, which is not supported by the multifunction printer, as text when the multifunction printer receives it. Text data is printed on A4 or Letter size - Dell 3115cn Color Laser Printer | Dell 3115cn User's Guide - Page 255
than Driver Size from the operator panel. *2 Only displayed when an optional 550-sheet paper feeder is installed on the multifunction printer. Fax Activity Purpose: To show information about the faxes you recently received or sent. Values: Automatically prints information about the faxes when - Dell 3115cn Color Laser Printer | Dell 3115cn User's Guide - Page 256
: Not Print Does not print the report. Prints the report when a communication error is detected. Print at Error Always prints the report for the fax transmission. Print Always* Protocol Monitor Purpose: To specify the protocol monitor report to detect the cause of the communication trouble - Dell 3115cn Color Laser Printer | Dell 3115cn User's Guide - Page 257
a communication error is detected. Print at Error Always prints the report for the fax transmission. Print Always* RAM Disk Purpose: To allocate memory to the RAM disk file system for the Secure Print and Proof Print features. The change becomes effective after the multifunction printer is turned - Dell 3115cn Color Laser Printer | Dell 3115cn User's Guide - Page 258
largest size. When there is no larger paper size, the multifunction printer substitutes paper of nearest size. Nearest Size Substitutes paper of security settings. NOTE: Values marked by an asterisk (*) are the factory default menu settings. Paper Density Purpose: To specify the paper density. - Dell 3115cn Color Laser Printer | Dell 3115cn User's Guide - Page 259
To specify the reference voltage settings for the transfer roller. Values: Plain -3 - +3 0* Plain Thick -3 - +3 0* Transparency -3 - +3 0* Covers -3 - +3 0* Covers Thick -3 - +3 0* Label -3 - +3 0* Coated -3 - +3 0* Coated Thick -3 - +3 0* Envelope -3 - +3 0* - Dell 3115cn Color Laser Printer | Dell 3115cn User's Guide - Page 260
Adjust Fuser NOTICE: The print quality changes depending on the setting values you select for this item. Purpose: To specify the temperature settings value for the fuser unit. Values: Plain -2 - +2 0 Plain Thick -2 - +2 0 Transparency -2 - +2 0 Covers -2 - +2 0 Covers Thick -2 - +2 0 - Dell 3115cn Color Laser Printer | Dell 3115cn User's Guide - Page 261
the registration automatically. On Does not adjust the registration automatically. Off* Color Reg Adjust Purpose: To print the color registration chart and to adjust the color registration by using the chart. This function is required after the multifunction printer is set up or moved. Values: - Dell 3115cn Color Laser Printer | Dell 3115cn User's Guide - Page 262
the NVM. After executing this function and rebooting the multifunction printer, all the default settings are reset to their default values. Values: User Section Initializes the user section. Initializes the system section. System Section Init Print Meter Purpose: To initialize the data for the - Dell 3115cn Color Laser Printer | Dell 3115cn User's Guide - Page 263
Non-DELL Toner NOTICE: When Non-Dell toner is used, the multifunction printer may be severely damaged and may not be covered by your warranty. Purpose: To specify whether to use the refilled print cartridge or not. When this setting is on, you can use print cartridges provided by other companies. - Dell 3115cn Color Laser Printer | Dell 3115cn User's Guide - Page 264
not limit access to the Admin menu. Disable* Limits access to the Admin menu. Enable Panel Lock/Change Password Purpose: To set a password to limit access to the Admin menu. Values: 0000-9999 0000* Copy/Scan/Fax Lock/Copy/Scan/Fax Set NOTE: Before enabling COPY/Scan/Fax Lock, ensure that Panel Lock - Dell 3115cn Color Laser Printer | Dell 3115cn User's Guide - Page 265
Copy/Scan/Fax Lock/Change Password Purpose: To set a password to limit access to the Copy, Scan, and Fax menus. Values: 0000-9999 0000* Secure Receive/Secure Receive Set NOTE: Before enabling Secure Receive, ensure that Panel Lock is enabled. Purpose: To set a password when you print received fax - Dell 3115cn Color Laser Printer | Dell 3115cn User's Guide - Page 266
of Admin Menu reports and lists. Speed Dial Purpose: To print the Speed Dial report. Protocol Monitor Purpose: To print Protocol Monitor report. Address Book Purpose: To print Address Book report. Server Address Purpose: To print server address report. Fax Activity Purpose: To print fax activity - Dell 3115cn Color Laser Printer | Dell 3115cn User's Guide - Page 267
Purpose: To print pending faxes report. Print Meter Purpose: To print the reports for the total number of pages printed. When printed using either the printer control panel or Dell Printer Configuration Web Tool, the report will be titled Print Volume Report. Panel Language Purpose: To determine - Dell 3115cn Color Laser Printer | Dell 3115cn User's Guide - Page 268
forget your password, turn off the multifunction printer. Then, while holding Menu, turn on the multifunction printer. Continue to hold Menu until the display indicates Ready to Init. This will recover the factory default panel password. Note that the password for Panel Lock, COPY/SCAN/FAX Lock, and - Dell 3115cn Color Laser Printer | Dell 3115cn User's Guide - Page 269
5. 6. Press until Disable appears, and then press . - Dell 3115cn Color Laser Printer | Dell 3115cn User's Guide - Page 270
your multifunction printer to install a combination of software programs, depending on your operating system. The following software programs can only operate on Windows. They cannot operate on Macintosh, UNIX, or Linux. Printing Status Window The Printing Status Window alerts you when an error or - Dell 3115cn Color Laser Printer | Dell 3115cn User's Guide - Page 271
or in a server on the network. Using the setup disk that you have created will reduce the amount of work required when installing the printer driver. Install in advance the Dell™ Multifunction Color Laser Printer 3115cn printer driver in the computer on which the setup disk is to be created. The - Dell 3115cn Color Laser Printer | Dell 3115cn User's Guide - Page 272
system. Create a separate setup disk for different types of operating systems. Software Update The firmware and/or driver updates can be downloaded from http://support.dell.com. Printer Settings Utility Using the Dell MFP Laser 3115cn Launcher window, you can set up scan system data options, and - Dell 3115cn Color Laser Printer | Dell 3115cn User's Guide - Page 273
from the multifunction printer to the Address Book Editor. 2 Allows you to edit a selected Address Book entry in the edit dialog box. 3 Deletes a selected Address Book entry. 4 Displays Address Book entries. ScanButton Manager Click the ScanButton Manager button to configure the scan - Dell 3115cn Color Laser Printer | Dell 3115cn User's Guide - Page 274
Dell ScanCenter Dell ScanCenter is a PaperPort application that enables you to scan items and send them directly to PaperPort or other programs on your computer without first running PaperPort. For more information about using Dell ScanCenter, refer to PaperPort's Help menu. - Dell 3115cn Color Laser Printer | Dell 3115cn User's Guide - Page 275
" If you experience a jam, see "Clearing Jams" for instructions. Sending a Job to Print To support all of the printer features, use the printer driver. When you choose Print from a software program, a window representing the printer driver opens. Select the appropriate settings for the specific job - Dell 3115cn Color Laser Printer | Dell 3115cn User's Guide - Page 276
Windows application: 1. Open the file you want to print. 2. From the File menu, select Print. 3. Verify that the correct printer is selected in the dialog box. Modify the system settings as appropriate (such as the pages you want to print or the number of copies). 4. Click Properties or Setup - Dell 3115cn Color Laser Printer | Dell 3115cn User's Guide - Page 277
desktop. 2. Click Start Printers and Faxes. Click Start Control Panel Hardware and Sound Printers (for Windows Vista). A list of available printers appears. 3. Double-click the multifunction printer you selected when you sent the job. A list of print jobs appears in the printer window. 4. Select the - Dell 3115cn Color Laser Printer | Dell 3115cn User's Guide - Page 278
use the printer operator panel to specify what you want to do with one or more of the jobs. You can select either Secure Print and Proof Print from "Stored Print". Then, you select your user name from a list. If you select Secure Print, you must type the password you specified in the driver when you - Dell 3115cn Color Laser Printer | Dell 3115cn User's Guide - Page 279
: When you select Del after Print, the held job is automatically deleted after printing. Proof Print If you send a Proof Print job, the multifunction printer prints one copy and holds the remaining copies you requested from the driver in print memory. Use Proof Print function to examine the first - Dell 3115cn Color Laser Printer | Dell 3115cn User's Guide - Page 280
send a job to the multifunction printer, you can specify a password from the driver. The password must be between 1 and 12 digits using numbers 0-9. The job is then held in print memory until you enter the same numeric password from the printer operator panel and choose to print or delete the job - Dell 3115cn Color Laser Printer | Dell 3115cn User's Guide - Page 281
ADF Setting Copy Options Changing the Default Settings Setting the Power Saver Timer Option Loading Paper for Copying The instructions for loading print materials are the same whether you are printing, faxing, or copying. For further details, see "Print Media Guidelines". Selecting Paper Tray After - Dell 3115cn Color Laser Printer | Dell 3115cn User's Guide - Page 282
all staples and paper clips before loading documents. Ensure any glue, ink or correction fluid on the paper is completely dry before loading feeder glass may cause black spots on the printout. For best results, clean the document feeder glass before use. See "Cleaning the scanner". To make a - Dell 3115cn Color Laser Printer | Dell 3115cn User's Guide - Page 283
document feeder glass and align it with the registration guide on the top left corner of the glass. 3. Close the document cover. NOTE: Leaving the cover open while copying may affect the copy quality and toner consumption. NOTE: If you are copying a page from a book or magazine, lift the cover until - Dell 3115cn Color Laser Printer | Dell 3115cn User's Guide - Page 284
50 sheets of 75 g/m2 (20 lb) documents face up on the ADF with top edge of the documents in first. Then adjust the document guides to the correct document size. 2. Customize the copy settings including the number of copies, copy size, contrast, and image quality. See "Setting Copy Options". To - Dell 3115cn Color Laser Printer | Dell 3115cn User's Guide - Page 285
NOTE: The copy options automatically return to their default status after copying. Number of Copies You can . 3. Press until Color appears, and then press . 4. Press to select the desired settings, and then press . Color Prints in the color mode. Black&White Prints in the black and white mode. 5. - Dell 3115cn Color Laser Printer | Dell 3115cn User's Guide - Page 286
NOTE: When you make a reduced copy, black lines may appear at the bottom of your copy. To select from (25-400%) 129% (in inch), 129% (in mm) 50% 154% (in inch), 141% (in mm) 70% (in inch), 64% (in mm) 200% 78% (in inch), 81% (in mm) NOTE: You can set the value in a percent for Custom. 5. Press - Dell 3115cn Color Laser Printer | Dell 3115cn User's Guide - Page 287
the desired settings, and then press . Normal* Works well with standard typed or printed documents. Darker1 Works well with light print or faint pencil markings. Darker2 Darker3 Lighter3 Works well with dark print. Lighter2 Lighter1 5. Press Start to begin copying. Sharpness Adjust the sharpness to - Dell 3115cn Color Laser Printer | Dell 3115cn User's Guide - Page 288
the copy sharper than the original. Softer Makes the copy softer than the original. 5. Press Start to begin copying. Color Saturation Adjusts the amount of color to make the colors deeper or lighter than the original. To adjust the sharpness: 1. Load the document to be copied on the document feeder - Dell 3115cn Color Laser Printer | Dell 3115cn User's Guide - Page 289
reduces or enlarges the original image to fit on the paper currently loaded in the multifunction printer. This special copy mode can be applied when you load a document using only the Copy Options". 5. Press Start to begin copying. 2Sided Print a two-sided original document onto one sheet of paper. - Dell 3115cn Color Laser Printer | Dell 3115cn User's Guide - Page 290
When you copy using this feature, the multifunction printer prints one side on the upper half of the paper and the other side on the lower half without reducing the original. If the original document is larger than the printable area, some portions may not be printed. To make the 2Sided copying: - Dell 3115cn Color Laser Printer | Dell 3115cn User's Guide - Page 291
Print two original images to fit onto one sheet of paper. To make the Multiple-Up copying: 1. Load the document(s) face up with top edge in - Dell 3115cn Color Laser Printer | Dell 3115cn User's Guide - Page 292
3. 4. Off* Does not perform multiple-up printing. Auto Automatically reduces the original pages to fit onto one sheet of paper. ID Copy Prints the original pages onto one sheet of paper in the original size. Manual Prints the original pages onto the one sheet of paper in the size specified in - Dell 3115cn Color Laser Printer | Dell 3115cn User's Guide - Page 293
to begin copying. Your original document is divided into 9 portions. Each portion is scanned and printed one by one in the following order: Image Repeat Print multiple image copies from the original document on a single page. The number of images is automatically determined by the original image and - Dell 3115cn Color Laser Printer | Dell 3115cn User's Guide - Page 294
then press . 5. Press Start to begin copying. Collated Sort the copy job. For example, if you make two copies of three page documents, one complete three page document will print followed by the second complete document. NOTE: Copy collate is only available when optional memory card is installed. 1. - Dell 3115cn Color Laser Printer | Dell 3115cn User's Guide - Page 295
on the document feeder glass, the display asks if you want to load another page. Press to select Yes or No, and then press . 7. If you select Yes the most frequently used modes. When you copy a document, the default settings are used unless they are changed by using the corresponding buttons on - Dell 3115cn Color Laser Printer | Dell 3115cn User's Guide - Page 296
the power saver timer for the multifunction printer. The multifunction printer waits before it restores the default copy settings, if you do not start copying after changing them on the operator panel. 1. Press until >SETUP appears, and then press . 2. Press until >Admin Menu appears, and then press - Dell 3115cn Color Laser Printer | Dell 3115cn User's Guide - Page 297
Scanning Scanning Overview Scanning From Operator Panel Scanning Using the TWAIN Driver Scanning Using the Windows Image Acquisition (WIA) Driver Using a Scanner on the Network Sending an E-Mail with the Scanned Image Scanning Overview Use your Dell™ Multifunction Color Laser Printer 3115cn to - Dell 3115cn Color Laser Printer | Dell 3115cn User's Guide - Page 298
image, and then press . 6. Press Start . The selected application window opens. Adjust the scan settings and start scan. For details, refer to the user's guide of the application. NOTE: If the following dialog box appears on your PC, select 3115cn MFP Scan Button Manager , and then click OK . - Dell 3115cn Color Laser Printer | Dell 3115cn User's Guide - Page 299
Using the TWAIN Driver Your multifunction printer supports the TWAIN driver for scanning images. TWAIN is one of the standard components provided by Microsoft® Windows® 2000, Windows XP, Windows Server® 2003, Windows Server 2008, and Windows Vista® , and works with various scanners. To scan an image - Dell 3115cn Color Laser Printer | Dell 3115cn User's Guide - Page 300
format and destination to save the picture. 10. Follow the on-screen instructions to edit the picture after it is copied to your computer. Scanning Using the Windows Image Acquisition (WIA) Driver Your multifunction printer also supports the WIA driver for scanning images. WIA is one of the standard - Dell 3115cn Color Laser Printer | Dell 3115cn User's Guide - Page 301
Windows Vista or Windows Server 2008, use Windows Photo Gallery instead of Paint . 3. Click File From Scanner or Camera . The Scan using Dell MFP Laser 3115cn window . 8. Follow the on-screen instructions to edit the picture after it is copied to your computer. To scan an image from Control Panel : - Dell 3115cn Color Laser Printer | Dell 3115cn User's Guide - Page 302
save the picture. 7. Click Next to start scanning. 8. Follow the on-screen instructions to edit the picture after it is copied to your computer. Using a Scanner on the Network The Scan to Server/Computer feature allows you to scan a document from the Dell MFP 3115cn and store it in a folder on your - Dell 3115cn Color Laser Printer | Dell 3115cn User's Guide - Page 303
to Computer/Server Through Wireless Setup " for more details. 5. Start to send the scanned file on the network. See "Start to send the scanned file on the Network " for more details. Here are some additional instructions if you need to create a password for your user account or locate the IP address - Dell 3115cn Color Laser Printer | Dell 3115cn User's Guide - Page 304
names to select box (Example of user login name, Myself ). NOTE: User login account with empty password will be rejected in the Scan to Folder authentication. Ensure that all user login accounts have a valid and non-empty password. See "Create a Password for Your User Login Account " for details on - Dell 3115cn Color Laser Printer | Dell 3115cn User's Guide - Page 305
Click on the user login name that you have just entered. Select Full Control check box. This will grant you permission to send the document into this folder. If you are using Windows Vista® or Windows Server 2008, you can share a folder with the following or similar instructions: 1. Create a folder - Dell 3115cn Color Laser Printer | Dell 3115cn User's Guide - Page 306
4. Select the Share this folder check box. 5. Enter a shared name in the Share name box. NOTE: Note down the shared name as you need to use this name in the next setting procedure. 6. Click on Permissions to create a write permission for this folder. 7. 8. - Dell 3115cn Color Laser Printer | Dell 3115cn User's Guide - Page 307
in the Scan to Folder authentication. Ensure that all user login accounts have a valid and non-empty password. See "Create a Password for Your User Login Account " for details on how to assign a password for your user login account. 9. Click OK when you are done. 10. Click on the user login name - Dell 3115cn Color Laser Printer | Dell 3115cn User's Guide - Page 308
report will be printed. Once you have obtained the IP address of the Dell MFP Laser 3115cn, you can setup the Address book by performing the following steps from a web browser. 1. Open a web browser. 2. Type in the IP address of the printer and click Go . The printer's web page appears. 3. Click - Dell 3115cn Color Laser Printer | Dell 3115cn User's Guide - Page 309
- Dell 3115cn Color Laser Printer | Dell 3115cn User's Guide - Page 310
from your Microsoft Windows operating system. Select FTP if you have a FTP server. NOTE: FTP Server depends on Microsoft Internet Information Services (IIS) and may not be installed on your computer. Please refer to Microsoft document for detailed instructions on how to setup FTP server. Server - Dell 3115cn Color Laser Printer | Dell 3115cn User's Guide - Page 311
account. (Refer to "Create a Password for Your User Login Account " for details on how to add a password in your user login account). Share Name: Enter the name of the shared folder on the recipient computer. For SMB only. Server Path: Enter the path where you want the scanned document to be stored - Dell 3115cn Color Laser Printer | Dell 3115cn User's Guide - Page 312
of the printer and click Go . The printer's web page appears. 3. Click Printer Settings , then click the Printer Settings tab, then click the Scan Defaults button. If a security login dialog box appears, type in the correct User name and Password. 4. Change from Wired to Wireless in the Network Port - Dell 3115cn Color Laser Printer | Dell 3115cn User's Guide - Page 313
, MyPic\John . You should now see MyShare\MyPic\John in your directory) After you have created a folder and sub-folder, you will now need to setup the Address Book. See "Setting Up the Address Book " for the details. Example of an entry for - Dell 3115cn Color Laser Printer | Dell 3115cn User's Guide - Page 314
send the scanned file on the Network 1. From the operator panel, press until >SCAN appears, and then press . 2. Press until Scan to Network appears. 3. the scanned image on the computer by using the SMB protocol. Search Address: Select the server address registered in Address Book. NOTE: Users need - Dell 3115cn Color Laser Printer | Dell 3115cn User's Guide - Page 315
correct. 016-781 Scan · If the server address is correct, then change the settings for the firewall. Press Login Error 016-782 Scan Press · Ensure the shared name or password is correct. SMB/FTP Error · Ensure the specified server path name and access right to the folder are correct. 016-783 Scan - Dell 3115cn Color Laser Printer | Dell 3115cn User's Guide - Page 316
instructions. 1. For Windows 2000/Windows Server 2003/Windows Server 2008: Click Start Run . For Windows scanned image from your multifunction printer, follow the steps below: Set E-Mail Alert Register a user Start to send e-mail with the scanned file Setting E-Mail Alert 1. Form the Dell Printer - Dell 3115cn Color Laser Printer | Dell 3115cn User's Guide - Page 317
the Apply New Settings button. Registering a New User 1. Form the Dell Printer Configuration Web Tool, click Address Book , and then click the E-Mail Address tab. 2. Click the Create button. The E-mail Server Settings page for registering a new user appears. 3. Enter the following: Name Address - Dell 3115cn Color Laser Printer | Dell 3115cn User's Guide - Page 318
4. 5. Setting Problems Mail Size Limits · Change the file format and resolution. 016-985 Scan Press SMTP Error 016-764 Scan Press · Ensure the SMTP server address is correct. Address Error 016-767 Scan Press · Ensure the e-mail address is correct. - Dell 3115cn Color Laser Printer | Dell 3115cn User's Guide - Page 319
Mode Setting Sounds Sending a Delayed Fax Specifying the Fax Settings Sending a Fax Sending a Fax from the driver (Direct Fax) Receiving a Fax Color Fax Automatic Dialing Other Ways to Fax FAX Languages Setting Procedure 1. Using Fax Initial Setup in Windows Installer is recommended. Please follow - Dell 3115cn Color Laser Printer | Dell 3115cn User's Guide - Page 320
telephone number and name or company name, will be printed at the top of each page sent from your multifunction printer. 1. Press until >SETUP appears, and then press . 2. Press until >Admin Menu appears, and then press . 3. Press until >Fax Settings appears, and then press . 4. Press until >G3ID - Dell 3115cn Color Laser Printer | Dell 3115cn User's Guide - Page 321
When prompted to enter a letter, press the appropriate button until the correct letter appears on the display. For example, to enter the letter O, press 6. Each time you press 6, the display shows a different letter, M, N, O and finally 6. To enter additional letters, repeat the first step. Press - Dell 3115cn Color Laser Printer | Dell 3115cn User's Guide - Page 322
entered in order for the access code to function. For example, enter the access code 9 and then press Pause before reset the correct time and date if loss of power to the multifunction printer occurs. To set the time and date: 1. Press until >SETUP appears, and then press . 2. Press until >Admin - Dell 3115cn Color Laser Printer | Dell 3115cn User's Guide - Page 323
until >SETUP appears, and then press . 2. Press until >Admin Menu multifunction printer works normally even if the ringer is turned off. 7. Press Cancel to return to the standby mode. Speaker Volume NOTE: You can turn on/off the speaker only when the telephone line is connected. 1. Press until >FAX - Dell 3115cn Color Laser Printer | Dell 3115cn User's Guide - Page 324
numbers. For details, see "Automatic Dialing ". Press Start to scan data. Once Delayed Start mode is activated, your multifunction printer stores all of the documents to be faxed into its memory and sends them at the programmed time. After faxing in the Delayed Start mode is complete, the data in - Dell 3115cn Color Laser Printer | Dell 3115cn User's Guide - Page 325
the fax setup to monitor for that specific ring pattern. Auto Answer Fax The multifunction printer answers an incoming call and automatically goes into the receive mode. The number of rings before the multifunction printer answers can be set in the Auto Answer Fax option. If the user memory - Dell 3115cn Color Laser Printer | Dell 3115cn User's Guide - Page 326
Receive is set to On . Tone Duplex Print You can use duplex printing when you receive a fax. This option is available only when the optional duplexer is installed on your multifunction printer. Send Header Prints the sender record at the head of the fax. Select Off to turn this feature off - Dell 3115cn Color Laser Printer | Dell 3115cn User's Guide - Page 327
receives color faxes. Extel Hook You can set the threshold value for the OnHook mode. Thresh Country You can select the country where the multifunction printer is used. Fwd. Error Prints the document failed to transfer when Forward Set Print is set to Off . Print NOTE: Prefix Dial only supports - Dell 3115cn Color Laser Printer | Dell 3115cn User's Guide - Page 328
of the legacy fax devices do not support the V.34 modem speed of 33,600 bits per second (bps). You may experience fax send or receive errors due to the higher modem speed. You can disable the V.34 with the following instructions. 1. When the printer is in Customer Mode , select Fax/Scanner Diag and - Dell 3115cn Color Laser Printer | Dell 3115cn User's Guide - Page 329
fax send or receive errors due to this data encoding method. You can disable the JBIG and select the MH, MR or MMR encoding with the following instructions. You can change the modem transmission encoding with the following instructions. 1. When the printer is in Customer Mode , select Fax/Scanner - Dell 3115cn Color Laser Printer | Dell 3115cn User's Guide - Page 330
modem receive encoding with the following instructions. 1. When the printer is in Customer Mode , select Fax/Scanner Diag and press button. 2. Press Sending a Fax You can fax data from you multifunction printer. Also you can directly fax data transferred from the computer running Windows. Loading an - Dell 3115cn Color Laser Printer | Dell 3115cn User's Guide - Page 331
Adjust the document resolution, referring to "Adjusting the Document Resolution ". To fax a document from the document feeder glass: 1. Open the document cover. 2. Place the document face down on the document feeder glass and align it with the registration guide on the top left corner of the glass. - Dell 3115cn Color Laser Printer | Dell 3115cn User's Guide - Page 332
. NOTE: If you are faxing a page from a book or magazine, printed using a dot-matrix printer. Super Fine Uses for documents containing extremely fine detail. The super fine mode is enabled only if the remote printer also supports the Super Fine resolution. See the note below. NOTE: Faxes scanned - Dell 3115cn Color Laser Printer | Dell 3115cn User's Guide - Page 333
close the cover. 2. Press until >FAX appears, and then press . 3. Press until >Lighter/Darker appears. 4. Press to select the desired setting, and then press . Normal* Works well with standard typed or printed documents. Darker1 Works well with light print or faint pencil markings. Darker2 Darker3 - Dell 3115cn Color Laser Printer | Dell 3115cn User's Guide - Page 334
No , and then press . After all of the pages are scanned, select No when the display shows "Another Page? " 7. The number is dialed and then the multifunction printer begins sending the fax when the remote fax machine is ready. NOTE: Press Cancel to cancel the fax job at any time while sending the - Dell 3115cn Color Laser Printer | Dell 3115cn User's Guide - Page 335
meanings, see "Understanding Multifunction Printer Messages ". If you receive an error message, press Cancel to clear the message and try to send the document again. You can set your multifunction printer to print a confirmation report automatically after each fax transmission. For further details - Dell 3115cn Color Laser Printer | Dell 3115cn User's Guide - Page 336
1. Open the file you want to send by fax. 2. Open the print dialog box from the application, and then select Dell MFP Laser 3115cn Fax . 3. Click Preferences . 4. The Printing Preferences dialog box opens. You can use the FAX Settings to set the following settings. NOTE: The settings done here are - Dell 3115cn Color Laser Printer | Dell 3115cn User's Guide - Page 337
super fine mode is enabled only if the remote printer also supports Super Fine resolution. See the notes below. NOTE: Faxes printed in the Super-high image quality by Direct Fax driver transmits at the highest resolution supported by the receiving device. b. Transmission Report Purpose: To specify - Dell 3115cn Color Laser Printer | Dell 3115cn User's Guide - Page 338
refer to the Help file for the driver. a. Enter the name and phone number directly. b. Specify a destination that is saved to the Phone Book on the PC. c. Specify a destination that is saved to the Address Book on the Dell Multifunction Color Laser Printer 3115cn.* * This can only be used if the - Dell 3115cn Color Laser Printer | Dell 3115cn User's Guide - Page 339
in the Authorization area before sending a fax from the Dell MFP Laser 3115cn Fax if the Scan/Fax Set (Setup Admin menu Secure Settings ) settings on the Dell Multifunction Color Laser Printer 3115cn have been set. If you do not enter the correct password, the fax will not be sent. You can check - Dell 3115cn Color Laser Printer | Dell 3115cn User's Guide - Page 340
keys on the external telephone. The multifunction printer receives the document. Press the buttons slowly in sequence. If you still hear the fax tone from the remote machine, try pressing the two-digit keys once again. The remote receive code is set to Off at the factory. The first and the last - Dell 3115cn Color Laser Printer | Dell 3115cn User's Guide - Page 341
not a Dell Multifunction Color Laser Printer 3115cn, the color fax function may not operate well. If this is the case, send the fax as black and white. Color faxes cannnot be sent while a fax is being sent or received. Automatic redial is not done if a transmission error occurs while a color fax is - Dell 3115cn Color Laser Printer | Dell 3115cn User's Guide - Page 342
To use the color fax function, turn on the color fax function. The factory default setting is off. How to set the color fax function: 1. Press until >Setup appears, and then press . 2. Press until >Admin menu appears, and then press . 3. Press until >Fax Settings appears, and then press . 4. Press - Dell 3115cn Color Laser Printer | Dell 3115cn User's Guide - Page 343
to be output by Fax Transmit (Setup Admin menu System Settings ). Not Print Does not print the report. Print at Error* Prints the report when a communication error is detected. Print Always Always prints the report for the fax transmission. If the fax was sent in color, "Color" is output on the - Dell 3115cn Color Laser Printer | Dell 3115cn User's Guide - Page 344
, see "Lighter/Darker ". 4. The document scans into the memory. When the document is loaded on the document feeder glass, the LCD display asks if you want to send another page. Press to select Yes to add more documents or to select No to begin sending the fax immediately, and then press . 5. The - Dell 3115cn Color Laser Printer | Dell 3115cn User's Guide - Page 345
do not want to assign a name, skip this step. 7. Press Back when the name appears correctly or without entering a name. 8. To store more fax numbers, repeat steps 4 through 6. To return to the standby mode, press Cancel . Editing Group Dial Numbers You can delete a specific speed dial number from - Dell 3115cn Color Laser Printer | Dell 3115cn User's Guide - Page 346
glass into the memory. The multifunction printer dials each of the numbers included in the group. Printing a Speed Dial List You can check your automatic dial setting by printing a Speed Dial list. 1. Press until >SETUP appears, and then press . 2. Press until >Admin Menu appears, and then press - Dell 3115cn Color Laser Printer | Dell 3115cn User's Guide - Page 347
until >SETUP appears, and then press . 2. Press until >Admin Menu appears default. 9. To return to the standby mode, press Cancel . When a fax is received in the secure receiving mode, your multifunction printer 3. Enter the password, and then press . The faxes stored in memory are printed. To turn - Dell 3115cn Color Laser Printer | Dell 3115cn User's Guide - Page 348
list shows the status of pending faxes. You may print this list to confirm your changes after changing any settings. Printing a Report 1. Press until >SETUP appears, and then press . 2. Press until >Admin Menu appears, and then press . 3. Press until >Admin Reports appears, and then press . 4. Press - Dell 3115cn Color Laser Printer | Dell 3115cn User's Guide - Page 349
you answer the call and hear fax tones, the multifunction printer will answer the fax call if you Set OnHook to On (you can hear voice or fax tones from the remote machine), and then press Start and hang up the receiver. OR Press the two-digit remote receive code and hang up the receiver. Using - Dell 3115cn Color Laser Printer | Dell 3115cn User's Guide - Page 350
use the computer modem if your multifunction printer is sending or receiving a fax. Follow the instructions provided with your computer modem and fax application to fax via the computer modem. If you want to capture images using your multifunction printer and Dell ScanDirect™, send images using your - Dell 3115cn Color Laser Printer | Dell 3115cn User's Guide - Page 351
-connected, you need to install the Dell™ Multifunction Color Laser Printer 3115cn software on each computer that prints documents using the multifunction printer. Setting Up the Locally Shared Printer You can share your new printer on the network using the Drivers and Utilities CD that shipped with - Dell 3115cn Color Laser Printer | Dell 3115cn User's Guide - Page 352
, that are installed with the Drivers and Utilities CD. To share a locally-attached printer on the network, you need to share the multifunction printer, and then install the shared printer on network clients: 1. Click Start Settings Printers and Faxes (Printers for Windows 2000). 2. Right-click this - Dell 3115cn Color Laser Printer | Dell 3115cn User's Guide - Page 353
of all the network clients printing with this printer. 6. Click OK. 7. Click the Browse button and locate the driver in the Drivers and Utilities CD To check that the multifunction printer was successfully shared: Ensure the printer object in the Printers and Faxes (Printers for Windows 2000) folder - Dell 3115cn Color Laser Printer | Dell 3115cn User's Guide - Page 354
, based on network traffic and other factors. 7. Print a test page to verify printer driver installation. 8. Click Start Control Panel Hardware and Sound Printers (Start Control Panel Printers for Windows Server 2008). 9. Right-click the printer you just created and select Properties. 10. From the - Dell 3115cn Color Laser Printer | Dell 3115cn User's Guide - Page 355
available drivers. 6. Select whether you want this multifunction printer to be the default printer for the client, click Next, and then click Finish (For Windows 2000, click Finish). 7. Print a test page to verify printer installation: a. Click Start Settings Printers and Faxes (Printers for Windows - Dell 3115cn Color Laser Printer | Dell 3115cn User's Guide - Page 356
· BOOTP Printing a Network Configuration Page The Network Configuration page shows how the network interface card on your multifunction printer is configured. The default settings are suitable for most applications. 1. Press until >SETUP appears, and then press . 2. Press until >Admin Menu appears - Dell 3115cn Color Laser Printer | Dell 3115cn User's Guide - Page 357
/DHCP(default): TCP/IP address is assigned automatically by a DHCP or BOOTP server on your network. Static Addressing To enter the TCP/IP address from your multifunction printer's operator panel, take the following steps: 1. Press until >SETUP appears, and then press . 2. Press until >Admin Menu - Dell 3115cn Color Laser Printer | Dell 3115cn User's Guide - Page 358
. 5. Press until >DHCP or >BOOTP appears, and then press . Restoring the Network Configuration You can return the network configuration to its default settings. 1. Press until >SETUP appears, and then press . 2. Press until >Admin Menu appears, and then press . 3. Press until >Wired Net or >Wireless - Dell 3115cn Color Laser Printer | Dell 3115cn User's Guide - Page 359
6. Power the multifunction printer off and back on or reset the network interface card. Resetting the Network Interface Card You can reset the network interface card when a network problems occurs. 1. Press until >SETUP appears, and then press . 2. Press until >Admin Menu appears, and then press . - Dell 3115cn Color Laser Printer | Dell 3115cn User's Guide - Page 360
a document. Well-chosen typefaces make a document easier to read. The multifunction printer has numerous resident fonts in PCL 5/PCL 6 and Adobe PostScript 3. to describe the weight of a typeface are bold, medium, light, black, and heavy. Style refers to other typeface modifications, such as tilt - Dell 3115cn Color Laser Printer | Dell 3115cn User's Guide - Page 361
of fixed space fonts. It is a measure of the number of characters that will print in one horizontal inch of type. For example, all 10pitch fonts print 10 characters per inch (cpi) and all 12-pitch fonts print 12 cpi: In proportional (or typographic) fonts, every character can have a different width - Dell 3115cn Color Laser Printer | Dell 3115cn User's Guide - Page 362
are deleted when you turn off or reset the multifunction printer. Scalable fonts provide the flexibility of printing in many different point sizes. Your multifunction printer uses different scalable font formats for downloading fonts to the multifunction printer. PCL 5/PCL 6 uses Intellifont and - Dell 3115cn Color Laser Printer | Dell 3115cn User's Guide - Page 363
(PCL 5/PCL 6)/Times New Roman (Adobe PostScript 3), are available for all printer languages. The following table lists all the fonts resident in your multifunction printer. See "Printing a Font Sample List" for instructions on how to print samples of the fonts. You can select the resident fonts from - Dell 3115cn Color Laser Printer | Dell 3115cn User's Guide - Page 364
Demi Italic Carta Courier Chicago Courier It Clarendon Roman Courier Bd Clarendon Bold Courier BdIt Clarendon Light Cooper Black LetterGothic Cooper Black Italic LetterGothic It Cooper Gothic 32BC LetterGothic Bd Cooper Gothic 33BC Coronet Albertus Md Courier Albertus XBd Courier - Dell 3115cn Color Laser Printer | Dell 3115cn User's Guide - Page 365
Marigold Arial Arial It Arial Bd Arial BdIt TimesNew TimesNew It TimesNew Bd TimesNew BdIt Symbol Wingdings Line Printer Times Roman Times It Times Bd Times BdIt Helvetica Helvetica Ob Helvetica Bd Helvetica BdOb Eurostile Extended No. 2 Eurostile Bold Extended No. 2 Geneva Gill Sans - Dell 3115cn Color Laser Printer | Dell 3115cn User's Guide - Page 366
Helvetica Condensed Bold Oblique CourierPS Hoefler Text CourierPS Ob Hoefler Text Italic CourierPS Bd Hoefler Text Black CourierPS BdOb Hoefler Text Black Italic Hoefler Ornaments SymbolPS Joanna Joanna Italic Palatino Roman Joanna Bold Palatino It Joanna Bold Italic Palatino Bd - Dell 3115cn Color Laser Printer | Dell 3115cn User's Guide - Page 367
ITC A G Go Bk Optima Bold ITC A G Go BkOb Optima Bold Italic ITC A G Go Dm Oxford ITC A G Go DmOb Palatino Roman Palatino Italic ZapfC MdIt Palatino Bold Palatino Bold Italic ZapfDingbats Stempel Garamond Roman Stempel Garamond Italic Stempel Garamond Bold Stempel Garamond Bold Italic - Dell 3115cn Color Laser Printer | Dell 3115cn User's Guide - Page 368
set also defines which character will print for each key on the keyboard (or more specifically, for each code point). Some applications require different characters at some code points. To support multiple applications and languages, your multifunction printer has 36 symbol sets for the resident - Dell 3115cn Color Laser Printer | Dell 3115cn User's Guide - Page 369
-9 Latin 5 ISO 8859-10 Latin 6 PC-8 PC-8 DN PC-775 Baltic PC-850 Multilingual PC-852 Latin 2 PC-1004 OS/2 PC Turkish Windows 3.1 Latin 1 Windows 3.1 Latin 2 Windows 3.1 Latin 5 DeskTop PS Text MC Text Microsoft Publishing Math 8 PS Math Pi Font Legal ISO 4 United Kingdom ISO 6 ASCII - Dell 3115cn Color Laser Printer | Dell 3115cn User's Guide - Page 370
operator panel displays messages describing the current state of the multifunction printer and indicates possible printer problems you must resolve. This topic provides a list of all printer messages, explains what they mean, and tells you how to clear the messages. 1 LCD Panel 6 (Start) button - Dell 3115cn Color Laser Printer | Dell 3115cn User's Guide - Page 371
NNN-NNN relates to printer problems. Turn off the multifunction printer, and then on. If this does not solve the problem, contact Dell. See "Contacting Dell" in the Owner's Manual or in this manual. The outer levers on both sides of the fuser unit are not securely locked. Error NNN-NNN relates to - Dell 3115cn Color Laser Printer | Dell 3115cn User's Guide - Page 372
Cart. NNN-NNN Replace XXX Cartridge The specified print cartridge is either missing or not fully inserted into the multifunction printer. XXX is one of the following: · Black · Cyan · Yellow · Magenta Error NNN-NNN relates to printer problems. The print cartridge is low on toner. XXX is one of the - Dell 3115cn Color Laser Printer | Dell 3115cn User's Guide - Page 373
problems occurs. · Press to clear the message, cancel the current print job, and conduct the next print job, if any. · Press Cancel to cancel the print job. Invalid Job 016-799 Data Violation Press When the configuration of the multifunction printer on the printer driver 035-702 Fax Job Failure - Dell 3115cn Color Laser Printer | Dell 3115cn User's Guide - Page 374
A dial tone cannot be detected. Check the communication line. Busy 035-781 Fax Job Failure Press The busy tone was detected after dialing the number. Full 033-503 Fax Job Failure Press The fax memory is full. · Press to clear the message. · The fax memory is full. Print the received images, - Dell 3115cn Color Laser Printer | Dell 3115cn User's Guide - Page 375
SMB/FTP Error 016-781 Scan Press SMTP Error 016-764 Scan Press Network Error 016-770 Scan Press Login Error 016-782 Scan Press SMB/FTP Error 016-783 Scan Press SMB/FTP Error 016-787 Scan Press SMB/FTP Error 016-784 Scan Press SMB/FTP Error 016-789 Scan Press SMB/FTP Error 016-788 Scan Press Cannot - Dell 3115cn Color Laser Printer | Dell 3115cn User's Guide - Page 376
clear the message. · Ensure the user name and password used in the SMTP server are correct. SMTP Login Error 016-506 Scan Press There are unspecified settings. · Press to clear the message. · Ensure the SMTP server or POP3 server is already specified from the Dell Printer Configuration Web Tool. - Dell 3115cn Color Laser Printer | Dell 3115cn User's Guide - Page 377
correct from the Dell Printer Configuration Web Tool. · Ensure the settings for the DNS server are correct. An error occurred in the SMTP server. · Press to clear the message. · Contact your SMTP server administrator. The settings for the network environment required for scanning are not prepared - Dell 3115cn Color Laser Printer | Dell 3115cn User's Guide - Page 378
From the Multipurpose Feeder Removing Print Jams From the Standard Tray Removing Print Jams From the Fuser Unit Removing Print Jams From the Optional Duplexer Removing Print Jams From the Optional Feeder NOTE: Before buying large quantities of any print media, Dell recommends trying a sample first - Dell 3115cn Color Laser Printer | Dell 3115cn User's Guide - Page 379
caused by misfeeding paper occur frequently. Identifying the Location of Paper Jams The following illustration shows where paper jams may occur along the print media path. CAUTION: Do not attempt to clear any jams using tools or instruments. This may permanently damage the multifunction printer. - Dell 3115cn Color Laser Printer | Dell 3115cn User's Guide - Page 380
1 Front cover 2 Fuser unit 3 Standard 250-sheet tray 4 Multipurpose feeder 5 Optional 550-sheet paper feeder 6 Optional duplexer 7 Automatic Document Feeder (ADF) Removing Print Jams from the ADF When a document jams while it passes through the Automatic Document Feeder (ADF), remove jams in the - Dell 3115cn Color Laser Printer | Dell 3115cn User's Guide - Page 381
gently to the right. 4. Close the document cover. Then load the documents back into the ADF. Removing Print Jams From the Multipurpose Feeder NOTICE: To protect the drums of the print cartridges against bright light, close the front cover within five minutes. If the front cover remains open for more - Dell 3115cn Color Laser Printer | Dell 3115cn User's Guide - Page 382
from the print media path. 1. Pull the jammed paper out of the multipurpose feeder. If no jammed paper can be found or it is hard to remove the paper, close the multipurpose feeder and go to the next step to remove the jammed paper from the inside of the multifunction printer. 2. Remove the - Dell 3115cn Color Laser Printer | Dell 3115cn User's Guide - Page 383
button (right side) and remove the jammed paper. Then, confirm that there are no scraps of paper remaining inside the multifunction printer. 4. Insert the tray back into the multifunction printer, and push until it stops. 5. Open and close the front cover. Removing Print Jams From the Standard Tray - Dell 3115cn Color Laser Printer | Dell 3115cn User's Guide - Page 384
front cover remains open for more than five minutes, print quality may deteriorate. NOTE: To resolve the error displayed on the operator panel, you must clear all print media from the print media path. 1. Pull the tray out of the multifunction printer until it stops. Hold the tray with both hands - Dell 3115cn Color Laser Printer | Dell 3115cn User's Guide - Page 385
4. Open the front cover by pushing the button (right side) and remove the jammed paper. Then, confirm that there are no scraps of paper remaining inside the multifunction printer. 5. Close the front cover. - Dell 3115cn Color Laser Printer | Dell 3115cn User's Guide - Page 386
on the tray. Doing so could damage the tray or the inside of the multifunction printer. Removing Print Jams From the Fuser Unit NOTICE: Ensure nothing touches or scratches the surface (black-colored film) of the transfer belt unit. Scratches, dirt, or oil from your hands on the film of the transfer - Dell 3115cn Color Laser Printer | Dell 3115cn User's Guide - Page 387
: To resolve the error displayed on the operator panel, you must clear all print media from the print media path. 1. Turn off the multifunction printer and wait for 30 minutes. 2. Push the button (right side) and open the front cover. 3. Lift the levers at both ends of the fuser unit, and remove the - Dell 3115cn Color Laser Printer | Dell 3115cn User's Guide - Page 388
CAUTION: The fuser unit is hot. Do not touch it, doing so may cause burns. 4. Open the cover of the fuser unit and remove the jammed paper. 5. Close the cover of the fuser unit and press down the levers at both ends of the fuser unit. - Dell 3115cn Color Laser Printer | Dell 3115cn User's Guide - Page 389
there are no scraps of paper remaining inside the multifunction printer, and then close the front cover. Removing Print Jams From the Optional Duplexer NOTICE: Ensure nothing touches or scratches the surface (black-colored film) of the transfer belt unit. Scratches, dirt, or oil from your hands on - Dell 3115cn Color Laser Printer | Dell 3115cn User's Guide - Page 390
must clear all print media from the print media path. 1. Push the button (right side) and open the front cover. 2. Pull out the jammed paper from the duplexer. If jammed paper cannot be found, go to the next step. 3. Pull up on the belt release levers and rotate the transfer belt unit up as shown - Dell 3115cn Color Laser Printer | Dell 3115cn User's Guide - Page 391
4. Remove the jammed paper and close the transfer belt unit. 5. Close the front cover. - Dell 3115cn Color Laser Printer | Dell 3115cn User's Guide - Page 392
front cover remains open for more than five minutes, print quality may deteriorate. NOTE: To resolve the error displayed on the operator panel, you must clear all print media from the print media path. 1. Pull the tray out of the multifunction printer until it stops. Hold the tray with both hands - Dell 3115cn Color Laser Printer | Dell 3115cn User's Guide - Page 393
2. Remove all jammed and/or creased paper from the tray. 3. Pull the jammed paper out carefully to avoid tearing it. If it is still hard to remove the paper, go to the next step to remove the jammed paper from the inside of the multifunction printer. - Dell 3115cn Color Laser Printer | Dell 3115cn User's Guide - Page 394
4. Open the front cover by pushing the button (right side) and remove the jammed paper. Then, confirm that there are no scraps of paper remaining inside the multifunction printer. 5. Close the front cover. - Dell 3115cn Color Laser Printer | Dell 3115cn User's Guide - Page 395
jam message is not cleared after closing the front cover, pull out the 250-sheet tray from the multifunction printer and remove the jammed paper. 6. Insert the tray back into the multifunction printer, and push until it stops. CAUTION: Do not use excessive force on the tray. Doing so could damage - Dell 3115cn Color Laser Printer | Dell 3115cn User's Guide - Page 396
Paper Size Setup Paper Type B. Configuration Parallel Printing USB Printing Setup Network Setup Security 2. Troubleshooting Instructions: Diagnostic Menu Map (Customer Mode) Testing "Print Quality" Testing "TonerPalletCheck" or "ContaminationChk" 3. Other Problems: How to replace Print cartridges - Dell 3115cn Color Laser Printer | Dell 3115cn User's Guide - Page 397
Transfer Belt Unit The section will help you solve problems with the multifunction printer, options, or print quality. Troubleshooting Guide Basic Printer Problems Display Problems Printing Problems Print Quality Problems Copy Problems Fax Problems Scanning Problems Option Problems Other Problems - Dell 3115cn Color Laser Printer | Dell 3115cn User's Guide - Page 398
· Turn off the multifunction printer, wait for 10 seconds, and turn on the multifunction printer. · Self Test Message appears on the operator panel. When the test is completed, Print is displayed. Settings in the software program, the printer driver, or the printer utilities are overriding the - Dell 3115cn Color Laser Printer | Dell 3115cn User's Guide - Page 399
does not stack neatly in the output bin. Multifunction printer does not duplex pages. Ensure the width and length guides on the print media sources are adjusted correctly. Do not overfill the print media sources. Do not force print media into the multipurpose feeder when you load it; otherwise - Dell 3115cn Color Laser Printer | Dell 3115cn User's Guide - Page 400
See "System Settings". · Verify that the print media is within the printer specifications. · The fuser unit is old or damaged. Replace the fuser unit. See "Replacing the Fuser Unit". Toner spots appear on the page/printing is blurred. · Check the print cartridges to ensure that they are installed - Dell 3115cn Color Laser Printer | Dell 3115cn User's Guide - Page 401
the Advanced tab in the printer properties dialog box. · If you are using downloaded fonts, verify that the fonts are supported by the multifunction printer, the host computer, and the software program. Part or all of the page prints in black. · Check the print cartridges to ensure that they are - Dell 3115cn Color Laser Printer | Dell 3115cn User's Guide - Page 402
is faded. · This occurs when the multifunction printer is operating in a location where relative humidity reaches 85% or more. Adjust the humidity or relocate the multifunction printer to an appropriate environment. Color registration is out · Print the color registration chart and adjust the - Dell 3115cn Color Laser Printer | Dell 3115cn User's Guide - Page 403
the multifunction printer turned on to prevent condensation from forming. In this case, you can reduce power consumption by using the energy-saving mode. If the problems still occur, contact Dell. See "Contacting Dell" in the Owner's Manual or in this manual. · This occurs when you print on talc - Dell 3115cn Color Laser Printer | Dell 3115cn User's Guide - Page 404
Vertical blanks · A print cartridge is damaged. Replace the print cartridge with a new one. Copy Problems Problem Action A document loaded in the Automatic Document Feeder (ADF) · Set the Auto Fit mode to Off on the cannot be copied. operator panel. Fax Problems - Dell 3115cn Color Laser Printer | Dell 3115cn User's Guide - Page 405
a Print Cartridge". Some of the words on an incoming fax The fax machine sending you the fax had a temporary document are stretched. jam. There are lines on the documents you Check your scan glass for marks and clean it. See "Cleaning the send. scanner". The multifunction printer dials - Dell 3115cn Color Laser Printer | Dell 3115cn User's Guide - Page 406
you want to use to make certain that the scanner job is being sent to the correct port. · Check if the multifunction printer is printing received data. Scan the document after the current job is completed. · Graphics are scanned more slowly than text. · Communication speed becomes slow in - Dell 3115cn Color Laser Printer | Dell 3115cn User's Guide - Page 407
. See "Printing a System Settings Page". Ensure the option is selected in the printer driver you are using. The following table lists printer options and corrective actions for related problems. If the suggested corrective action does not correct the problem, call customer service. Problem Action - Dell 3115cn Color Laser Printer | Dell 3115cn User's Guide - Page 408
or the error message on the display. You need to know your printer model type and serial number. See the label on the back of the multifunction printer near the controller card for this information. Troubleshooting Guide Configuration of your printer instructions User Settings Setup Menus - Dell 3115cn Color Laser Printer | Dell 3115cn User's Guide - Page 409
* Only displayed when an optional 550-sheet paper feeder is installed on the multifunction printer. Setup printing Letter Plain from Multipurpose Feeder 1. On the printer operator menu, press until >SETUP appears, and then press . 2. Press until >Tray Settings appears, and then press . 3. Press - Dell 3115cn Color Laser Printer | Dell 3115cn User's Guide - Page 410
Press or until Letter appears, and then press . 10. Now we have the MPF Size set to Print and then click the Properties button, you will get this same driver properties window. 17. Open up Word and create a new document. 18. Go to File Print. 19. Select the Dell MFP Laser 3115cn from the printers - Dell 3115cn Color Laser Printer | Dell 3115cn User's Guide - Page 411
or until Auto appears, and then press . 10. Now we have the Tray1 Size set to Letter Print and then click the Properties button, you will get this same driver properties window. 17. Open up Word and create a new document. 18. Go to File Print. 19. Select the Dell MFP Laser 3115cn from the printers - Dell 3115cn Color Laser Printer | Dell 3115cn User's Guide - Page 412
the hardware settings on the multifunction printer correct Now, all software settings screen shots are from WORD, this was done in Word 2003. However if in any application, you go File Print and then click the Properties button, you will get this same driver properties window. 17. Open up Word and - Dell 3115cn Color Laser Printer | Dell 3115cn User's Guide - Page 413
Dell MFP Laser 3115cn from the printers list. 20. Click the Preferences button. 21. This brings up Printing Preferences. 22. Click the Paper/Output tab. 23. Select Paper Size to Letter. 24. Select Paper Source to Tray 2. 25. Click OK. 26. Now the printer driver is setup then press . 10. Now we have - Dell 3115cn Color Laser Printer | Dell 3115cn User's Guide - Page 414
However if in any application, you go File Print and then click the Properties button, you will get this same driver properties window. 17. Open up Word and create a new document. 18. Go to File Print. 19. Select the Dell MFP Laser 3115cn from the printers list. 20. Click the Preferences button. 21 - Dell 3115cn Color Laser Printer | Dell 3115cn User's Guide - Page 415
However if in any application, you go File Print and then click the Properties button, you will get this same driver properties window. 17. Open up Word and create a new document. 18. Go to File Print. 19. Select the Dell MFP Laser 3115cn from the printers list. 20. Click the Preferences button. 21 - Dell 3115cn Color Laser Printer | Dell 3115cn User's Guide - Page 416
paper size (Letter) appears, and then press . 10. Now we have the MPF Size set to Print and then click the Properties button, you will get this same driver properties window. 17. Open up Word and create a new document. 18. Go to File Print. 19. Select the Dell MFP Laser 3115cn from the printers - Dell 3115cn Color Laser Printer | Dell 3115cn User's Guide - Page 417
your computer or a print server using a USB or parallel cable. If your multifunction printer is attached to a network and not your computer, see "Setup Network". Installing Printer Drivers When you install the printer driver, also install the fax driver. After the printer driver has been installed - Dell 3115cn Color Laser Printer | Dell 3115cn User's Guide - Page 418
! screen appears, click Print Test Page if necessary. Click Finish. Windows® XP, Windows XP 64-bit Edition, Windows Server® 2003, Windows Server 2003 64-bit Edition, Windows Server ® 2008, Windows Server 2008 64-bit Edition, and Windows 2000 1. Connect the multifunction printer to your computer with - Dell 3115cn Color Laser Printer | Dell 3115cn User's Guide - Page 419
and not your computer, see "Setup Network". Setup Network NOTE: To use this multifunction printer in a UNIX or Linux environment, you need to install a UX Filter or Linux Driver. For more information on how to install and use these, refer to your User's Guide. NOTE: When using a CD drive in a Linux - Dell 3115cn Color Laser Printer | Dell 3115cn User's Guide - Page 420
Settings page again. Printer Setup NOTE: When you use IPv6 Mode for network printing, you cannot install the printer driver from the Drivers and Utilities CD. Use the Add Printer wizard in Windows Vista. For details, see "Printing With Web Services for Devices (WSD)" in the User's Guide. 1. Insert - Dell 3115cn Color Laser Printer | Dell 3115cn User's Guide - Page 421
the network, and then enter a share name that users will easily identify. c. If you want to set a multifunction printer as the default, select the Set this printer as default check box. d. If you want to restrict color printing, select the appropriate Dell ColorTrack option. Enter the password when - Dell 3115cn Color Laser Printer | Dell 3115cn User's Guide - Page 422
attached must be installed on the multifunction printer. Step 1. Install a multifunction printer to the already-operating wireless network (When wireless setting is already set to your computer) 1. Insert the Drivers and Utilities CD into your computer. 2. The Drivers and Utilities CD should launch - Dell 3115cn Color Laser Printer | Dell 3115cn User's Guide - Page 423
the User Account Control dialog box appears. 3. Select the Network Installation option button, and then click Next. 4. Select the Configure Wireless Printer using a USB connection (Recommended) option button, and then click Next. 5. Reset the wireless setting of the multifunction printer following - Dell 3115cn Color Laser Printer | Dell 3115cn User's Guide - Page 424
Enter Wireless Network Settings screen is sent to the multifunction printer. 10. On the Wireless configuration is now complete screen, create the wireless setting sent to the multifunction printer on your computer following the steps below, and then click Next. For Windows XP and Windows Server 2003 - Dell 3115cn Color Laser Printer | Dell 3115cn User's Guide - Page 425
that you send to the multifunction printer and click OK. i. Click Move up to move the setting to the top of the list. j. Click OK to close the Property dialog box. For Windows Vista: a. Open Control Panel. b. Select Network and Internet. c. Select Network and Sharing Center. d. Select Connect - Dell 3115cn Color Laser Printer | Dell 3115cn User's Guide - Page 426
A test page will be printed with the installed printer by clicking the Print Test Page button. Use the Dell Printer Configuration Web Tool to monitor the status of your network printer without leaving your desk. You can view and/or change the printer configuration settings, monitor toner level, and - Dell 3115cn Color Laser Printer | Dell 3115cn User's Guide - Page 427
OK to close the Property dialog box. For Windows Vista: a. Open Control Panel. b. Select Network and Internet. c. Select Network and Sharing Center. d. Select Connect to a network. e. Select dell_device from the network items listed in Connect to a network. f. Select Connect Anyway in the warning - Dell 3115cn Color Laser Printer | Dell 3115cn User's Guide - Page 428
is sent to the multifunction printer. 10. On the Wireless configuration is now complete screen, change the wireless setting of your computer to the same as that sent to the multifunction printer, and then click Next. For Windows XP and Windows Server 2003: a. Select Network Connections from Control - Dell 3115cn Color Laser Printer | Dell 3115cn User's Guide - Page 429
that you send to the multifunction printer in the list in Preferred Network group. g. Click Move up to move the setting to the top of the list. h. Click OK to close the Property dialog box. For Windows Vista: a. Open Control Panel. b. Select Network and Internet. c. Select Network and Sharing Center - Dell 3115cn Color Laser Printer | Dell 3115cn User's Guide - Page 430
13. with the installed printer by clicking the Print Test Page button. Step 2. Construct new wireless network environment for both computer and multifunction printer (When wireless setting needs to be set to your computer) 1. Insert the Drivers and Utilities CD into your computer to launch the - Dell 3115cn Color Laser Printer | Dell 3115cn User's Guide - Page 431
Windows Vista: a. Open Control Panel. b. Select Network and Internet. c. Select Network and Sharing Center. d. Select Connect to a network. e. Select dell_device from the network items listed in Connect to a network Wireless Network Printer Settings screen, and then click Next. 9. On the Printer - Dell 3115cn Color Laser Printer | Dell 3115cn User's Guide - Page 432
to the multifunction printer. 10. On the Wireless configuration is now complete screen, create the wireless setting sent to the multifunction printer on your computer following the steps below, and then click Next. For Windows XP and Windows Server 2003: a. Select Network Connections from Control - Dell 3115cn Color Laser Printer | Dell 3115cn User's Guide - Page 433
A test page will be printed with the installed printer by clicking the Print Test Page button. Use the Dell Printer Configuration Web Tool to monitor the status of your network printer without leaving your desk. You can view and/or change the printer configuration settings, monitor toner level, and - Dell 3115cn Color Laser Printer | Dell 3115cn User's Guide - Page 434
Step 1. Install a multifunction printer to the already-operating wireless network (When wireless setting is already set to your computer) For Dynamic Host Configuration Protocol network: 1. Create wireless setting of your computer following the steps below: For Windows XP and Windows Server 2003: a. - Dell 3115cn Color Laser Printer | Dell 3115cn User's Guide - Page 435
.254.1.1/ 5. Change the wireless setting of the multifunction printer on Dell Printer Configuration Web Tool. 6. Reset the multifunction printer. 7. Restore the wireless setting on your computer. For Windows XP and Windows Server 2003: a. Select Network Connections from Control Panel. b. Right-click - Dell 3115cn Color Laser Printer | Dell 3115cn User's Guide - Page 436
send to the multifunction printer in the list in Preferred Network group. g. Click Move up to move the setting to the top of the list. h. Click OK to close the Property dialog box. NOTE: When your operating system is earlier than Windows 2000, create settings according to the manual of the wireless - Dell 3115cn Color Laser Printer | Dell 3115cn User's Guide - Page 437
your operating system is earlier than Windows 2000, create settings according to the manual of the wireless setting tool provided by your wireless device manufacturer. For Windows Vista: a. Open Control Panel. b. Select Network and Internet. c. Select Network and Sharing Center. d. Select Connect to - Dell 3115cn Color Laser Printer | Dell 3115cn User's Guide - Page 438
5. Change the wireless setting of the multifunction printer on Dell Printer Configuration Web Tool. 6. Reset the multifunction printer. 7. Restore the wireless setting on your computer. For Windows XP and Windows Server 2003: a. Select Network Connections from Control Panel. b. Right-click - Dell 3115cn Color Laser Printer | Dell 3115cn User's Guide - Page 439
send to the multifunction printer in the list in Preferred Network group. g. Click Move up to move the setting to the top of the list. h. Click OK to close the Property dialog box. NOTE: When your operating system is earlier than Windows 2000, create settings according to the manual of the wireless - Dell 3115cn Color Laser Printer | Dell 3115cn User's Guide - Page 440
your operating system is earlier than Windows 2000, create settings according to the manual of the wireless setting tool provided by your wireless device manufacturer. For Windows Vista: a. Open Control Panel. b. Select Network and Internet. c. Select Network and Sharing Center. d. Select Connect to - Dell 3115cn Color Laser Printer | Dell 3115cn User's Guide - Page 441
http://168.254.1.1 5. See "Print Server Settings" in the "Dell Printer Configuration Web Tool" to create a wireless setting. 6. Reset the multifunction printer. 7. Restore the wireless setting on your computer. For Windows XP and Windows Server 2003: a. Select Network Connections from Control Panel - Dell 3115cn Color Laser Printer | Dell 3115cn User's Guide - Page 442
to the manual of the wireless setting tool provided by your wireless device manufacturer. For Windows Vista: a. Open Control Panel. b. Select Network and Internet. c. Select Network and Sharing Center. d. Select Connect to a network. e. Select the setting you send to the multifunction from the - Dell 3115cn Color Laser Printer | Dell 3115cn User's Guide - Page 443
your operating system is earlier than Windows 2000, create settings according to the manual of the wireless setting tool provided by your wireless device manufacturer. For Windows Vista: a. Open Control Panel. b. Select Network and Internet. c. Select Network and Sharing Center. d. Select Connect to - Dell 3115cn Color Laser Printer | Dell 3115cn User's Guide - Page 444
5. Change the wireless setting of the multifunction printer on Dell Printer Configuration Web Tool. 6. Reset the multifunction printer. 7. Restore the wireless setting on your computer. For Windows XP and Windows Server 2003: a. Select Network Connections from Control Panel. b. Right-click - Dell 3115cn Color Laser Printer | Dell 3115cn User's Guide - Page 445
to the manual of the wireless setting tool provided by your wireless device manufacturer. For Windows Vista: a. Open Control Panel. b. Select Network and Internet. c. Select Network and Sharing Center. d. Select Connect to a network. e. Select the setting you send to the multifunction from the - Dell 3115cn Color Laser Printer | Dell 3115cn User's Guide - Page 446
is a success. Wireless Setting through Dell Printer Configuration Web Tool - Advanced setup Access point (Infrastructure, DHCP network) 1. Create new wireless settings for your computer. For Windows XP and Windows Server 2003: a. Select Network Connections from Control Panel. b. Right-click - Dell 3115cn Color Laser Printer | Dell 3115cn User's Guide - Page 447
the settings for the wireless adapter to the default. i. Press Menu on printer Control Panel. ii. Scroll down and select Admin Menu. iii. Scroll down and select Wireless net. iv. Scroll down and select Reset MPC. v. Restart the multifunction printer. b. Retrieve the wireless adapter IP address on - Dell 3115cn Color Laser Printer | Dell 3115cn User's Guide - Page 448
the typical network printer installation method to complete driver installation. 5. To communicate with the multifunction printer, you need to restore the previous wireless settings on your computer. 6. Restore the previous wireless settings for your computer. For Windows XP and Windows Server 2003 - Dell 3115cn Color Laser Printer | Dell 3115cn User's Guide - Page 449
to the multifunction printer in the list in the Preferred Network group g. Click Move up to move the setting to the top of the list. h. Click OK to close the Property dialog box. NOTE: When your operating system is earlier than Windows 2000, create settings according to the manual of the wireless - Dell 3115cn Color Laser Printer | Dell 3115cn User's Guide - Page 450
your operating system is earlier than Windows 2000, create settings according to the manual of the wireless setting tool provided by your wireless device manufacturer. For Windows Vista: a. Open Control Panel. b. Select Network and Internet. c. Select Network and Sharing Center. d. Select Connect to - Dell 3115cn Color Laser Printer | Dell 3115cn User's Guide - Page 451
Windows Server 2008: a. Open Control Panel. b. Select Network and Sharing Center. c. Select Connect to a network. d. Select dell_device from the network items listed in Connect to a network of the multifunction printer to your computer settings. a. Press the Menu button. b. Scroll to the Admin menu. - Dell 3115cn Color Laser Printer | Dell 3115cn User's Guide - Page 452
Web browser. For example, http://:192.168.1.2 6. Change wireless settings of the multifunction printer from Dell Printer Configuration Web Tool. a. Click Print server setting on the left navigational bar. b. Click Print server setting tab. c. Click Wireless LAN sub-tab. d. Change the SSID setting - Dell 3115cn Color Laser Printer | Dell 3115cn User's Guide - Page 453
: When your operating system is earlier than Windows 2000, create settings according to the manual of the wireless setting tool provided by your wireless device manufacturer. Setup Security 1. Press until >SETUP appears, and then press . 2. Press until >Admin Menu appears, and then press . 3. Press - Dell 3115cn Color Laser Printer | Dell 3115cn User's Guide - Page 454
operator panel. When changing the password for the Dell Printer Configuration Web Tool, click Set Password on the left frame and set the password. Troubleshooting Instructions Use the Customer Mode to locate the unit in the multifunction printer that causes a problem. Diagnostic Menu Map (Customer - Dell 3115cn Color Laser Printer | Dell 3115cn User's Guide - Page 455
Testing "Print Quality" "Print Quality" is used to diagnose print quality defects. 1. On the Customer Mode menu, go down to Cyan20%, Magenta20%, Yellow20%, or Black20% and press . - Dell 3115cn Color Laser Printer | Dell 3115cn User's Guide - Page 456
Fax/Scanner Dialog Parameter Fax Parameter Capability ECM, and then press . Enable* Enables the ECM mode. Disable Disables the ECM mode. Clear NVRAM You can restore the original factory default menu settings by initializing NVRAM. 1. Press until >SETUP appears, and then press . 2. Press until >Admin - Dell 3115cn Color Laser Printer | Dell 3115cn User's Guide - Page 457
in this manual. Dell recommends Dell print cartridges for your multifunction printer. Dell does not provide warranty coverage for problems caused by using accessories, parts, or components not supplied by Dell. CAUTION: Never throw used print cartridges into a fire. The residual toner could explode - Dell 3115cn Color Laser Printer | Dell 3115cn User's Guide - Page 458
want to replace and pull it out. CAUTION: Since the used print cartridge may spill some toner, do not shake it. Installing a New Print Cartridge 1. Select the new print cartridge which color matches the color of the handles on the printer cartridge to be replaced and shake it five or six times to - Dell 3115cn Color Laser Printer | Dell 3115cn User's Guide - Page 459
from its packaging. NOTE: To protect the drum against bright light, do not remove the orange protective cover of the print cartridge before the cartridge is inserted into its slot in the multifunction printer. 3. Completely remove the seal from the print cartridge by pulling the tab on the end of - Dell 3115cn Color Laser Printer | Dell 3115cn User's Guide - Page 460
5. Remove the orange protective cover of the installed print cartridge and discard. 6. Close the front cover. - Dell 3115cn Color Laser Printer | Dell 3115cn User's Guide - Page 461
opening the front cover. Dell fuser unit is available only through Dell. To order by phone, see "Contacting Dell" in the Owner's Manual or in this manual. Dell recommends Dell fuser unit for your multifunction printer. Dell does not provide warranty coverage for problems caused by using accessories - Dell 3115cn Color Laser Printer | Dell 3115cn User's Guide - Page 462
3. Lift the chute gate to its upright position. 4. Release the levers at both ends of the fuser unit. - Dell 3115cn Color Laser Printer | Dell 3115cn User's Guide - Page 463
5. Hold both sides of the installed fuser unit, pull it towards the front of the multifunction printer to release the connection on the right side, then lift upward to remove. Installing a New Fuser Unit 1. Unpack a new fuser unit and hold both sides of the fuser unit with both hands. 2. - Dell 3115cn Color Laser Printer | Dell 3115cn User's Guide - Page 464
1. 2. With the connector of the fuser unit toward the slot, push the connector into the slot firmly. NOTE: Ensure that the fuser connector is firmly seated. 3. Lock both levers at the ends of the fuser unit. - Dell 3115cn Color Laser Printer | Dell 3115cn User's Guide - Page 465
4. Lower the chute gate to its horizontal position. 5. Close the front cover. - Dell 3115cn Color Laser Printer | Dell 3115cn User's Guide - Page 466
the safety instructions in your Owner's Manual or Product Information Guide. Dell separator rollers are available only through Dell. To order by phone, see "Contacting Dell" in the Owner's Manual or in this manual. Dell recommends Dell separator rollers for your multifunction printer. Dell does not - Dell 3115cn Color Laser Printer | Dell 3115cn User's Guide - Page 467
NOTE: Remove all paper from the tray before opening the separator roller cover. 2. Push back the handles on each side of the separator roller cover as shown in the following illustration and open the cover. 3. Turn the separator roller until the roller hook can be seen. - Dell 3115cn Color Laser Printer | Dell 3115cn User's Guide - Page 468
4. Pull the separator roller hook out of the groove in the axle, and then slide the separator roller to the right. Installing the New Separator Roller in the Tray 1. Align the hole of the new separator roller with the axle. - Dell 3115cn Color Laser Printer | Dell 3115cn User's Guide - Page 469
2. Slide the separator roller along the axle so the protrusions fit completely into the slots and the roller hook reseats into the groove on the axle. 3. Close the separator roller cover until both sides click into place. 4. Load paper into the tray and replace it into the multifunction printer. - Dell 3115cn Color Laser Printer | Dell 3115cn User's Guide - Page 470
4. Removing the Used Separator Roller Inside the Multifunction Printer 1. Pull the tray out of the multifunction printer until it stops. Hold the tray with both hands, lift the front slightly, and remove it from the multifunction printer. 2. Turn the separator roller until the roller hook can be - Dell 3115cn Color Laser Printer | Dell 3115cn User's Guide - Page 471
the axle, and then slide the separator roller to the left. 4. Repeat steps 2 and 3 to remove the other separator roller from the inside of the multifunction printer. - Dell 3115cn Color Laser Printer | Dell 3115cn User's Guide - Page 472
Installing the New Separator Roller Inside the Multifunction Printer 1. Align the hole of the new separator roller with the axle. 2. Slide the separator roller along the axle so the protrusions fit completely into the slots and the roller hook re-seats into the groove on the axle. - Dell 3115cn Color Laser Printer | Dell 3115cn User's Guide - Page 473
into the multifunction printer. Replacing the Transfer Belt Unit CAUTION: Before performing any of the following procedures, read and follow the safety instructions in your Owner's Manual or Product Information Guide. NOTICE: Ensure nothing touches or scratches the surface (black-colored film) of - Dell 3115cn Color Laser Printer | Dell 3115cn User's Guide - Page 474
or in this manual. Dell recommends Dell transfer belt units for your multifunction printer. Dell does not provide warranty coverage for problems caused by using accessories, parts, or components not supplied by Dell. Removing the Used Transfer Belt Unit NOTE: Remove any print jobs from the output - Dell 3115cn Color Laser Printer | Dell 3115cn User's Guide - Page 475
: Do not touch the inside of the multifunction printer. Some parts may be hot. Allow time for the multifunction printer to cool before attempting to remove parts in this area. 4. Hold both sides of the transfer belt unit with both hands and pull up the left side of the unit until the peg on the left - Dell 3115cn Color Laser Printer | Dell 3115cn User's Guide - Page 476
1. Unpack a new transfer belt unit. 2. Insert the left peg into the corresponding left side belt unit hole, then align the right peg with the groove, and then push down on the right side of the transfer belt unit to seat into place. 3. Close the transfer belt unit by pulling it down until it clicks. - Dell 3115cn Color Laser Printer | Dell 3115cn User's Guide - Page 477
4. Remove the film cover from the installed transfer belt unit and discard. 5. Close the front cover. - Dell 3115cn Color Laser Printer | Dell 3115cn User's Guide - Page 478
provides information for network printing with WSD, Microsoft's new Windows Vista protocol. Printer Setup Printer Setup You can install your new printer on the network using the Drivers and Utilities CD that shipped with your printer, or using Microsoft's Windows Add Printer wizard. However, when - Dell 3115cn Color Laser Printer | Dell 3115cn User's Guide - Page 479
Print Cartridges Replacing the Fuser Unit Replacing Separator Rollers Replacing the Transfer Belt Unit Adjusting Color Registration Cleaning the scanner Cleaning the Roller in the ADF Determining the Status of Supplies If your multifunction printer is connected to the network, the Dell Printer - Dell 3115cn Color Laser Printer | Dell 3115cn User's Guide - Page 480
order toner for your multifunction printer. You can also order print cartridges by the following method. 1. Click Start All Programs Dell Printers Additional Color Laser Software Dell Supplies Management System. The Dell Supplies Management System window appears. 2. Select your multifunction printer - Dell 3115cn Color Laser Printer | Dell 3115cn User's Guide - Page 481
instructions in your Owner's Manual or Product Information Guide. NOTICE: To protect the drums of the print cartridges Dell" in the Owner's Manual or in this manual. Dell recommends that you use Dell print cartridges for your multifunction printer. Dell does not provide warranty coverage for problems - Dell 3115cn Color Laser Printer | Dell 3115cn User's Guide - Page 482
in burns and injuries. CAUTION: Since the used print cartridge may spill some toner, do not shake it. Removing the Used Print Cartridge 1. Push the button (right side) and open the front cover. 2. Grasp the handles at both ends of the print cartridge that you want to replace and pull it out - Dell 3115cn Color Laser Printer | Dell 3115cn User's Guide - Page 483
print cartridge may spill some toner, do not shake it. Installing a New Print Cartridge 1. Select the new print cartridge which color matches the color of the handles on the printer cartridge to be replaced and shake it five or six times to distribute the toner evenly. 2. Remove the print cartridge - Dell 3115cn Color Laser Printer | Dell 3115cn User's Guide - Page 484
protect the drum against bright light, do not remove the orange protective cover of the print cartridge before the cartridge is inserted into its slot in the multifunction printer. 3. Completely remove the seal from the print cartridge by pulling the tab on the end of the print cartridge. NOTE: Pull - Dell 3115cn Color Laser Printer | Dell 3115cn User's Guide - Page 485
5. Remove the orange protective cover of the installed print cartridge and discard. 6. Close the front cover. - Dell 3115cn Color Laser Printer | Dell 3115cn User's Guide - Page 486
opening the front cover. Dell fuser unit is available only through Dell. To order by phone, see "Contacting Dell" in the Owner's Manual or in this manual. Dell recommends Dell fuser unit for your multifunction printer. Dell does not provide warranty coverage for problems caused by using accessories - Dell 3115cn Color Laser Printer | Dell 3115cn User's Guide - Page 487
2. 3. Lift the chute gate to its upright position. 4. Release the levers at both ends of the fuser unit. - Dell 3115cn Color Laser Printer | Dell 3115cn User's Guide - Page 488
5. Hold both sides of the installed fuser unit, pull it towards the front of the multifunction printer to release the connection on the right side, then lift upward to remove. Installing a New Fuser Unit 1. Unpack a new fuser unit and hold both sides of the fuser unit with both hands. 2. - Dell 3115cn Color Laser Printer | Dell 3115cn User's Guide - Page 489
1. 2. With the connector of the fuser unit toward the slot, push the connector into the slot firmly. NOTE: Ensure that the fuser connector is firmly seated. 3. Lock both levers at the ends of the fuser unit. - Dell 3115cn Color Laser Printer | Dell 3115cn User's Guide - Page 490
4. Lower the chute gate to its horizontal position. 5. Close the front cover. - Dell 3115cn Color Laser Printer | Dell 3115cn User's Guide - Page 491
the safety instructions in your Owner's Manual or Product Information Guide. Dell separator rollers are available only through Dell. To order by phone, see "Contacting Dell" in the Owner's Manual or in this manual. Dell recommends Dell separator rollers for your multifunction printer. Dell does not - Dell 3115cn Color Laser Printer | Dell 3115cn User's Guide - Page 492
NOTE: Remove all paper from the tray before opening the separator roller cover. 2. Push back the handles on each side of the separator roller cover as shown in the following illustration and open the cover. 3. Turn the separator roller until the roller hook can be seen. - Dell 3115cn Color Laser Printer | Dell 3115cn User's Guide - Page 493
4. Pull the separator roller hook out of the groove in the axle, and then slide the separator roller to the right. Installing the New Separator Roller in the Tray 1. Align the hole of the new separator roller with the axle. - Dell 3115cn Color Laser Printer | Dell 3115cn User's Guide - Page 494
2. Slide the separator roller along the axle so the protrusions fit completely into the slots and the roller hook reseats into the groove on the axle. 3. Close the separator roller cover until both sides click into place. 4. Load paper into the tray and replace it into the multifunction printer. - Dell 3115cn Color Laser Printer | Dell 3115cn User's Guide - Page 495
4. Removing the Used Separator Roller Inside the Multifunction Printer 1. Pull the tray out of the multifunction printer until it stops. Hold the tray with both hands, lift the front slightly, and remove it from the multifunction printer. 2. Turn the separator roller until the roller hook can be - Dell 3115cn Color Laser Printer | Dell 3115cn User's Guide - Page 496
the axle, and then slide the separator roller to the left. 4. Repeat steps 2 and 3 to remove the other separator roller from the inside of the multifunction printer. - Dell 3115cn Color Laser Printer | Dell 3115cn User's Guide - Page 497
Installing the New Separator Roller Inside the Multifunction Printer 1. Align the hole of the new separator roller with the axle. 2. Slide the separator roller along the axle so the protrusions fit completely into the slots and the roller hook re-seats into the groove on the axle. - Dell 3115cn Color Laser Printer | Dell 3115cn User's Guide - Page 498
into the multifunction printer. Replacing the Transfer Belt Unit CAUTION: Before performing any of the following procedures, read and follow the safety instructions in your Owner's Manual or Product Information Guide. NOTICE: Ensure nothing touches or scratches the surface (black-colored film) of - Dell 3115cn Color Laser Printer | Dell 3115cn User's Guide - Page 499
or in this manual. Dell recommends Dell transfer belt units for your multifunction printer. Dell does not provide warranty coverage for problems caused by using accessories, parts, or components not supplied by Dell. Removing the Used Transfer Belt Unit NOTE: Remove any print jobs from the output - Dell 3115cn Color Laser Printer | Dell 3115cn User's Guide - Page 500
: Do not touch the inside of the multifunction printer. Some parts may be hot. Allow time for the multifunction printer to cool before attempting to remove parts in this area. 4. Hold both sides of the transfer belt unit with both hands and pull up the left side of the unit until the peg on the left - Dell 3115cn Color Laser Printer | Dell 3115cn User's Guide - Page 501
1. Unpack a new transfer belt unit. 2. Insert the left peg into the corresponding left side belt unit hole, then align the right peg with the groove, and then push down on the right side of the transfer belt unit to seat into place. 3. Close the transfer belt unit by pulling it down until it clicks. - Dell 3115cn Color Laser Printer | Dell 3115cn User's Guide - Page 502
4. Remove the film cover from the installed transfer belt unit and discard. 5. Close the front cover. Adjusting Color Registration To adjust the color registration when you first install the multifunction printer or after moving it to a new location, follow the procedure below. See "Operator Panel" - Dell 3115cn Color Laser Printer | Dell 3115cn User's Guide - Page 503
>SETUP appears, and then press . 2. Press until >Admin Menu appears, and then press . 3. Press until >Maintenance appears, and then press . 4. Press until >Color Reg Adjust appears, and then press . 5. Press until >ColorRegi Chart appears, and then press . The color registration chart is printed - Dell 3115cn Color Laser Printer | Dell 3115cn User's Guide - Page 504
: After printing the color registration chart, do not turn off the multifunction printer until the printer motor has stopped running. NOTE: If 0 is not next to the straightest lines, determine the values and adjust the multifunction printer again. Cleaning the scanner Keeping the scanner clean helps - Dell 3115cn Color Laser Printer | Dell 3115cn User's Guide - Page 505
Wipe the surface of the document feeder glass and ADF glass until it is clean and dry. 1 White Sheet NOTE: Handle with care. 2 Document Cover 3 ADF Glass 4 Document Feeder Glass 4. Wipe the underside of the white document cover and white sheet until it is clean and dry. 5. Close the document cover. - Dell 3115cn Color Laser Printer | Dell 3115cn User's Guide - Page 506
two rollers in the ADF clean helps ensure the best possible copies. Dell recommends cleaning the rollers at regular intervals. 1. Open the cover of the ADF. 2. Wipe the roller with a dry soft lint-free cloth or paper towel until it is clean. If the rollers get soiled with ink stains, paper from the - Dell 3115cn Color Laser Printer | Dell 3115cn User's Guide - Page 507
media handling options must be removed from the multifunction printer. For shipping, pack the multifunction printer and print media handling options securely to avoid damage. Removing the Optional 550-Sheet Paper Feeder Removing the Optional Duplexer Removing the Optional Memory Card Removing the - Dell 3115cn Color Laser Printer | Dell 3115cn User's Guide - Page 508
off the tray module, and place it on a level surface. CAUTION: To lift the multifunction printer safely, remove the print cartridges and lift it with two people facing the front and back. Never try to lift the multifunction printer while facing its right and left sides. 5. Insert the tray into the - Dell 3115cn Color Laser Printer | Dell 3115cn User's Guide - Page 509
the Optional Duplexer NOTICE: Ensure nothing touches or scratches the surface (black-colored film) of the transfer belt unit. Scratches, dirt, or oil from your hands on the film of the transfer belt unit may reduce print quality. NOTICE: To protect the drums of the print cartridges against bright - Dell 3115cn Color Laser Printer | Dell 3115cn User's Guide - Page 510
3. Pull up on the belt release levers and rotate the transfer belt unit up as shown in the illustration. 4. Hold the latch of the duplexer as shown in the following illustration and pull out the duplexer from the multifunction printer. - Dell 3115cn Color Laser Printer | Dell 3115cn User's Guide - Page 511
5. Close the transfer belt unit by pulling it down. 6. Close the front cover. - Dell 3115cn Color Laser Printer | Dell 3115cn User's Guide - Page 512
is turned off and unplug all cables including the power cord from the rear of the multifunction printer. 2. Turn the screw on the control board cover gently in a counter-clockwise direction and open the cover. 3. Pull the latches on both edges of the - Dell 3115cn Color Laser Printer | Dell 3115cn User's Guide - Page 513
4. Hold the memory card and pull it out. 5. Close the control board cover and turn the screw clockwise. - Dell 3115cn Color Laser Printer | Dell 3115cn User's Guide - Page 514
adapter is also installed, it must be removed first. 1. Ensure that the multifunction printer is turned off and unplug all cables including the power cord from the rear of the multifunction printer. 2. Turn the screw on the control board cover gently in counter-clockwise direction and open the - Dell 3115cn Color Laser Printer | Dell 3115cn User's Guide - Page 515
4. Hold the multi-protocol card and remove it from the control board. 5. Close the control board cover and turn the screw clockwise. - Dell 3115cn Color Laser Printer | Dell 3115cn User's Guide - Page 516
Removing the Wireless Printer Adapter 1. Ensure that the multifunction printer is turned off. 2. Turn the screw on the control board cover gently in a counter-clockwise direction and open the cover. 3. Remove the wireless printer adapter cap from the control board by releasing the cap's hooks. - Dell 3115cn Color Laser Printer | Dell 3115cn User's Guide - Page 517
4. Remove the wireless printer adapter from the multifunction printer. 5. Attach the plate by tightening the screw on the back side of the multifunction printer to cover the wireless printer adapter socket. - Dell 3115cn Color Laser Printer | Dell 3115cn User's Guide - Page 518
6. Close the control board cover and turn the screw clockwise. - Dell 3115cn Color Laser Printer | Dell 3115cn User's Guide - Page 519
; UNIX3 (RedHat AS 2.1, HP-UX 11.i, Solaris 9/10) (English). 1 Your Dell Multifunction Color Laser Printer 3115cn is compatible with Microsoft, Novell and Linux operating systems, but Dell technical phone support only supports factory-installed operating systems (Microsoft) for the first 30 days - Dell 3115cn Color Laser Printer | Dell 3115cn User's Guide - Page 520
64-bit Edition, Windows Server 2003, Windows Server 2003 Enterprise x64 Edition, Windows Server 2008, Windows Server 2008 Enterprise x64 Edition, Windows 2000, Windows NT 4.0, UNIX (Solaris 9/10, HP-UX 11.i), Linux (Red Hat ES 3/4, SuSE 9.2/9.3, TurboLinux 10 Desktop), Mac OS X (10.2.8, 10.3.9, 10 - Dell 3115cn Color Laser Printer | Dell 3115cn User's Guide - Page 521
, or computers). This information helps network administrators manage the network (analyze performance, traffic, errors, and so on). Dell Multifunction Color Laser Printer 3115cn complies with standard industry MIB specifications, allowing the multifunction printer to be recognized and managed by - Dell 3115cn Color Laser Printer | Dell 3115cn User's Guide - Page 522
the following requirements: Connection specifications and symbols Connection type 1 Wall jack connector 2 Phone connector 3 USB USB2.0 4 Parallel 5 Wireless 6 Ethernet IEEE 1284 IEEE802.11b/802.11g 10 Base-T/100 Base-TX - Dell 3115cn Color Laser Printer | Dell 3115cn User's Guide - Page 523
Description Optical: 600 x 600 dpi Color 17 cpm, Black&White 30 cpm (In case when scanned from document feeder glass, and feed paper from standard tray) A5, A4, B5, Executive, Letter, Legal 13", Legal 14 Document feeder glass: 25% - 400%, ADF: 25% - 400% 1 - 99 pages Text, Text&Photo, Photo, Best - Dell 3115cn Color Laser Printer | Dell 3115cn User's Guide - Page 524
dpi) Color: 939.8 µs/line (8 bit), 1879.6 µs/line (16 bit) Facsimile Specifications Compatibility ITU-T Group 3 Applicable line Public Switched Telephone Network (PSTN) or behind PABX Data coding MH/MR/MMR/JBIG Modem speed 33.6 Kbps Transmission speed Approx. 3 seconds/page *Transmission - Dell 3115cn Color Laser Printer | Dell 3115cn User's Guide - Page 525
printer features to output in the following manner. Input paper selection Double-sided printing Output paper selection NOTICE: Depending on the configurations of the printers files and XWD (X Windows Dump) image files received from a workstation connected to the multifunction printer by a USB cable - Dell 3115cn Color Laser Printer | Dell 3115cn User's Guide - Page 526
be used, ensure that the USB ports are working. (Mandatory) 2. Set up IP address and subnet mask when the multifunction printer is used in the network environment. (Mandatory) 3. Make TBCP (Tagged Binary Communication Protocol) Filter function available if TBCP (Tagged Binary Communication Protocol - Dell 3115cn Color Laser Printer | Dell 3115cn User's Guide - Page 527
. Supported operating system is described in "Page Description of output printer. For more information, see the HP-UX related manual. Files Added print tool Source file of the model interface program (stored as the printer name during registration) Interface program for PRINTER (stored as the printer - Dell 3115cn Color Laser Printer | Dell 3115cn User's Guide - Page 528
Dell Multifunction Color Laser Printer 3115cn postio3115.fd postio3115 Filter description file /usr/share/man/man1 download3115.fd txt2ps23115cn.1 download3115 filter description file Manual page file for txt2ps2 sunras2ps23115cn.1 Manual page file for sunras2ps2 tiff2ps23115cn.1 Manual page - Dell 3115cn Color Laser Printer | Dell 3115cn User's Guide - Page 529
.1 Manual page file for xwd2ps2 NOTE: The directories listed are default directories. Installation Procedure Overview This section provides information on the installation of the UNIX filter using the UNIX workstation. Linux 1. Setup the multifunction printer and network. 2. Insert the Drivers - Dell 3115cn Color Laser Printer | Dell 3115cn User's Guide - Page 530
model to install. Printer Model? 1. Dell MFP Color Laser 3115cn 2. Exit Enter Process No(1/2)? : 1 5. It asks whether you want to install the filter. Type . Install Filter? (y/n) [y] : y NOTE: If [ ] appears in a message, the default value will appear inside the [ ]. It will be selected when - Dell 3115cn Color Laser Printer | Dell 3115cn User's Guide - Page 531
installation is complete. Setting the Multifunction Printer Write system settings in /etc/printcap no spooling directory, it is not possible to print large files. NOTICE: The account files or logging on Solaris Installation/System Setting 1. Insert the Drivers and Utilities CD in the CD-ROM drive - Dell 3115cn Color Laser Printer | Dell 3115cn User's Guide - Page 532
model to install. Printer Model ? 1. Dell MFP Color Laser 3115cn 2. Exit Enter Process No (1/2)? : 1 5. The following menu appears. Select and set up the local printer. Solaris Installation for Dell MFP Laser Printer 3115cn Type Printer 1. Set Local Printer 2. Set Remote Printer Enter Process No - Dell 3115cn Color Laser Printer | Dell 3115cn User's Guide - Page 533
is 'ps' (y/n)[y] : y NOTICE: Type ps when the multifunction printer is a network connection printer. 9. Type the printer name to be registered with the system. Enter printer-name? [dell3115cn] : dell3115cn Printer-name is 'dell3115cn' (y/n)[y] : y 10. Specify the directory to install the utility. To - Dell 3115cn Color Laser Printer | Dell 3115cn User's Guide - Page 534
device file for all workstations. 3. Type ./install.sh and run the installer. # ./install.sh 4. Select the printer model to install. Printer Model ? 1. Dell MFP Color Laser 3115cn 2. Exit Enter Process No (1/2)? : 1 5. Specify the directory to install the utility. Enter install directory name /usr - Dell 3115cn Color Laser Printer | Dell 3115cn User's Guide - Page 535
. Delete the filters registered during the installation using the lpfilter command. # lpfilter -f dell3115cn -x (for Dell Multifunction Color Laser Printer 3115cn) # lpfilter -f download3115 -x # lpfilter -f postio3115cn -x # lpfilter -f posttxt3115cn -x 3. Delete the symbolic files required to call - Dell 3115cn Color Laser Printer | Dell 3115cn User's Guide - Page 536
the following files from /etc/lp/fd. Filter description files for various printers. dell3115cn.fd (for Dell Multifunction Color Laser Printer 3115cn) download3115.fd postio3115cn.fd posttxt3115cn.fd HP-UX 1. Delete the multifunction printer that was registered with the system. Use the sam command to - Dell 3115cn Color Laser Printer | Dell 3115cn User's Guide - Page 537
settings when using various utilities via /etc/printcap. Hereinafter, it is referred to as the default command option setting file. Method: To define a multifunction printer named a4d which prints on A4 with the long-edge binding feature turned on, follow the following steps. Procedure: 1. Register - Dell 3115cn Color Laser Printer | Dell 3115cn User's Guide - Page 538
command or how to make use of them, see the related manuals of Solaris. Printing From Solaris To print to the default printer: If the multifunction printer is registered as the default printer, the name of the multifunction printer can be shortened and specified as shown in the following example - Dell 3115cn Color Laser Printer | Dell 3115cn User's Guide - Page 539
default printer can be set up for each user. NOTE: The above example describes the setup method executed when csh is used. To select a paper tray for printing: To select a paper tray for printing . To set a multifunction printer named dell3115cn as the default printer for printing, type as follows: - Dell 3115cn Color Laser Printer | Dell 3115cn User's Guide - Page 540
specified, the printing direction or position will be adjusted and both sides of the paper printed so that the shorter edge of the pages can be 14 inches). executive Feed paper from the tray loaded with Executive (7.25 x 10.5 inches). monarch Feed paper from the tray loaded with Monarch (3.875 x - Dell 3115cn Color Laser Printer | Dell 3115cn User's Guide - Page 541
with MxNinches defined by users. Possible range specified: Width: 3.00-8.66 inches Length: 3.86-14.0 inches If this option is not specified or the tray specified tray is not available, feed paper from the default tray. -y toner_save Turns on the save toner mode for printing. The print result will be - Dell 3115cn Color Laser Printer | Dell 3115cn User's Guide - Page 542
Thick Back/Coated 3/Coated Paper 3- Side 2 E Envelope If this option is not specified, multipurpose feeder Paper Type for the multifunction printer can be used. -y mfo=mode Specifies orientation for multipurpose feeder. Available orientations for multipurpose feeder are as follows: le Landscape ler - Dell 3115cn Color Laser Printer | Dell 3115cn User's Guide - Page 543
following: auto AutoTray/Auto 1 1stTray/Tray 1 (Standard 250-sheet tray) 2 2ndTray/Tray 2 (Optional 550-sheet paper feeder) off Off -y sp Specifies printed separators. -y sb Specifies Skip Blank Pages. -y cm=mode Specifies output color. Available output colors are as follows: c Color (CMYK) k Black - Dell 3115cn Color Laser Printer | Dell 3115cn User's Guide - Page 544
-y cc=mode Specifies image types. Available image types are as follows: 0 Off 1 Photo 2 sRGB 3 Standard/ Normal 4 Presentation This option is available only for color printing and when entry data is RGB data. -y gc=mode Specifies RGB gamma correction. Available RGB gamma corrections are as follows - Dell 3115cn Color Laser Printer | Dell 3115cn User's Guide - Page 545
guaranteed modes are as follows: on On off Off This option is available only for color printing. -y ct Specifies color transformation. This option is available only for color printing. -y br=mode Specifies brightness adjustment. Available brightness adjustment option value are as follows: +5 Bright - Dell 3115cn Color Laser Printer | Dell 3115cn User's Guide - Page 546
Dark 2 -3 Dark 3 -4 Dark 4 -5 Dark 5 -y rgbc=mode Specifies RGB color correction. Available RGB color corrections are as follows. 10 Perceptual 11 Saturation 12 Relative Colorimetric 13 Absolute Colorimetric This option is available only for color printing and when entry data is RGB data. -y rgbpr - Dell 3115cn Color Laser Printer | Dell 3115cn User's Guide - Page 547
color printing and when entry data is RGB data. -y cb=cyan-low:cyan-middle:cyan-high:magenta-low:magenta-middle:magenta-high:yellowlow:yellow-middle:yellow high:black-low:black-middle:black-high Specifies adjustment value for color balance of each color Black low density, Black medium density, Black - Dell 3115cn Color Laser Printer | Dell 3115cn User's Guide - Page 548
to 0x7E, except 0x20 " " (blank) and 0x3A":" (colon). Secure Print -y hld=store:UserID:Password:DocumentName -y hld=store:UserID:Password: Store Print -y hld=store:UserID::DocumentName -y hld=store:UserID:: Proof Print -y hld=proof:UserID::DocumentName -y hld=proof:UserID:: -y -jown= jobownername - Dell 3115cn Color Laser Printer | Dell 3115cn User's Guide - Page 549
specified for job owner name, "Unknown User" is used as job owner name. printing from the registered logical printer during the installation. Printing From HP-UX To print to the default printer: If the multifunction printer is registered as the default printer, the name of the multifunction printer - Dell 3115cn Color Laser Printer | Dell 3115cn User's Guide - Page 550
% setenv PRINTER dell3115cn % lp filename To print with added options: To print with the options, specify user name and password used for authentication printing in the environment variable. Specifying the User Name To specify the User Name for Authentication Printing: You can specify a unique user - Dell 3115cn Color Laser Printer | Dell 3115cn User's Guide - Page 551
printing is already specified, the filter option has the higher priority over authentication printing. NOTE: If you only specify the password without specifying the user :format:page] [-Hffont black-low:black-middle:black-high] [Hld=PrintType:UserID:Password:DocumentName] [-Jown=jobownername:password - Dell 3115cn Color Laser Printer | Dell 3115cn User's Guide - Page 552
paper size. For this reason, the user need not be aware of the paper printed so that the shorter edge of the pages can be bound. This option is available only when optional duplexer is installed on the multifunction printer. -D Enables the long-edge binding feature. When it is specified, the printing - Dell 3115cn Color Laser Printer | Dell 3115cn User's Guide - Page 553
with Folio (8.5 x 13 inches). LG Feed paper from the tray loaded with Legal (8.5 x 14 inches). EX Feed paper from the tray loaded with Executive (7.25 x 10.5 inches). MO Feed paper from the tray loaded with Monarch (3.875 x 7.5 inches). - Dell 3115cn Color Laser Printer | Dell 3115cn User's Guide - Page 554
than that of normal printing. In some cases, this option will be ignored. -2 Sets printing to two-column printing. -r Rotates the image by 90° and uses the paper in the landscape orientation. -F Ignores the form feed code (FF). -llines Specifies the number of lines per page. -wcolumns Specifies the - Dell 3115cn Color Laser Printer | Dell 3115cn User's Guide - Page 555
as point size. The default is 10. -E This function turns on the image enhancement function. For models without the image enhancement mechanism, this option will be ignored. -ffont Sets the font. NOTE: The available fonts are limited to the font in the multifunction printer. For more information, see - Dell 3115cn Color Laser Printer | Dell 3115cn User's Guide - Page 556
. If this option is omitted, uh is specified as the default value. u User name h Host name t Date and time If the output contents are specified as tuh, it is output as follows: Date and Time User: username Host: hostname page specifies the page to output. This option is omissible. f Output the top - Dell 3115cn Color Laser Printer | Dell 3115cn User's Guide - Page 557
(GMT etc.). -Hffont Specify the font to print the header and footer. European fonts the same as half size alphanumeric fonts can be specified. Helvetica is specified as default. If the wrong font is specified, the default European font of the multifunction printer can be used. If the header/footer - Dell 3115cn Color Laser Printer | Dell 3115cn User's Guide - Page 558
3 C3B Coated Thick Back/Coated 3/Coated Paper 3- Side 2 E Envelope If this option is not specified, multipurpose feeder Paper Type of the multifunction printer can be used. -Mfo=mode Specifies orientation for multipurpose feeder. Available orientations for multipurpose feeder are as follows: le - Dell 3115cn Color Laser Printer | Dell 3115cn User's Guide - Page 559
Landscape ler Landscape (Rotated) se Portrait ser Portrait (Rotated) -Pon Specifies alternate tray. Available alternate trays are as follows: 0 Use system settings 1 Display message 2 Feed from multipurpose feeder 3 Use nearest size (Adjust to fit) 4 Use larger size (Adjust to fit) 5 Use nearest - Dell 3115cn Color Laser Printer | Dell 3115cn User's Guide - Page 560
only when the paper tray for separators is specified. -Sb Specifies Skip Blank Pages. -Cm=mode Specifies output color. Available output colors are as follows: c Color (CMYK) k Black -Pr=mode Specifies print mode. Available print modes are as follows: hs High Speed hq High Quality -Cc=mode Specifies - Dell 3115cn Color Laser Printer | Dell 3115cn User's Guide - Page 561
data is RGB data. -Gc=mode Specifies RGB gamma correction. Available RGB gamma corrections are as follows: 1.0 1.0 1.4 1.4 1.8 1.8 2.2 2.2 2.6 2.6 off Off This option is available only for color printing and when entry data is RGB data. -Sc=mode Specifies screen. Available screens are as follows: - Dell 3115cn Color Laser Printer | Dell 3115cn User's Guide - Page 562
guaranteed options are as follows: on On off Off This option is available only for color printing. -Ct Specifies color transformation. This option is available only for color printing. -Br=mode Specifies brightness adjustment. Available brightness adjustment option value are as follows: +5 Bright - Dell 3115cn Color Laser Printer | Dell 3115cn User's Guide - Page 563
Dark 2 -3 Dark 3 -4 Dark 4 -5 Dark 5 -RGBc=mode Specifies RGB color correction. Available RGB color corrections are as follows: 10 Perceptual 11 Saturation 12 Relative Colorimetric 13 Absolute Colorimetric This option is available only for color printing and when entry data is RGB data. -RGBPr=mode - Dell 3115cn Color Laser Printer | Dell 3115cn User's Guide - Page 564
available only for color printing and when entry data is RGB data. -Cb=cyan-low:cyan-middle:cyan-high:magenta-low:magenta-middle:magenta-high:yellowlow:yellow-middle:yellow high:black-low:black-middle:black-high Specifies adjustment value for color balance of each color/density. Available adjustment - Dell 3115cn Color Laser Printer | Dell 3115cn User's Guide - Page 565
high density, and "Dark 2" for Black low density, it can be specified using either of the following: -Cb=0:-2:0:0:0:0:0:0:+3:+2:0:0 -Cb=:-2:::::::+3:+2:: -Hld=PrintType:UserID:Password:DocumentName Secure Print PrintType store Secure Print/Store Print proof Proof Print UserID Up to eight single-byte - Dell 3115cn Color Laser Printer | Dell 3115cn User's Guide - Page 566
-Hld=store:UserID:Password: Store Print -Hld=store:UserID::DocumentName -Hld=store:UserID:: Proof Print -Hld=proof:UserID::DocumentName -Hld=proof:UserID:: NOTICE: Ensure that you specify Secure Print only when you directly print data to a multifunction printer. Secure Print may not be available - Dell 3115cn Color Laser Printer | Dell 3115cn User's Guide - Page 567
password length result of the command into the PostScript language program using txt2ps2 and print it to the multifunction printer, type as follows: % ls -alF | txt2ps2 | lpr dellbin3115/.dellpsdefault3115 This is the default command option setting file for individual users. Important When the same - Dell 3115cn Color Laser Printer | Dell 3115cn User's Guide - Page 568
output by the default option of txt2ps2. Thus, when the output of txt2ps2 is to be taken as the output of another application (psrev of TRANSCRIPT, etc.), add the page number description by inserting the line command (-Ilines). If a BS code is found at the beginning of a line, the print position of - Dell 3115cn Color Laser Printer | Dell 3115cn User's Guide - Page 569
direction or position will be adjusted and both sides of the paper printed so that the longer edge of the pages can be bound. This option is available only when the optional duplexer is installed on the multifunction printer. -Itray-input Specifies the paper tray. A paper tray can be selected by - Dell 3115cn Color Laser Printer | Dell 3115cn User's Guide - Page 570
with Executive (7.25 x 10.5 inches). MO Feed paper users. Possible range specified: Width: 3.00-8.66 inches Length: 3.86-14.0 inches If this option is not specified or the tray specified is not available, feed paper from the default tray. -t Turns on the save toner mode for printing. The print - Dell 3115cn Color Laser Printer | Dell 3115cn User's Guide - Page 571
-l=left,bottom Specifies the print position. Printing will be executed from the left and bottom of the page. The default is 0.25 inches for be ignored. -Hd=position:format Specifies the position to be output the user information as the header or footer. position specifies output position. But this - Dell 3115cn Color Laser Printer | Dell 3115cn User's Guide - Page 572
username Host: hostname. Specify these options as follows: In the case that convert text file, output the host name following the user name on the upper right corner of the paper, output all pages. (User name, Host name, all page output are default) -Hd=ur -Hd=ur:uh -Hffont Specify the font to print - Dell 3115cn Color Laser Printer | Dell 3115cn User's Guide - Page 573
Thick/Coated 3/Coated Paper 3 C3B Coated Thick Back/Coated 3/Coated Paper 3- Side 2 E Envelope If this option is not specified, multipurpose feeder Paper Type of the multifunction printer can be used. -Mfo=mode Specifies orientation for multipurpose feeder. - Dell 3115cn Color Laser Printer | Dell 3115cn User's Guide - Page 574
Available orientations for multipurpose feeder are as follows: le Landscape ler Landscape (Rotated) se Portrait ser Portrait (Rotated) -Pon Specifies alternate tray. Available alternate trays are as follows: 0 Use system settings 1 Display message 2 Feed from multipurpose feeder 3 Use nearest size ( - Dell 3115cn Color Laser Printer | Dell 3115cn User's Guide - Page 575
Available only when the paper tray for separators is specified. -Sb Specifies Skip Blank Pages. -Cm=mode Specifies output color. Available output colors are as follows: c Color (CMYK) k Black -Pr=mode Specifies print mode. Available print modes are as follows: hs High speed hq High quality -Cc=mode - Dell 3115cn Color Laser Printer | Dell 3115cn User's Guide - Page 576
Specifies image types. Available image types are as follows: 0 Off 1 Photo 2 sRGB 3 Standard/ Normal 4 Presentation This option is available only for color printing and when entry data is RGB data. -Gc=mode Specifies RGB gamma correction. Available RGB gamma corrections are as follows: 1.0 1.0 1.4 - Dell 3115cn Color Laser Printer | Dell 3115cn User's Guide - Page 577
guaranteed options are as follows: on On off Off This option is available only for color printing. -Ct Specifies color transformation. This option is available only for color printing. -Br=mode Specifies brightness adjustment. Available brightness adjustment option value are as follows: +5 Bright - Dell 3115cn Color Laser Printer | Dell 3115cn User's Guide - Page 578
+3 Bright 3 +2 Bright 2 +1 Bright 1 +0 Normal -1 Dark 1 -2 Dark 2 -3 Dark 3 -4 Dark 4 -5 Dark 5 -RGBc=mode Specifies RGB color correction. Available RGB color corrections are as follows: 10 Perceptual 11 Saturation 12 Relative Colorimetric 13 Absolute Colorimetric - Dell 3115cn Color Laser Printer | Dell 3115cn User's Guide - Page 579
available only for color printing and when entry data is RGB data. -Cb=cyan-low:cyan-middle:cyan-high:magenta-low:magenta-middle:magenta-high:yellowlow:yellow-middle:yellow high:black-low:black-middle:black-high Specifies adjustment value for color balance of each color/density. Available adjustment - Dell 3115cn Color Laser Printer | Dell 3115cn User's Guide - Page 580
high density, and "Dark 2" for Black low density, it can be specified using either of the following: -Cb=0:-2:0:0:0:0:0:0:+3:+2:0:0 -Cb=:-2:::::::+3:+2:: -Hld=PrintType:UserID:Password:DocumentName Secure Print PrintType store Secure Print/Store Print proof Proof Print UserID Up to eight single-byte - Dell 3115cn Color Laser Printer | Dell 3115cn User's Guide - Page 581
-Hld=store:UserID:Password: Store Print -Hld=store:UserID::DocumentName -Hld=store:UserID:: Proof Print -Hld=proof:UserID::DocumentName -Hld=proof:UserID:: NOTICE: Ensure that you specify Secure Print only when you directly print data to a multifunction printer. Secure Print may not be available - Dell 3115cn Color Laser Printer | Dell 3115cn User's Guide - Page 582
one pixel of the raster data as one pixel of the multifunction printer. If the print position option specifies a point beyond the printable area of the multifunction printer, data beyond the printable area will not be printed. tiff2ps2 (Linux/Solaris/HP-UX) Format /usr/local/dellbin3115/tiff2ps2 - Dell 3115cn Color Laser Printer | Dell 3115cn User's Guide - Page 583
direction or position will be adjusted and both sides of the paper printed so that the longer edge of the pages can be bound. This option is available only when the optional duplexer is installed on the multifunction printer. -Itray-input Specifies the paper tray. A paper tray can be selected by - Dell 3115cn Color Laser Printer | Dell 3115cn User's Guide - Page 584
14 inches). EX Feed paper from the tray loaded with Executive (7.25 x 10.5 inches). MO Feed paper from the tray loaded with Monarch (3.875 x 7.5 inches ). COM10 Feed paper from the tray loaded with Envelope #10 (4.125 x 9.5 inches). DL Feed paper from the tray loaded with DL - Dell 3115cn Color Laser Printer | Dell 3115cn User's Guide - Page 585
loaded with MxNinches defined by users Possible range specified: Width: 3.00-8.66 inches Length: 3.86-14.0 inches If this option is not specified or the tray specified is not available, feed paper from the default tray. -t Turns on the save toner mode for printing. The print result will be fainter - Dell 3115cn Color Laser Printer | Dell 3115cn User's Guide - Page 586
username Host: hostname. Specify these options as follows: In the case that convert text file, output the host name following the user name on the upper right corner of the paper, output all pages. (User name, Host name, all page output are default) -Hd=ur -Hd=ur:uh -Hffont Specify the font to print - Dell 3115cn Color Laser Printer | Dell 3115cn User's Guide - Page 587
Specifies multipurpose feeder. -M=type Specifies multipurpose feeder Paper Type. Available multipurpose feeder Paper Types are as follows: B FinePaper/Bond/Plain Paper 2 BB FinePaperBack/Bond/Plain Paper 2 - Side 2 P Stationary/Plain/Plain Paper 1 PB StationaryBack/Plain/Plain Paper 1 - Side 2 H1 - Dell 3115cn Color Laser Printer | Dell 3115cn User's Guide - Page 588
Coated Thick Back/Coated 3/Coated Paper 3- Side 2 E Envelope If this option is not specified, multipurpose feeder Paper Type of the multifunction printer can be used. -Mfo=mode Specifies orientation for multipurpose feeder. Available orientations for multipurpose feeder are as follows: le Landscape - Dell 3115cn Color Laser Printer | Dell 3115cn User's Guide - Page 589
250-sheet tray) 2 2ndTray/Tray 2 (Optional 550-sheet paper feeder) off Off -Sp Specifies printed separators. Available only when the paper tray for separators is specified. -Sb Specifies Skip Blank Pages. -Cm=mode Specifies output color. Available output colors are as follows: c Color (CMYK) k Black - Dell 3115cn Color Laser Printer | Dell 3115cn User's Guide - Page 590
image types. Available image types are as follows: 0 Off 1 Photo 2 sRGB 3 Standard/Normal 4 Presentation This option is available only for color printing and when entry data is RGB data. -Gc=mode Specifies RGB gamma correction. Available RGB gamma corrections are as follows: 1.0 1.0 1.4 1.4 1.8 1.8 - Dell 3115cn Color Laser Printer | Dell 3115cn User's Guide - Page 591
2.2 2.2 2.6 2.6 off Off This option is available only for color printing and when entry data is RGB data. -Sc=mode Specifies screen. Available screens are as follows: on On off Off This option is available only for color printing. -Ct Specifies color transformation. This option is available only for - Dell 3115cn Color Laser Printer | Dell 3115cn User's Guide - Page 592
brightness adjustment. Available brightness adjustment option value are as follows: +5 Bright 5 +4 Bright 4 +3 Bright 3 +2 Bright 2 +1 Bright 1 +0 Normal -1 Dark 1 -2 Dark 2 -3 Dark 3 -4 Dark 4 -5 Dark 5 -RGBc=mode Specifies RGB color correction. Available RGB color corrections are as follows: 10 - Dell 3115cn Color Laser Printer | Dell 3115cn User's Guide - Page 593
RGB color temperature option value are as follows: 5000 5000K 6000 6000K 9300 9300K This option is available only for color printing and when entry data is RGB data. -Cb=cyan-low:cyan-middle:cyan-high:magenta-low:magenta-middle:magenta-high:yellowlow:yellow-middle:yellow high:black-low:black-middle - Dell 3115cn Color Laser Printer | Dell 3115cn User's Guide - Page 594
Specifies adjustment value for color balance of each color/density. Available adjustment values are as follows: +3 Dark 3 Black low density, it can be specified using either of the following: -Cb=0:-2:0:0:0:0:0:0:+3:+2:0:0 -Cb=:-2:::::::+3:+2:: -Hld=PrintType:UserID:Password:DocumentName Secure Print - Dell 3115cn Color Laser Printer | Dell 3115cn User's Guide - Page 595
-Hld=store:UserID:Password: Store Print -Hld=store:UserID::DocumentName -Hld=store:UserID:: Proof Print -Hld=proof:UserID::DocumentName -Hld=proof:UserID:: NOTICE: Ensure that you specify Secure Print only when you directly print data to a multifunction printer. Secure Print may not be available - Dell 3115cn Color Laser Printer | Dell 3115cn User's Guide - Page 596
character is specified for job owner name, "Unknown User" is used as job owner name. NOTE: Characters multifunction printer. If the print position option (-lleft bottom) specifies a point beyond the printable area of the multifunction printer, data beyond the printable area will not be printed - Dell 3115cn Color Laser Printer | Dell 3115cn User's Guide - Page 597
direction or position will be adjusted and both sides of the paper printed so that the shorter edge of the pages can be bound. This option is available only when the optional duplexer is installed on the multifunction printer. -D Enables the long-edge binding feature. When it is specified, the - Dell 3115cn Color Laser Printer | Dell 3115cn User's Guide - Page 598
with Folio (8.5 x 13 inches). LG Feed paper from the tray loaded with Legal (8.5 x 14 inches). EX Feed paper from the tray loaded with Executive (7.25 x 10.5 inches). MO Feed paper from the tray loaded with Monarch (3.875 x 7.5 inches). COM10 Feed paper from the tray loaded with Envelope - Dell 3115cn Color Laser Printer | Dell 3115cn User's Guide - Page 599
loaded with MxNinches defined by users Possible range specified: Width: 3.00-8.66 inches Length: 3.86-14.0 inches If this option is not specified or the tray specified is not available, feed paper from the default tray. -t Turns on the save toner mode for printing. The print result will be fainter - Dell 3115cn Color Laser Printer | Dell 3115cn User's Guide - Page 600
and Time User: username Host: hostname. -Hffont Specify the font to print header and footer. European fonts the same as half size alphanumeric fonts can be specified. Helvetica is specified as default. If the wrong font is specified, default European font of the multifunction printer can be used - Dell 3115cn Color Laser Printer | Dell 3115cn User's Guide - Page 601
Specifies multipurpose feeder. -M=type Specifies multipurpose feeder Paper Type. Available multipurpose feeder Paper Types are as follows: B FinePaper/Bond/Plain Paper 2 BB FinePaperBack/Bond/Plain Paper 2 - Side 2 P Stationary/Plain/Plain Paper 1 PB StationaryBack/Plain/Plain Paper 1 - Side 2 H1 - Dell 3115cn Color Laser Printer | Dell 3115cn User's Guide - Page 602
Coated Thick Back/Coated 3/Coated Paper 3- Side 2 E Envelope If this option is not specified, multipurpose feeder Paper Type of the multifunction printer can be used. -Mfo=mode Specifies orientation for multipurpose feeder. Available orientations for multipurpose feeder are as follows: le Landscape - Dell 3115cn Color Laser Printer | Dell 3115cn User's Guide - Page 603
250-sheet tray) 2 2ndTray/Tray 2 (Optional 550-sheet paper feeder) off Off -Sp Specifies printed separators. Available only when the paper tray for separators is specified. -Sb Specifies Skip Blank Pages. -Cm=mode Specifies output color. Available output colors are as follows: c Color (CMYK) k Black - Dell 3115cn Color Laser Printer | Dell 3115cn User's Guide - Page 604
image types. Available image types are as follows: 0 Off 1 Photo 2 sRGB 3 Standard/ Normal 4 Presentation This option is available only for color printing and when entry data is RGB data. -Gc=mode Specifies RGB gamma correction. Available RGB gamma corrections are as follows: 1.0 1.0 1.4 1.4 1.8 1.8 - Dell 3115cn Color Laser Printer | Dell 3115cn User's Guide - Page 605
2.2 2.2 2.6 2.6 off Off This option is available only for color printing and when entry data is RGB data. -Sc=mode Specifies screen. Available screens are as follows: on On off Off This option is available only for color printing. -Ct Specifies color transformation. This option is available only for - Dell 3115cn Color Laser Printer | Dell 3115cn User's Guide - Page 606
brightness adjustment. Available brightness adjustment option value are as follows: +5 Bright 5 +4 Bright 4 +3 Bright 3 +2 Bright 2 +1 Bright 1 +0 Normal -1 Dark 1 -2 Dark 2 -3 Dark 3 -4 Dark 4 -5 Dark 5 -RGBc=mode Specifies RGB color correction. Available RGB color corrections are as follows: 10 - Dell 3115cn Color Laser Printer | Dell 3115cn User's Guide - Page 607
RGB color temperature option value are as follows: 5000 5000K 6000 6000K 9300 9300K This option is available only for color printing and when entry data is RGB data. -Cb=cyan-low:cyan-middle:cyan-high:magenta-low:magenta-middle:magenta-high:yellowlow:yellow-middle:yellow high:black-low:black-middle - Dell 3115cn Color Laser Printer | Dell 3115cn User's Guide - Page 608
Specifies adjustment value for color balance of each color/density. Available adjustment values are as follows: +3 Dark 3 Black low density, it can be specified using either of the following: -Cb=0:-2:0:0:0:0:0:0:+3:+2:0:0 -Cb=:-2:::::::+3:+2:: -Hld=PrintType:UserID:Password:DocumentName Secure Print - Dell 3115cn Color Laser Printer | Dell 3115cn User's Guide - Page 609
-Hld=store:UserID:Password: Store Print -Hld=store:UserID::DocumentName -Hld=store:UserID:: Proof Print -Hld=proof:UserID::DocumentName -Hld=proof:UserID:: NOTICE: Ensure that you specify Secure Print only when you directly print data to a multifunction printer. Secure Print may not be available - Dell 3115cn Color Laser Printer | Dell 3115cn User's Guide - Page 610
character is specified for job owner name, "Unknown User" is used as job owner name. NOTE: password is treated as not specified. NOTE: Only numbers are acceptable for password. NOTE: Acceptable password pixel of the multifunction printer. If the print position option (-lleft bottom) specifies a point - Dell 3115cn Color Laser Printer | Dell 3115cn User's Guide - Page 611
program and no data conversion will be executed. The following control codes are interpreted for the conversion of input data. LF Line feed printed so that the shorter edge of the pages can be bound. This option is available only when the optional duplexer is installed on the multifunction printer - Dell 3115cn Color Laser Printer | Dell 3115cn User's Guide - Page 612
same as txt2ps2. -t Turns on the save toner mode for printing. The print result will be fainter than that of normal printing. In some cases, this option will be is not specified, multipurpose feeder Paper Type of the multifunction printer can be used. -Mfo=mode Specifies orientation for multipurpose - Dell 3115cn Color Laser Printer | Dell 3115cn User's Guide - Page 613
Skip Blank Pages. -Cm=mode Specifies output color. -Pr=mode Specifies print mode. -Cc=mode Specifies image types. This option is available only for color printing and when entry data is RGB data. -Gc=mode Specifies RGB gamma correction. This option is available only for color printing and when - Dell 3115cn Color Laser Printer | Dell 3115cn User's Guide - Page 614
is available only for color printing and when entry data is RGB data. -Cb=cyan-low:cyan-middle:cyan-high:magenta-low:magenta-middle:magenta-high:yellowlow;yellow-middle:yellow high:black-low:black-middle:black-high Specifies adjustment value for color balance of each color/density. -Cb Option value - Dell 3115cn Color Laser Printer | Dell 3115cn User's Guide - Page 615
directory in advance. HP-UX The multifunction printer to specify as an output printer must be registered in your system. To register an output printer, use sam command and so on. See the HP-UX related manual for details. To install UNIX filter into the default directory (/usr/local/dellbin3115), it - Dell 3115cn Color Laser Printer | Dell 3115cn User's Guide - Page 616
is to be taken as the output of another application (psrev of TRANSCRIPT, etc.), add the page number description by inserting the line command (-Ilines). If a BS code is found at the beginning of a line, the print position of the next character will be on the left of the beginning of a line. When - Dell 3115cn Color Laser Printer | Dell 3115cn User's Guide - Page 617
printable area of the multifunction printer, data beyond the printable area will not be printed. Using tiff2ps2 (Linux/Solaris/HP-UX) There are four types of supported compression formats. Huffman compression (CCITT Group 3 transformed Huffman run length encoding) Fax-CCITT3 compression (facsimile - Dell 3115cn Color Laser Printer | Dell 3115cn User's Guide - Page 618
specify landscape and 2-column. In case of the PostScript file, it happens that the multifunction printer doesn't output all pages despite that output all page is specified. In such a case, specify print the only top page. It's impossible to use lp command in Solaris. TBCP Filter (Solaris/Linux/HP - Dell 3115cn Color Laser Printer | Dell 3115cn User's Guide - Page 619
IN NO EVENT SHALL SAM LEFFLER OR SILICON GRAGHICS BE LIABLE FOR ANY SPECIAL, INCIDENTAL, INDIRECT OR CONSEQUENTIAL DAMAGES OF ANY KIND, OR ANY DAMAGES WHATSOEVER RESULTING FROM LOSS OF USE, DATA OR PROFITS, WHETHER OR NOT ADVISED OF THE POSSIBILITY OF DAMAGE, AND ON ANY THEORY OF LIABILITY, ARISING - Dell 3115cn Color Laser Printer | Dell 3115cn User's Guide - Page 620
Operation on Turbolinux 10 Desktop or RedHat ES 3/4 Installing the Printer Driver 1. Double-click Dell-MFP-Laser-3115cn-x.x-x.noarch.rpm in the Drivers and Utilities CD. 2. Type the administrator's password. 3. Click Continue in the Completed System Preparation window. Installation starts. When - Dell 3115cn Color Laser Printer | Dell 3115cn User's Guide - Page 621
. appears. The setting is complete. Execute printing from the software program. Uninstalling the Printer Driver 1. Click Start System Terminal. 2. Type the following command in the terminal window: su (Type the administrator's password) rpm -e Dell-MFP-Laser-3115cn The printer driver is uninstalled. - Dell 3115cn Color Laser Printer | Dell 3115cn User's Guide - Page 622
up the print queue on your workstation. 1. Click Start Applications System YaST. 2. Type the administrator's password. YaST Control Center is activated. 3. Select Hardware from Printer. 4. Printer setup: Autodetected printers is activated. For USB connections: a. Select Dell MFP Laser 3115cn on USB - Dell 3115cn Color Laser Printer | Dell 3115cn User's Guide - Page 623
, and type the queue name for printing in Name for printing. The Description of Printer and Location of Printer do not have to be specified. e. Select the Do Local Filtering check box, and then click Next. f. Select DELL as Select manufacturer. Select Dell MFP Laser 3115cn as Select Model, and then - Dell 3115cn Color Laser Printer | Dell 3115cn User's Guide - Page 624
as color mode or double-sided printing. 1. Start the Web browser. Type http://localhost:631/ in Location, and then press the Enter key. 2. Type root as the user name, and type the administrator's password. The CUPS window appears. NOTE: Set the password for authority as the printer administrator - Dell 3115cn Color Laser Printer | Dell 3115cn User's Guide - Page 625
1. 2. Type the following command on the terminal window: su (Type the administrator's password) rpm -e Dell-MFP-Laser-3115cn The printer driver is uninstalled. - Dell 3115cn Color Laser Printer | Dell 3115cn User's Guide - Page 626
instructions in your Owner's Manual or Product Information Guide prior to setting up and operating your printer. Regulatory Information Federal Communications Commission (FCC) Compliance Information Statement (US Only) The Dell™Multifunction Color Laser Printer and on, the user is encouraged to try - Dell 3115cn Color Laser Printer | Dell 3115cn User's Guide - Page 627
in compliance with FCC regulations: Model number: Dell™ Multifunction Color Laser Printer Company name: Dell Inc. One Dell Way Round Rock, Texas 78682 USA 512-338 or modifications to this unit not expressly approved by the party responsible for compliance could void the user authority to operate the - Dell 3115cn Color Laser Printer | Dell 3115cn User's Guide - Page 628
Union) Marking by the symbol indicates compliance of this Dell printer to the EMC Directive and the Low Voltage Directive of the European Harmonic Current Emissions (Equipment Input Current Up to and Including 16 A Per Phase). EN 61000-3-3 - Electromagnetic Compatibility (EMC) - Part 3: - Dell 3115cn Color Laser Printer | Dell 3115cn User's Guide - Page 629
B domestic environment. A Declaration of Conformity in accordance with the preceding directives and standards has been made and is on file at Dell Inc. Products Europe BV, Limerick, Ireland. CE Mark Notice This equipment complies with the essential requirements of the European Union Directive 1999 - Dell 3115cn Color Laser Printer | Dell 3115cn User's Guide - Page 630
Dell Multifunction Color Laser Printer 3115cn Tensi laser operating in the wavelength region of 770-795 nanometers. The laser system and printer are designed so there is never any human access to laser radiation above a Class I level during normal operation, user maintenance, or prescribed service - Dell 3115cn Color Laser Printer | Dell 3115cn User's Guide - Page 631
is not in use for extended periods of time, particularly at night and on weekends. MSDS Materials for Dell Printer All MSDS materials for Dell Printers can be found at the following URL: http://www1.us.dell.com/content/topics/global.aspx/corp/environment/en/prod_design? c=us&l=en&s=corp&~section=001 - Dell 3115cn Color Laser Printer | Dell 3115cn User's Guide - Page 632
from lightning. Do not use the telephone to report a gas leak in the vicinity of the leak. Use only the power cord indicated in this manual. - Dell 3115cn Color Laser Printer | Dell 3115cn User's Guide - Page 633
file transfer protocol (FTP) ftp://ftp.dell.com/ Log in as user: anonymous, and use your email address as your password. Electronic Support Service [email protected] [email protected] [email protected] (for Asian/Pacific countries only) support.euro.dell.com (for Europe only) Electronic - Dell 3115cn Color Laser Printer | Dell 3115cn User's Guide - Page 634
Service Warranty and Return Policy Dell Computer Corporation ("Dell") manufactures its hardware products from parts and components that are new or equivalent to new in accordance with industry-standard practices. For information about the Dell warranty for your printer, see the Owner's Manual
-
 1
1 -
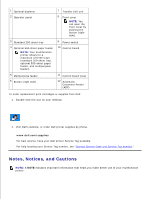 2
2 -
 3
3 -
 4
4 -
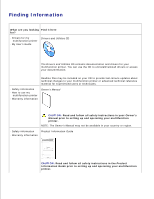 5
5 -
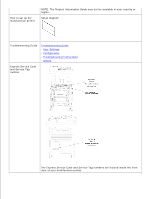 6
6 -
 7
7 -
8
-
9
-
10
-
11
-
12
-
13
-
14
-
15
-
16
-
17
-
18
-
19
-
20
-
21
-
22
-
23
-
24
-
25
-
26
-
27
-
28
-
29
-
30
-
31
-
32
-
33
-
34
-
35
-
36
-
37
-
38
-
39
-
40
-
41
-
42
-
43
-
44
-
45
-
46
-
47
-
48
-
49
-
50
-
51
-
52
-
53
-
54
-
55
-
56
-
57
-
58
-
59
-
60
-
61
-
62
-
63
-
64
-
65
-
66
-
67
-
68
-
69
-
70
-
71
-
72
-
73
-
74
-
75
-
76
-
77
-
78
-
79
-
80
-
81
-
82
-
83
-
84
-
85
-
86
-
87
-
88
-
89
-
90
-
91
-
92
-
93
-
94
-
95
-
96
-
97
-
98
-
99
-
100
-
101
-
102
-
103
-
104
-
105
-
106
-
107
-
108
-
109
-
110
-
111
-
112
-
113
-
114
-
115
-
116
-
117
-
118
-
119
-
120
-
121
-
122
-
123
-
124
-
125
-
126
-
127
-
128
-
129
-
130
-
131
-
132
-
133
-
134
-
135
-
136
-
137
-
138
-
139
-
140
-
141
-
142
-
143
-
144
-
145
-
146
-
147
-
148
-
149
-
150
-
151
-
152
-
153
-
154
-
155
-
156
-
157
-
158
-
159
-
160
-
161
-
162
-
163
-
164
-
165
-
166
-
167
-
168
-
169
-
170
-
171
-
172
-
173
-
174
-
175
-
176
-
177
-
178
-
179
-
180
-
181
-
182
-
183
-
184
-
185
-
186
-
187
-
188
-
189
-
190
-
191
-
192
-
193
-
194
-
195
-
196
-
197
-
198
-
199
-
200
-
201
-
202
-
203
-
204
-
205
-
206
-
207
-
208
-
209
-
210
-
211
-
212
-
213
-
214
-
215
-
216
-
217
-
218
-
219
-
220
-
221
-
222
-
223
-
224
-
225
-
226
-
227
-
228
-
229
-
230
-
231
-
232
-
233
-
234
-
235
-
236
-
237
-
238
-
239
-
240
-
241
-
242
-
243
-
244
-
245
-
246
-
247
-
248
-
249
-
250
-
251
-
252
-
253
-
254
-
255
-
256
-
257
-
258
-
259
-
260
-
261
-
262
-
263
-
264
-
265
-
266
-
267
-
268
-
269
-
270
-
271
-
272
-
273
-
274
-
275
-
276
-
277
-
278
-
279
-
280
-
281
-
282
-
283
-
284
-
285
-
286
-
287
-
288
-
289
-
290
-
291
-
292
-
293
-
294
-
295
-
296
-
297
-
298
-
299
-
300
-
301
-
302
-
303
-
304
-
305
-
306
-
307
-
308
-
309
-
310
-
311
-
312
-
313
-
314
-
315
-
316
-
317
-
318
-
319
-
320
-
321
-
322
-
323
-
324
-
325
-
326
-
327
-
328
-
329
-
330
-
331
-
332
-
333
-
334
-
335
-
336
-
337
-
338
-
339
-
340
-
341
-
342
-
343
-
344
-
345
-
346
-
347
-
348
-
349
-
350
-
351
-
352
-
353
-
354
-
355
-
356
-
357
-
358
-
359
-
360
-
361
-
362
-
363
-
364
-
365
-
366
-
367
-
368
-
369
-
370
-
371
-
372
-
373
-
374
-
375
-
376
-
377
-
378
-
379
-
380
-
381
-
382
-
383
-
384
-
385
-
386
-
387
-
388
-
389
-
390
-
391
-
392
-
393
-
394
-
395
-
396
-
397
-
398
-
399
-
400
-
401
-
402
-
403
-
404
-
405
-
406
-
407
-
408
-
409
-
410
-
411
-
412
-
413
-
414
-
415
-
416
-
417
-
418
-
419
-
420
-
421
-
422
-
423
-
424
-
425
-
426
-
427
-
428
-
429
-
430
-
431
-
432
-
433
-
434
-
435
-
436
-
437
-
438
-
439
-
440
-
441
-
442
-
443
-
444
-
445
-
446
-
447
-
448
-
449
-
450
-
451
-
452
-
453
-
454
-
455
-
456
-
457
-
458
-
459
-
460
-
461
-
462
-
463
-
464
-
465
-
466
-
467
-
468
-
469
-
470
-
471
-
472
-
473
-
474
-
475
-
476
-
477
-
478
-
479
-
480
-
481
-
482
-
483
-
484
-
485
-
486
-
487
-
488
-
489
-
490
-
491
-
492
-
493
-
494
-
495
-
496
-
497
-
498
-
499
-
500
-
501
-
502
-
503
-
504
-
505
-
506
-
507
-
508
-
509
-
510
-
511
-
512
-
513
-
514
-
515
-
516
-
517
-
518
-
519
-
520
-
521
-
522
-
523
-
524
-
525
-
526
-
527
-
528
-
529
-
530
-
531
-
532
-
533
-
534
-
535
-
536
-
537
-
538
-
539
-
540
-
541
-
542
-
543
-
544
-
545
-
546
-
547
-
548
-
549
-
550
-
551
-
552
-
553
-
554
-
555
-
556
-
557
-
558
-
559
-
560
-
561
-
562
-
563
-
564
-
565
-
566
-
567
-
568
-
569
-
570
-
571
-
572
-
573
-
574
-
575
-
576
-
577
-
578
-
579
-
580
-
581
-
582
-
583
-
584
-
585
-
586
-
587
-
588
-
589
-
590
-
591
-
592
-
593
-
594
-
595
-
596
-
597
-
598
-
599
-
600
-
601
-
602
-
603
-
604
-
605
-
606
-
607
-
608
-
609
-
610
-
611
-
612
-
613
-
614
-
615
-
616
-
617
-
618
-
619
-
620
-
621
-
622
-
623
-
624
-
625
-
626
-
627
-
628
-
629
-
630
-
631
-
632
-
633
-
634
 |
 |
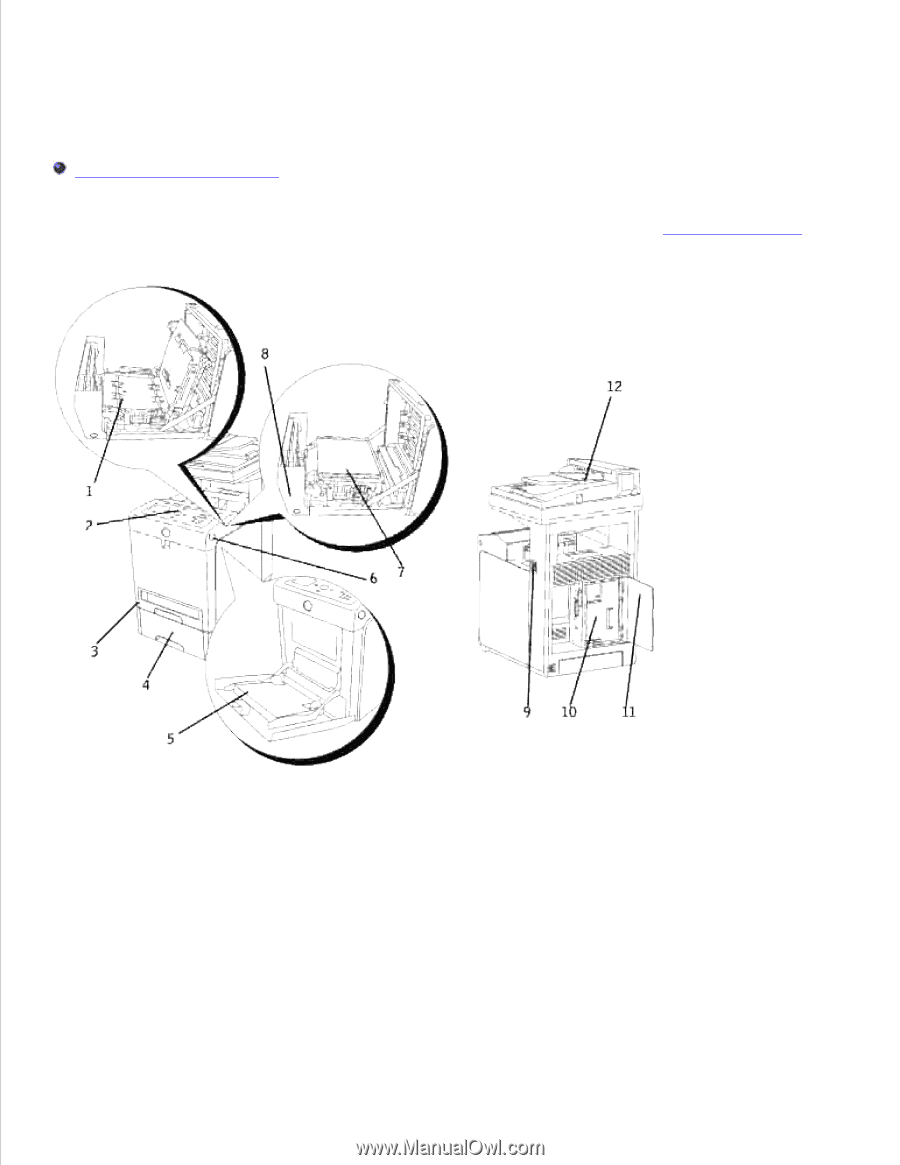
Dell™ Multifunction Color Laser Printer 3115cn
User's Guide
Notes, Notices, and Cautions
Click the links to the left for information on the features, options, and operation of your multifunction printer.
For information on other documentation included with your multifunction printer, see "
Finding Information
."