Dell 5310n Mono Laser Printer User's Guide - Page 15
Clearing Jams - cartridges
 |
View all Dell 5310n Mono Laser Printer manuals
Add to My Manuals
Save this manual to your list of manuals |
Page 15 highlights
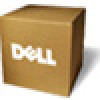
Clearing Jams Identifying Jams Clearing Printer Jams By carefully selecting print media and loading it properly, you should be able to avoid most paper jams. For more information on avoiding paper jams, see Avoiding Jams. If jams do occur, follow the steps outlined in this section. To resolve the paper jam messages, you must clear the entire paper path and then press the Select button to clear the message and resume printing. The printer prints a new copy of the page that jammed if Jam Recovery is set to On or Auto; however, the Auto setting does not guarantee the page will print. Identifying Jams If the printer jams, the appropriate jam message will be displayed on the printer operator panel. The following illustration shows the path that print media travels through the printer. The path varies depending on the input source (trays, multipurpose feeder, envelope feeder) and output bins (expander) you are using. The following table lists the jam messages that can occur and the action necessary to clear the message. The jam message indicates the area where the jam occurred. However, it is best to clear the entire paper path to ensure you have cleared all possible jams. Number Message What to do* 1 27x Paper Jam Check Bin x Open the output bin rear doors, and then remove the jam. 2 202 Paper Jam Open Rear Door Open the rear door on the printer, and then remove the jam. 3 201 Paper Jam Remove Cartridge Open the top front cover, remove the print cartridge, and then remove the jam. 4 200 Paper Jam Remove Cartridge Open the top front cover, remove the print cartridge, and then remove the jam. 5 23x Paper Jam Open Duplex Open the rear duplex door, and then remove the jam. Rear Door 6 260 Paper Jam Check Env Lift the envelope weight, remove all envelopes, flex and stack the envelopes, reload the envelope feeder, and Feeder adjust the guide. 7 250 Paper Jam Check MP Remove all media from the multipurpose feeder, flex and stack the media, reload the multipurpose feeder, and Feeder adjust the guide. 8 23x Paper Jam Check Duplex Remove the duplex tray from the duplex unit, raise the duplex deflector, and remove the jam. Open the rear duplex door, and remove the jam. 9 24x Paper Jam Check Tray x Open each tray, and then remove any jammed media. * After clearing the jam, press the Select button to resume printing. Clearing Printer Jams
-
 1
1 -
2
-
3
-
4
-
5
-
6
-
7
-
8
-
9
-
 10
10 -
 11
11 -
 12
12 -
 13
13 -
 14
14 -
 15
15 -
 16
16 -
 17
17 -
 18
18 -
 19
19 -
 20
20 -
21
-
22
-
23
-
24
-
25
-
26
-
27
-
28
-
29
-
30
-
31
-
32
-
33
-
34
-
35
-
36
-
37
-
38
-
39
-
40
-
41
-
42
-
43
-
44
-
45
-
46
-
47
-
48
-
49
-
50
-
51
-
52
-
53
-
54
-
55
-
56
-
57
-
58
-
59
-
60
-
61
-
62
-
63
-
64
-
65
-
66
-
67
-
68
-
69
-
70
-
71
-
72
-
73
-
74
-
75
-
76
-
77
-
78
-
79
-
80
-
81
-
82
-
83
-
84
-
85
-
86
-
87
-
88
-
89
-
90
-
91
-
92
-
93
-
94
-
95
-
96
-
97
-
98
-
99
-
100
-
101
-
102
-
103
-
104
-
105
-
106
-
107
-
108
-
109
-
110
-
111
-
112
-
113
-
114
-
115
-
116
-
117
-
118
-
119
-
120
-
121
-
122
-
123
-
124
-
125
-
126
-
127
-
128
-
129
-
130
-
131
-
132
-
133
-
134
-
135
-
136
-
137
-
138
-
139
-
140
-
141
-
142
-
143
-
144
-
145
-
146
-
147
-
148
-
149
-
150
 |
 |