Dell 5310n Mono Laser Printer User's Guide - Page 16
and 201 Paper Jam Remove Cartridge
 |
View all Dell 5310n Mono Laser Printer manuals
Add to My Manuals
Save this manual to your list of manuals |
Page 16 highlights
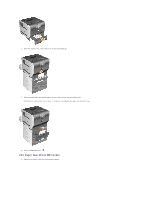
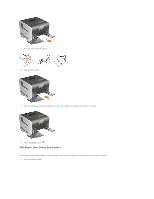
Although there are several places a jam can occur, clearing the paper path is fairly easy depending on the jam message or messages displayed on the operator panel. Paper jams can occur in three areas: the front of the printer, inside the printer, and at the rear of the printer. Jams in the front of the printer occur in the input options or the duplex tray. Jams inside the printer occur in two locations and require the removal of the print cartridge. Jams can also occur at the rear of the printer or in one of the output options. NOTE: The following clearing jam instructions may seem out of numerical sequence. However, they have been grouped to help you quickly clear the print path. To go to a specific jam, see Identifying Jams. 200 and 201 Paper Jam Remove Cartridge 1. Pull on the notch on the front of the printer to lower the multipurpose feeder. 2. Push the release latch to the right to open the top front cover. CAUTION: The inside of the printer may be hot. Allow the printer to cool before touching any internal components. 3. Lift and pull the print cartridge out of the printer. NOTICE: Do not touch the photoconductor drum on the underside of the cartridge. Use the cartridge handle whenever you are holding the cartridge. 4. Place the print cartridge aside. NOTE: Do not leave the cartridge exposed to light for extended periods.
-
 1
1 -
2
-
3
-
4
-
5
-
6
-
7
-
8
-
9
-
10
-
 11
11 -
 12
12 -
 13
13 -
 14
14 -
 15
15 -
 16
16 -
 17
17 -
 18
18 -
 19
19 -
 20
20 -
 21
21 -
22
-
23
-
24
-
25
-
26
-
27
-
28
-
29
-
30
-
31
-
32
-
33
-
34
-
35
-
36
-
37
-
38
-
39
-
40
-
41
-
42
-
43
-
44
-
45
-
46
-
47
-
48
-
49
-
50
-
51
-
52
-
53
-
54
-
55
-
56
-
57
-
58
-
59
-
60
-
61
-
62
-
63
-
64
-
65
-
66
-
67
-
68
-
69
-
70
-
71
-
72
-
73
-
74
-
75
-
76
-
77
-
78
-
79
-
80
-
81
-
82
-
83
-
84
-
85
-
86
-
87
-
88
-
89
-
90
-
91
-
92
-
93
-
94
-
95
-
96
-
97
-
98
-
99
-
100
-
101
-
102
-
103
-
104
-
105
-
106
-
107
-
108
-
109
-
110
-
111
-
112
-
113
-
114
-
115
-
116
-
117
-
118
-
119
-
120
-
121
-
122
-
123
-
124
-
125
-
126
-
127
-
128
-
129
-
130
-
131
-
132
-
133
-
134
-
135
-
136
-
137
-
138
-
139
-
140
-
141
-
142
-
143
-
144
-
145
-
146
-
147
-
148
-
149
-
150
 |
 |
