Dell 5310n Mono Laser Printer User's Guide - Page 70
Select, Hex Trace
 |
View all Dell 5310n Mono Laser Printer manuals
Add to My Manuals
Save this manual to your list of manuals |
Page 70 highlights
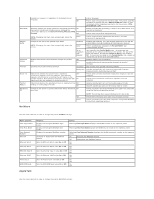
Cancel not available Cancelling Change Change Change Change Check duplex connection Wait for the message to clear. Wait for the message to clear. l Press the Select button if you have changed the media. l Select Use current to print on media currently in the printer. l Cancel the current job. l Turn the printer off and back on. If the error recurs, turn the printer off, unplug the power cord from the wall outlet, and then remove the duplex unit. Reattach the duplex unit, connect the power cord to a properly grounded outlet, and restart the printer. For more information, see Installing a Duplex Unit. If the error recurs, turn the printer off, unplug the power cord from the wall outlet, and then remove the specified device, and call for service. l Press the Select button to clear the message and print without using the device. Check tray connection l Turn the printer off and back on. If the error recurs, turn the printer off, unplug the power cord from the wall outlet, and then remove the specified tray. Reattach the tray, connect the power cord to a properly grounded outlet, and restart the printer. For more information, see Installing a 250-Sheet or 500-Sheet Drawer. If the error recurs, turn the printer off, unplug the power cord from the wall outlet, and then remove the specified device, and call for service. l Press the Select button to clear the message and print without using the device. Clearing job accounting statistics Close Door or Insert Cartridge Wait for the message to clear. l Close the upper front door. l Install the toner cartridge. Copies Defragmenting Flash DO NOT POWER OFF Delete Enter the desired number of copies. Wait for the message to clear. NOTE: Do not turn the printer off while this message is displayed. l Press the Select button to delete the specified job. l Press Stop to cancel the operation. Delete all l Press the Select button to delete all confidential jobs. l Press Stop to cancel the operation. Delete all confidential jobs l Press the Select button to delete all held jobs. l Press Stop to cancel the operation. Deleting Disabling DLEs Disabling Menus Enabling Menus Enter PIN Enter PIN to lock Flushing buffer Formatting Flash DO NOT POWER OFF Hex Trace Insert Tray Install bin Wait for the message to clear. Wait for the message to clear. Wait for the message to clear. NOTE: While the menus are disabled, you cannot change the printer settings from the operator panel. Wait for the message to clear. Enter the PIN you identified in the driver when you sent the confidential job to the printer. Enter the correct pin number to lock the operator panel and prevent menu changes. Wait for the message to clear. Wait for the message to clear. NOTE: Do not turn the printer off while this message is displayed. The printer is in Hex Trace mode. Insert the specified tray into the printer. l Turn the printer off, unplug the power cord from the wall outlet, install the specified bin, connect the power cord to a properly grounded outlet, and then restart the printer. For more information, see Installing a 250Sheet or 500-Sheet Drawer. l Cancel the current job. Install duplex l Turn the printer off, unplug the power cord from the wall outlet, install the duplex unit, connect the power cord to a properly grounded outlet, and then restart the printer. For more information, see Installing a Duplex Unit. l Cancel the current job. Install envelope feeder Install tray l Turn the printer off, install the envelope feeder, and restart the printer. For more information, see Installing an Envelope Feeder. l Cancel the current job. l Turn the printer off, unplug the power cord from the wall outlet, install the specified tray, reconnect the power cord to a properly grounded outlet, and then restart the printer. For more information, see Installing a 250Sheet or 500-Sheet Drawer. l Cancel the current job.
-
 1
1 -
2
-
3
-
4
-
5
-
6
-
7
-
8
-
9
-
10
-
11
-
12
-
13
-
14
-
15
-
16
-
17
-
18
-
19
-
20
-
21
-
22
-
23
-
24
-
25
-
26
-
27
-
28
-
29
-
30
-
31
-
32
-
33
-
34
-
35
-
36
-
37
-
38
-
39
-
40
-
41
-
42
-
43
-
44
-
45
-
46
-
47
-
48
-
49
-
50
-
51
-
52
-
53
-
54
-
55
-
56
-
57
-
58
-
59
-
60
-
61
-
62
-
63
-
64
-
 65
65 -
 66
66 -
 67
67 -
 68
68 -
 69
69 -
 70
70 -
 71
71 -
 72
72 -
 73
73 -
 74
74 -
 75
75 -
76
-
77
-
78
-
79
-
80
-
81
-
82
-
83
-
84
-
85
-
86
-
87
-
88
-
89
-
90
-
91
-
92
-
93
-
94
-
95
-
96
-
97
-
98
-
99
-
100
-
101
-
102
-
103
-
104
-
105
-
106
-
107
-
108
-
109
-
110
-
111
-
112
-
113
-
114
-
115
-
116
-
117
-
118
-
119
-
120
-
121
-
122
-
123
-
124
-
125
-
126
-
127
-
128
-
129
-
130
-
131
-
132
-
133
-
134
-
135
-
136
-
137
-
138
-
139
-
140
-
141
-
142
-
143
-
144
-
145
-
146
-
147
-
148
-
149
-
150
 |
 |
