Dell Latitude C840 User Guide - Page 100
Replacing the Hard Drive, Connecting a TV to the Computer
 |
UPC - 609525176179
View all Dell Latitude C840 manuals
Add to My Manuals
Save this manual to your list of manuals |
Page 100 highlights
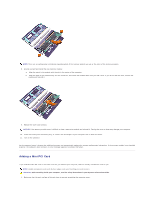
13. Replace the Mini PCI card cover. Replacing the Hard Drive NOTICE: To prevent data loss, turn off your computer before removing the hard drive. Do not remove the hard drive while the computer is on, in standby mode, or in hibernate mode. NOTICE: Hard drives are extremely fragile; even a slight bump can damage the drive. CAUTION: If you remove the hard drive from the computer when the drive is hot, do not touch the metal housing of the hard drive. CAUTION: Before working inside your computer, read the safety instructions in your System Information Guide. NOTE: Dell does not guarantee compatibility or provide support for hard drives from sources other than Dell. To replace the hard drive in the hard drive bay: 1. Make sure that the work surface is flat and clean to prevent scratching the computer cover. 2. Save and close any open files, exit any open programs, and shut down the computer. 3. If the computer is docked, undock it. 4. Disconnect the computer from the electrical outlet. 5. Wait 10 to 20 seconds and then disconnect any attached devices. 6. Remove any installed PC Cards, batteries, and devices. Handle components and cards by their edges, and avoid touching pins and contacts. 7. Ground yourself by touching a metal connector on the back of the computer, and continue to do so periodically during this procedure. 8. Turn the computer over. Use a small screwdriver to remove the hard drive screw(s), and place the screw(s) in a safe location. NOTICE: When the hard drive is not in the computer, store it in protective antistatic packaging. See "Protecting Against Electrostatic Discharge" in your System Information Guide." 9. Lift the hard drive cover until you feel a click. 10. Slide the hard drive out of the computer. 11. Remove the new drive from its packaging. Save the original packaging to use when storing or shipping the hard drive. NOTICE: Use firm and even pressure to slide the drive into place. If you force the hard drive into place using excessive force, you may damage the connector. 12. Insert the drive into the bay, and lift the hard drive cover until you feel a click. Push the hard drive until it is fully seated in the bay. Press the hard drive cover down. 13. Replace and tighten the hard drive screw(s). 14. Use the Operating System CD to install the operating system for your computer. 15. Use the Drivers and Utilities CD to install the drivers and utilities for your computer. Connecting a TV to the Computer
-
 1
1 -
2
-
3
-
4
-
5
-
6
-
7
-
8
-
9
-
10
-
11
-
12
-
13
-
14
-
15
-
16
-
17
-
18
-
19
-
20
-
21
-
22
-
23
-
24
-
25
-
26
-
27
-
28
-
29
-
30
-
31
-
32
-
33
-
34
-
35
-
36
-
37
-
38
-
39
-
40
-
41
-
42
-
43
-
44
-
45
-
46
-
47
-
48
-
49
-
50
-
51
-
52
-
53
-
54
-
55
-
56
-
57
-
58
-
59
-
60
-
61
-
62
-
63
-
64
-
65
-
66
-
67
-
68
-
69
-
70
-
71
-
72
-
73
-
74
-
75
-
76
-
77
-
78
-
79
-
80
-
81
-
82
-
83
-
84
-
85
-
86
-
87
-
88
-
89
-
90
-
91
-
92
-
93
-
94
-
 95
95 -
 96
96 -
 97
97 -
 98
98 -
 99
99 -
 100
100 -
 101
101 -
 102
102 -
 103
103 -
 104
104 -
 105
105 -
106
-
107
-
108
-
109
-
110
-
111
-
112
-
113
-
114
-
115
-
116
-
117
-
118
-
119
 |
 |
