Dell Latitude C840 User Guide - Page 98
Adding a Mini PCI Card
 |
UPC - 609525176179
View all Dell Latitude C840 manuals
Add to My Manuals
Save this manual to your list of manuals |
Page 98 highlights
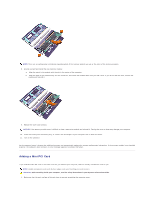
NOTE: There are no configuration restrictions regarding which of the memory sockets you use or the order of the memory modules. 8. Ground yourself and install the new memory module: a. Align the notch in the module with the slot in the center of the connector. b. Slide the edge of the module firmly into the connector, and rotate the module down until you feel a click. If you do not feel the click, remove the module and reinstall it. 9. Replace the cover and screw(s). NOTICE: If the memory module cover is difficult to close, remove the module and reinstall it. Forcing the cover to close may damage your computer. 10. Insert the battery into the battery bay, or connect the AC adapter to your computer and an electrical outlet. 11. Turn on the computer. As the computer boots, it detects the additional memory and automatically updates the system configuration information. If the memory module is not installed properly, the computer does not boot; no error message appears to indicate this failure. Adding a Mini PCI Card If you ordered a Mini PCI card at the same time that you ordered your computer, Dell has already installed the card for you. NOTE: Handle components and cards by their edges, and avoid touching pins and contacts. CAUTION: Before working inside your computer, read the safety instructions in your System Information Guide. 1. Make sure that the work surface is flat and clean to prevent scratching the computer cover.
-
 1
1 -
2
-
3
-
4
-
5
-
6
-
7
-
8
-
9
-
10
-
11
-
12
-
13
-
14
-
15
-
16
-
17
-
18
-
19
-
20
-
21
-
22
-
23
-
24
-
25
-
26
-
27
-
28
-
29
-
30
-
31
-
32
-
33
-
34
-
35
-
36
-
37
-
38
-
39
-
40
-
41
-
42
-
43
-
44
-
45
-
46
-
47
-
48
-
49
-
50
-
51
-
52
-
53
-
54
-
55
-
56
-
57
-
58
-
59
-
60
-
61
-
62
-
63
-
64
-
65
-
66
-
67
-
68
-
69
-
70
-
71
-
72
-
73
-
74
-
75
-
76
-
77
-
78
-
79
-
80
-
81
-
82
-
83
-
84
-
85
-
86
-
87
-
88
-
89
-
90
-
91
-
92
-
 93
93 -
 94
94 -
 95
95 -
 96
96 -
 97
97 -
 98
98 -
 99
99 -
 100
100 -
 101
101 -
 102
102 -
 103
103 -
104
-
105
-
106
-
107
-
108
-
109
-
110
-
111
-
112
-
113
-
114
-
115
-
116
-
117
-
118
-
119
 |
 |
