Dell OptiPlex 755 User's Guide - Page 340
Power Supply Self-Test
 |
View all Dell OptiPlex 755 manuals
Add to My Manuals
Save this manual to your list of manuals |
Page 340 highlights
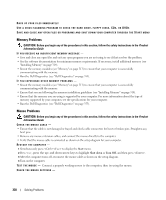
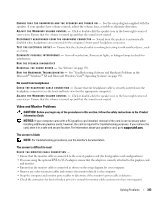
• Ensure that the main power cable and front panel cable are securely connected to the system board (see the "System Board Components" section for your computer). • Perform the power supply self-test, if applicable (see "Power Supply Self-Test" on page 340). I F T H E P O W E R L I G H T I S B L I N K I N G A M B E R - The computer is receiving electrical power, but an internal power problem may exist. • Ensure that the voltage selection switch is set to match the AC power at your location (if applicable). • Ensure that all components and cables are properly installed and securely connected to the system board (see the "System Board Components" section for your computer). • Perform the power supply self-test, if applicable (see "Power Supply Self-Test" on page 340). I F T H E P O W E R L I G H T I S S T E A D Y A M B E R - A device may be malfunctioning or incorrectly installed. • Ensure that the processor power cable is securely connected to the system board power connector (POWER2) (see the "System Board Components" section for your computer). • Remove and then reinstall all memory modules (see "Memory" on page 313). • Remove and then reinstall any expansion cards, including graphics cards (see the "Cards" section for your computer). • Perform the power supply self-test, if applicable (see "Power Supply Self-Test" on page 340). E L I M I N A T E I N T E R F E R E N C E - Some possible causes of interference are: • Power, keyboard, and mouse extension cables • Too many devices connected to the same power strip • Multiple power strips connected to the same electrical outlet Power Supply Self-Test . CAUTION: Before you begin any of the procedures in this section, follow the safety instructions in the Product Information Guide. If your mini tower, desktop, or small form factor computer has been certified for ENERGY STAR® 4.0, then your power supply is equipped with a self-test feature to help with troubleshooting power problems. The self-test feature can be performed with the power supply connected to computer devices or in isolation. The test button and LED are accessible externally on the back of the power supply (where the AC plug is located). NOTE: The power supply self-test feature is available only with ENERGY STAR 4.0 power supplies. 340 Solving Problems 1 2 1 test button 2 test LED
-
 1
1 -
2
-
3
-
4
-
5
-
6
-
7
-
8
-
9
-
10
-
11
-
12
-
13
-
14
-
15
-
16
-
17
-
18
-
19
-
20
-
21
-
22
-
23
-
24
-
25
-
26
-
27
-
28
-
29
-
30
-
31
-
32
-
33
-
34
-
35
-
36
-
37
-
38
-
39
-
40
-
41
-
42
-
43
-
44
-
45
-
46
-
47
-
48
-
49
-
50
-
51
-
52
-
53
-
54
-
55
-
56
-
57
-
58
-
59
-
60
-
61
-
62
-
63
-
64
-
65
-
66
-
67
-
68
-
69
-
70
-
71
-
72
-
73
-
74
-
75
-
76
-
77
-
78
-
79
-
80
-
81
-
82
-
83
-
84
-
85
-
86
-
87
-
88
-
89
-
90
-
91
-
92
-
93
-
94
-
95
-
96
-
97
-
98
-
99
-
100
-
101
-
102
-
103
-
104
-
105
-
106
-
107
-
108
-
109
-
110
-
111
-
112
-
113
-
114
-
115
-
116
-
117
-
118
-
119
-
120
-
121
-
122
-
123
-
124
-
125
-
126
-
127
-
128
-
129
-
130
-
131
-
132
-
133
-
134
-
135
-
136
-
137
-
138
-
139
-
140
-
141
-
142
-
143
-
144
-
145
-
146
-
147
-
148
-
149
-
150
-
151
-
152
-
153
-
154
-
155
-
156
-
157
-
158
-
159
-
160
-
161
-
162
-
163
-
164
-
165
-
166
-
167
-
168
-
169
-
170
-
171
-
172
-
173
-
174
-
175
-
176
-
177
-
178
-
179
-
180
-
181
-
182
-
183
-
184
-
185
-
186
-
187
-
188
-
189
-
190
-
191
-
192
-
193
-
194
-
195
-
196
-
197
-
198
-
199
-
200
-
201
-
202
-
203
-
204
-
205
-
206
-
207
-
208
-
209
-
210
-
211
-
212
-
213
-
214
-
215
-
216
-
217
-
218
-
219
-
220
-
221
-
222
-
223
-
224
-
225
-
226
-
227
-
228
-
229
-
230
-
231
-
232
-
233
-
234
-
235
-
236
-
237
-
238
-
239
-
240
-
241
-
242
-
243
-
244
-
245
-
246
-
247
-
248
-
249
-
250
-
251
-
252
-
253
-
254
-
255
-
256
-
257
-
258
-
259
-
260
-
261
-
262
-
263
-
264
-
265
-
266
-
267
-
268
-
269
-
270
-
271
-
272
-
273
-
274
-
275
-
276
-
277
-
278
-
279
-
280
-
281
-
282
-
283
-
284
-
285
-
286
-
287
-
288
-
289
-
290
-
291
-
292
-
293
-
294
-
295
-
296
-
297
-
298
-
299
-
300
-
301
-
302
-
303
-
304
-
305
-
306
-
307
-
308
-
309
-
310
-
311
-
312
-
313
-
314
-
315
-
316
-
317
-
318
-
319
-
320
-
321
-
322
-
323
-
324
-
325
-
326
-
327
-
328
-
329
-
330
-
331
-
332
-
333
-
334
-
 335
335 -
 336
336 -
 337
337 -
 338
338 -
 339
339 -
 340
340 -
 341
341 -
 342
342 -
 343
343 -
 344
344 -
 345
345 -
346
-
347
-
348
-
349
-
350
-
351
-
352
-
353
-
354
-
355
-
356
-
357
-
358
-
359
-
360
-
361
-
362
-
363
-
364
-
365
-
366
-
367
-
368
-
369
-
370
-
371
-
372
-
373
-
374
-
375
-
376
-
377
-
378
-
379
-
380
-
381
-
382
-
383
-
384
-
385
-
386
 |
 |
