Epson EPL-N1200 Service Manual - Page 122
ABCDE, 3.2 Print Quality Anomaly, Table 5-29.
 |
View all Epson EPL-N1200 manuals
Add to My Manuals
Save this manual to your list of manuals |
Page 122 highlights
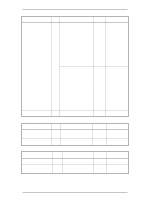
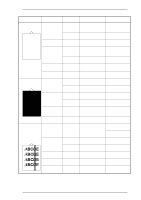
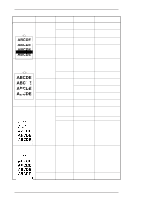
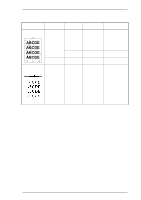
Troubleshooting EPL-N1200 Service Manual 5.3.2 Print Quality Anomaly This section describes how to isolate a print quality problem from the possible causes. Table 5-29. Print Quality Anomaly Symptom Possible Cause Part Name Check Item Remedy Low image density Foggy background ABCDE ABCDE ABCDE ABCDE Poor development Improper charging Imaging cartridge Check the toner level in the imaging cartridge. High-voltage supply (HV1) - board Imaging cartridge - HV1 board - Image transfer problem Image transfer roller Check to see if the surface of image transfer roller is damaged. HV1 board - Paper problem Paper Defective optical unit Optical unit Check to see if paper is moist. - Improper print density setting - - Poor development Imaging cartridge - Check the wiring of developing bias line. Improper charging Drum charge Improper print density setting in - SelecType level 2 Defective optical unit Optical unit - Check the wiring of PC drum charging bias line. - - Shake the imaging cartridge. Replace the imaging cartridge. Replace the HV1 board. Replace the imaging cartridge. Replace the HV1 board. Replace the image transfer roller. Replace the HV1 board. Replace paper. Replace the optical unit. Adjust the print density using SelecType. Replace the imaging cartridge. Replace the HV1 board. Replace the HV1 board. Replace the imaging cartridge. Adjust the print density in SelecType. Replace the optical unit. 5-10 Rev. A
-
 1
1 -
2
-
3
-
4
-
5
-
6
-
7
-
8
-
9
-
10
-
11
-
12
-
13
-
14
-
15
-
16
-
17
-
18
-
19
-
20
-
21
-
22
-
23
-
24
-
25
-
26
-
27
-
28
-
29
-
30
-
31
-
32
-
33
-
34
-
35
-
36
-
37
-
38
-
39
-
40
-
41
-
42
-
43
-
44
-
45
-
46
-
47
-
48
-
49
-
50
-
51
-
52
-
53
-
54
-
55
-
56
-
57
-
58
-
59
-
60
-
61
-
62
-
63
-
64
-
65
-
66
-
67
-
68
-
69
-
70
-
71
-
72
-
73
-
74
-
75
-
76
-
77
-
78
-
79
-
80
-
81
-
82
-
83
-
84
-
85
-
86
-
87
-
88
-
89
-
90
-
91
-
92
-
93
-
94
-
95
-
96
-
97
-
98
-
99
-
100
-
101
-
102
-
103
-
104
-
105
-
106
-
107
-
108
-
109
-
110
-
111
-
112
-
113
-
114
-
115
-
116
-
 117
117 -
 118
118 -
 119
119 -
 120
120 -
 121
121 -
 122
122 -
 123
123 -
 124
124 -
 125
125 -
 126
126 -
 127
127 -
128
-
129
-
130
-
131
-
132
-
133
-
134
-
135
-
136
-
137
-
138
-
139
-
140
-
141
-
142
-
143
-
144
-
145
-
146
-
147
-
148
-
149
 |
 |
