Epson EPL-N1200 Service Manual - Page 129
Clear Seal Removal, Imaging Cartridge Insertion, Shaking
 |
View all Epson EPL-N1200 manuals
Add to My Manuals
Save this manual to your list of manuals |
Page 129 highlights
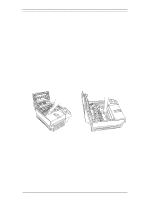
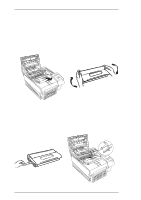
Maintenance EPL-N1200 Service Manual 6.1.1.2 Consumable Replacement This printer uses consumable imaging cartridge S051016. The life of this cartridge is 6000 pages when printing on A4 or letter size pages with a 5% print ratio continuously. If printed images become faint, remove the cartridge and gently shake it. This will distribute the toner and may make the images darker. If the image is still too light, replace the imaging cartridge. The procedure for changing the imaging cartridge is described below. qImaging Cartridge Replacement 1. Gently open the top cover and remove the imaging cartridge by pulling it out. 2. Dispose of the used imaging cartridge. 3. While holding the new imaging cartridge horizontally, gently shake it a few times to distribute the toner evenly. Figure 6-3. Imaging Cartridge Removal Figure 6-4. Imaging Cartridge Shaking 4. Set the imaging cartridge on a clean, flat surface. Firmly grip the tab on the left side of the cartridge. Pull the clear seal all the way out with firm, even pressure, as shown. 5. Shake the imaging cartridge again. 6. Insert the imaging cartridge into the printer by placing the pins on each side of the cartridge into the grooves inside the printer. Slide it gently into the opening until it stops. Close the top cover. And reset the toner counter. Figure 6-5. Clear Seal Removal 6-2 Figure 6-6. Imaging Cartridge Insertion Rev. A
-
 1
1 -
2
-
3
-
4
-
5
-
6
-
7
-
8
-
9
-
10
-
11
-
12
-
13
-
14
-
15
-
16
-
17
-
18
-
19
-
20
-
21
-
22
-
23
-
24
-
25
-
26
-
27
-
28
-
29
-
30
-
31
-
32
-
33
-
34
-
35
-
36
-
37
-
38
-
39
-
40
-
41
-
42
-
43
-
44
-
45
-
46
-
47
-
48
-
49
-
50
-
51
-
52
-
53
-
54
-
55
-
56
-
57
-
58
-
59
-
60
-
61
-
62
-
63
-
64
-
65
-
66
-
67
-
68
-
69
-
70
-
71
-
72
-
73
-
74
-
75
-
76
-
77
-
78
-
79
-
80
-
81
-
82
-
83
-
84
-
85
-
86
-
87
-
88
-
89
-
90
-
91
-
92
-
93
-
94
-
95
-
96
-
97
-
98
-
99
-
100
-
101
-
102
-
103
-
104
-
105
-
106
-
107
-
108
-
109
-
110
-
111
-
112
-
113
-
114
-
115
-
116
-
117
-
118
-
119
-
120
-
121
-
122
-
123
-
 124
124 -
 125
125 -
 126
126 -
 127
127 -
 128
128 -
 129
129 -
 130
130 -
 131
131 -
 132
132 -
 133
133 -
 134
134 -
135
-
136
-
137
-
138
-
139
-
140
-
141
-
142
-
143
-
144
-
145
-
146
-
147
-
148
-
149
 |
 |
