Epson EPL-N1200 Service Manual - Page 123
Table 5-29. Print Quality Anomaly Continued
 |
View all Epson EPL-N1200 manuals
Add to My Manuals
Save this manual to your list of manuals |
Page 123 highlights
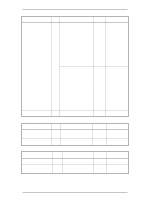
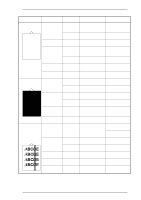
EPL-N1200 Service Manual Troubleshooting Table 5-29. Print Quality Anomaly (Continued) Symptom Blank print Black print White/black lines and bands ABCDE ABCDE ABCDE ABCDE Possible Cause Part Name Check Item Remedy Poor development Imaging cartridge HV1 board Check whether the imaging cartridge is installed properly. - Improper charging Poor image transfer HV1 board - Image transfer roller Check the surface of the image transfer roller. HV1 board - Improper print density setting. - - Defective optical unit Optical unit - Improper charging Imaging cartridge - HV1 board - Poor Imaging cartridge - development HV1 board - Improper setting of the print - - density. Defective optical unit Optical unit - Improper charging Imaging cartridge - Poor HV1 board - development Imaging cartridge - Improper drum cleaning Imaging cartridge - Dirt on the optical unit lens. Optical unit - Dirt on the fusing roller Fusing roller - Reinstall the imaging cartridge. Replace the HV1 board. Replace the HV1 board. Replace the image transfer roller. Replace the HV1 board. Adjust the print density in SelecType. Replace the optical unit. Replace the imaging cartridge. Replace the HV1 board. Replace the imaging cartridge. Replace the HV1 board. Adjust the print density by SelecType. Replace the optical unit. Shake the imaging cartridge. Replace the imaging cartridge. Replace the HV1 board. Replace the imaging cartridge. Replace the imaging cartridge. Clean the optical unit lens. Clean the fusing roller. Rev. A 5-11
-
 1
1 -
2
-
3
-
4
-
5
-
6
-
7
-
8
-
9
-
10
-
11
-
12
-
13
-
14
-
15
-
16
-
17
-
18
-
19
-
20
-
21
-
22
-
23
-
24
-
25
-
26
-
27
-
28
-
29
-
30
-
31
-
32
-
33
-
34
-
35
-
36
-
37
-
38
-
39
-
40
-
41
-
42
-
43
-
44
-
45
-
46
-
47
-
48
-
49
-
50
-
51
-
52
-
53
-
54
-
55
-
56
-
57
-
58
-
59
-
60
-
61
-
62
-
63
-
64
-
65
-
66
-
67
-
68
-
69
-
70
-
71
-
72
-
73
-
74
-
75
-
76
-
77
-
78
-
79
-
80
-
81
-
82
-
83
-
84
-
85
-
86
-
87
-
88
-
89
-
90
-
91
-
92
-
93
-
94
-
95
-
96
-
97
-
98
-
99
-
100
-
101
-
102
-
103
-
104
-
105
-
106
-
107
-
108
-
109
-
110
-
111
-
112
-
113
-
114
-
115
-
116
-
117
-
 118
118 -
 119
119 -
 120
120 -
 121
121 -
 122
122 -
 123
123 -
 124
124 -
 125
125 -
 126
126 -
 127
127 -
 128
128 -
129
-
130
-
131
-
132
-
133
-
134
-
135
-
136
-
137
-
138
-
139
-
140
-
141
-
142
-
143
-
144
-
145
-
146
-
147
-
148
-
149
 |
 |
