Garmin Edge Explore 2 Owners Manual - Page 11
Navigation, Going for a Ride, Locations, Marking Your Location
 |
View all Garmin Edge Explore 2 manuals
Add to My Manuals
Save this manual to your list of manuals |
Page 11 highlights
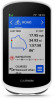
Navigation Navigation features and settings also apply to navigating courses (Courses, page 7). • Locations and finding places (Locations, page 5) • Planning a course (Courses, page 7) • Route settings (Route Settings, page 13) • Map settings (Map Settings, page 12) Going for a Ride If you are using a wireless sensor or accessory, it can be paired and activated during initial setup (Pairing Your Wireless Sensors, page 26). 1 Hold to turn on the device. 2 Go outside, and wait while the device locates satellites. The satellite bars turn green when the device is ready. 3 From the home screen, select or to change the biking profile. 4 Press to start the activity timer. NOTE: History is recorded only while the activity timer is running. 5 Swipe left or right to view additional data screens. You can swipe down from the top of the data screens to view the widgets. 6 If necessary, tap the screen to view status overlay data (including battery life) or return to the home screen. 7 Press to stop the activity timer. 8 Select Save. 9 Select . Locations You can record and store locations in the device. Marking Your Location Before you can mark a location, you must locate satellites. If you want to remember landmarks or return to a certain spot, you can mark a location. 1 Go for a ride. 2 Select Navigation > > Mark Location > . Navigation 5
-
 1
1 -
2
-
3
-
4
-
5
-
 6
6 -
 7
7 -
 8
8 -
 9
9 -
 10
10 -
 11
11 -
 12
12 -
 13
13 -
 14
14 -
 15
15 -
 16
16 -
17
-
18
-
19
-
20
-
21
-
22
-
23
-
24
-
25
-
26
-
27
-
28
-
29
-
30
-
31
-
32
-
33
-
34
-
35
-
36
-
37
-
38
-
39
-
40
-
41
-
42
-
43
-
44
-
45
-
46
-
47
-
48
-
49
-
50
-
51
-
52
-
53
-
54
-
55
-
56
-
57
-
58
-
59
-
60
-
61
-
62
 |
 |
