Garmin eTrex Summit Owner's Manual - Page 26
Reference
 |
View all Garmin eTrex Summit manuals
Add to My Manuals
Save this manual to your list of manuals |
Page 26 highlights
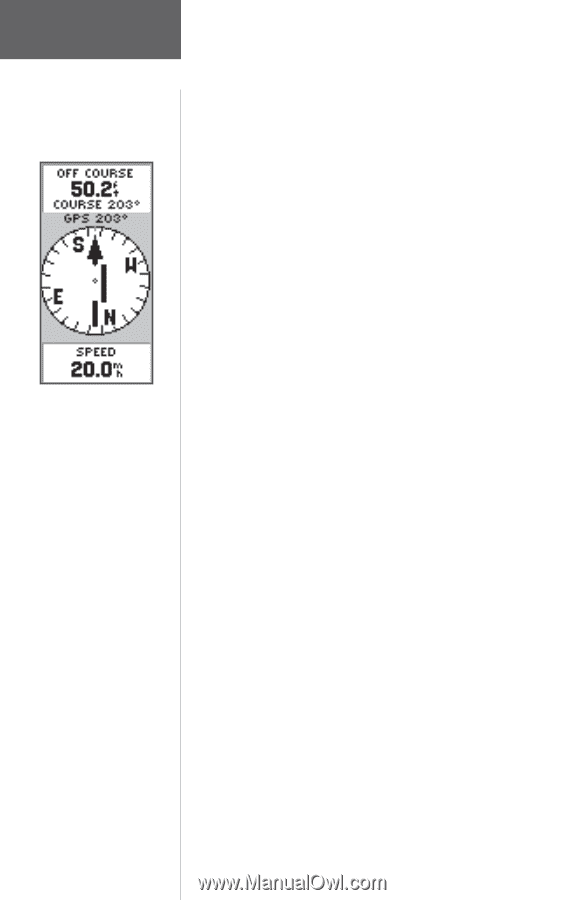
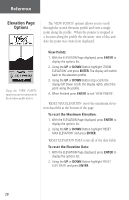
Reference Pointer Page Options When using the 'Set Course' feature, the 'Pointer' indicates a direct bearing to your destination. The center of the pointer (D-Bar) will show your cross track (the distance you are right or left of the desired course). The example above shows that you are headed toward your destination but have drifted off course to the left about 50 feet. To return to your desired course turn toward the D-Bar (right) until the D-Bar aligns with the pointer • Set Course: The Set Course feature allows the user to visually locate a landmark, lock in a bearing to the point and begin navigation on that bearing. When using the Set Course feature the Pointer will point the direction you need to navigate, and display the cross track or the amount you are off course from straight line navigation. Using the Set Course feature: 1. Press ENTER to activate the options list. 2. Using the UP or DOWN Button, highlight 'SIGHT 'N GO' and press ENTER. 3. Holding the eTrex Summit level, line up the sighting marks on the case with a distant landmark. 4. Press ENTER to lock the magnetic bearing. 5. Using the UP or DOWN Button, select 'SET COURSE'. Press ENTER. The eTrex Summit will begin navigation on the locked bearing 6. To end navigation, press ENTER. Using the UP or DOWN Button, select 'STOP NAVIGATION' and press ENTER. • Big Heading/Compass: this allows the user to select between seeing either large heading numbers or a large compass. • Reset Max Speed: this resets the Maximum Speed achieved during a trip. • Reset Trip: the trip time, trip distance (odometer) and average speed are reset to zeros. • Stop Navigation: stops any active navigation. To select a Pointer Page option: 1. Press the ENTER Button on the POINTER Page. 2. The Options Menu appears. Press the UP or DOWN Button, highlight the desired option, and press ENTER. Once you press ENTER, the change is made and the Options Menu disappears. 24
-
 1
1 -
2
-
3
-
4
-
5
-
6
-
7
-
8
-
9
-
10
-
11
-
12
-
13
-
14
-
15
-
16
-
17
-
18
-
19
-
20
-
 21
21 -
 22
22 -
 23
23 -
 24
24 -
 25
25 -
 26
26 -
 27
27 -
 28
28 -
 29
29 -
 30
30 -
 31
31 -
32
-
33
-
34
-
35
-
36
-
37
-
38
-
39
-
40
-
41
-
42
-
43
-
44
-
45
-
46
-
47
-
48
-
49
-
50
-
51
-
52
-
53
-
54
-
55
-
56
-
57
-
58
-
59
-
60
-
61
-
62
-
63
-
64
-
65
-
66
-
67
-
68
-
69
-
70
-
71
-
72
-
73
 |
 |