Garmin eTrex Summit Owner's Manual - Page 42
To delete all tracks, To start TracBack Navigation, Show Map
 |
View all Garmin eTrex Summit manuals
Add to My Manuals
Save this manual to your list of manuals |
Page 42 highlights
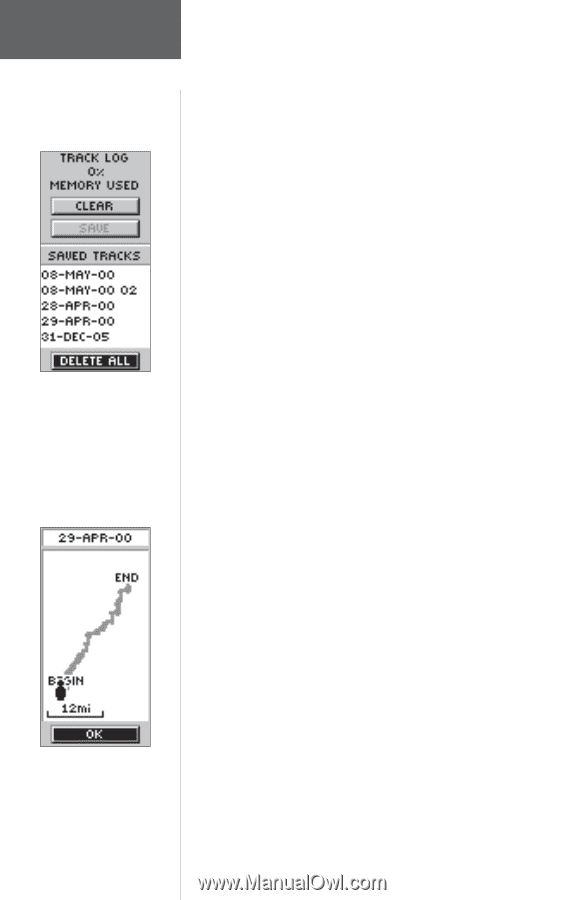
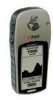
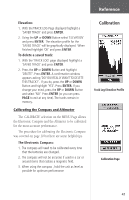
Reference Track Logs Delete All Tracks Show Map To delete all tracks: 1. On the TRACK LOG Page, Press the UP or DOWN Button and highlight 'DELETE ALL'. Press ENTER. The verification window appears. 2. If you really want to delete all saved tracks, press the UP or DOWN Button and highlight 'YES'. Press ENTER. If you change your mind, press the UP or DOWN Button and select 'NO'. Press ENTER. The tracks remain in memory (or you can press PAGE to exit at any time). There are four options that can be selected for a 'SAVED TRACK'. These options are 'TRACBACK', 'SHOW MAP' 'ELEVATION' and 'DELETE'. To start TracBack Navigation: 1. With the 'TRACK LOG' page displayed highlight a 'SAVED TRACK' and press ENTER. 2. Using the UP or DOWN Button highlight 'TRACBACK' and press ENTER. The direction window appears asking you if you want the destination to be at the beginning of the track or the end of the track (see sidebar). Press the UP or DOWN Button and select the desired destination point. The POINTER Page appears guiding you to the destination you selected. Show Map: 1. With the TRACK LOG page displayed highlight a 'SAVED TRACK' and press ENTER. 2. Using the UP or DOWN Button select 'SHOW MAP' and press ENTER. The 'SAVED TRACK' will be graphically displayed. When finished highlight 'OK' and press ENTER. The 'ELEVATION' option displays the elevation profile for the entire track log graphically. 40
-
 1
1 -
2
-
3
-
4
-
5
-
6
-
7
-
8
-
9
-
10
-
11
-
12
-
13
-
14
-
15
-
16
-
17
-
18
-
19
-
20
-
21
-
22
-
23
-
24
-
25
-
26
-
27
-
28
-
29
-
30
-
31
-
32
-
33
-
34
-
35
-
36
-
 37
37 -
 38
38 -
 39
39 -
 40
40 -
 41
41 -
 42
42 -
 43
43 -
 44
44 -
 45
45 -
 46
46 -
 47
47 -
48
-
49
-
50
-
51
-
52
-
53
-
54
-
55
-
56
-
57
-
58
-
59
-
60
-
61
-
62
-
63
-
64
-
65
-
66
-
67
-
68
-
69
-
70
-
71
-
72
-
73
 |
 |