Garmin eTrex Summit Owner's Manual - Page 45
To change the time format - gps set
 |
View all Garmin eTrex Summit manuals
Add to My Manuals
Save this manual to your list of manuals |
Page 45 highlights
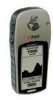
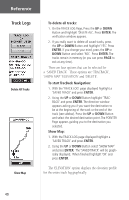
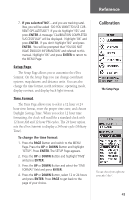
Reference 7. If you selected 'NO'-and you are tracking satellites, you will be asked 'DO YOU WANT TO USE CURRENT GPS ALTITUDE'? If you do highlight 'YES' and press ENTER. A message 'CALIBRATION COMPLETED SUCCESSFULLY' will be displayed. Highlight 'OK' and press ENTER. If you don't highlight 'NO' and press ENTER. You will be prompted that 'YOU DO NOT HAVE ENOUGH INFORMATION' and referred to this manual. Highlight 'OK' and press ENTER to return to the MENU Page. Setup Page The Setup Page allows you to customize the eTrex Summit. On the Setup Page you can change coordinate systems, map datums, and distance units. You can also change the time format, north reference, operating mode, display contrast, and display back light timeout. Time Format The Time Page allows you to select a 12 hour or 24 hour time format, enter the proper time zone, and choose Daylight Savings Time. When you select 12 hour time formatting, the clock will read like a standard clock with 12 hour AM and 12 hour PM cycles. The 24 hour option sets the eTrex Summit to display a 24 hour cycle (Military Time). To change the time format: 1. Press the PAGE Button and switch to the MENU Page. Press the UP or DOWN Button and highlight 'SETUP'. Press ENTER. The SETUP Page appears. 2. Press the UP or DOWN Button and highlight 'TIME' and press ENTER. 3. Press the UP or DOWN Button and select the 'TIME FORMAT' field and press ENTER. 4. Press the UP or DOWN Button, select 12 or 24 hours and press ENTER. Press PAGE to get back to the page of your choice. Calibration The Setup Page You can choose from eight time zones plus 'other'. 43
-
 1
1 -
2
-
3
-
4
-
5
-
6
-
7
-
8
-
9
-
10
-
11
-
12
-
13
-
14
-
15
-
16
-
17
-
18
-
19
-
20
-
21
-
22
-
23
-
24
-
25
-
26
-
27
-
28
-
29
-
30
-
31
-
32
-
33
-
34
-
35
-
36
-
37
-
38
-
39
-
 40
40 -
 41
41 -
 42
42 -
 43
43 -
 44
44 -
 45
45 -
 46
46 -
 47
47 -
 48
48 -
 49
49 -
 50
50 -
51
-
52
-
53
-
54
-
55
-
56
-
57
-
58
-
59
-
60
-
61
-
62
-
63
-
64
-
65
-
66
-
67
-
68
-
69
-
70
-
71
-
72
-
73
 |
 |