Garmin eTrex Summit Owner's Manual - Page 41
Track Logs
 |
View all Garmin eTrex Summit manuals
Add to My Manuals
Save this manual to your list of manuals |
Page 41 highlights
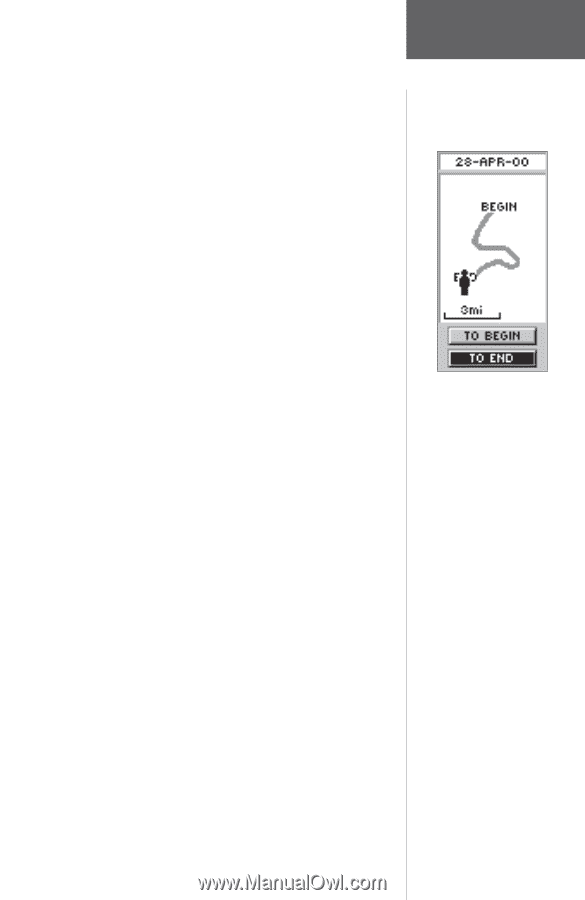
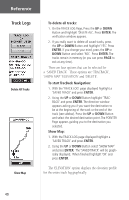
Reference Saving the Current 'Track Log': 1. With the MENU Page displayed, highlight 'TRACKS' and press ENTER. The TRACK LOG Page will appear. 2. Press the UP or DOWN Button and highlight 'SAVE' and press ENTER. The SAVE BACK THROUGH window appears giving you a time frame for saving a track or 'ENTIRE LOG'. Press the UP or DOWN Button and select the desired option. Press ENTER. The saved track appears graphically on a sub page. Press the UP or DOWN Button and select 'OK'. Press ENTER. 3. The track is now saved and appears in the 'SAVED TRACKS' list on the TRACK LOG Page. Renaming a Saved Track Log: 1. With the MENU Page displayed, highlight 'TRACKS' and press ENTER. The TRACK LOG Page will appear. 2. Place the highlight on a 'Saved Track' and press ENTER. 3. On the selection page highlight 'SHOW MAP' and press ENTER. The 'Saved Track' will be displayed on a map. At the top of the map is a default name. Using the UP or DOWN Button highlight the name and press ENTER. The EDIT TRACK NAME Page will be displayed. 4. With the EDIT TRACK NAME Page displayed, pressing the DOWN Button will move the highlight to the next place in the name field. When the desired place is selected, press ENTER to activate the drop down alpha-numeric list. 5. Using the UP or DOWN Button select the correct character then press ENTER. When the name is entered correctly, highlight 'OK' and press ENTER. Track Logs The 'BEGIN' point is the point defining the starting point when saving a track log. 'END' is the last point that was saved. Each saved track will always have a 'BEGIN' and 'END' point for navigation. The 'BEGIN-END' pair imply the direction of the saved track. If you want to retrace the track, navigate to 'END'. If you want to track back to the starting point, navigate to 'BEGIN'. 39
-
 1
1 -
2
-
3
-
4
-
5
-
6
-
7
-
8
-
9
-
10
-
11
-
12
-
13
-
14
-
15
-
16
-
17
-
18
-
19
-
20
-
21
-
22
-
23
-
24
-
25
-
26
-
27
-
28
-
29
-
30
-
31
-
32
-
33
-
34
-
35
-
 36
36 -
 37
37 -
 38
38 -
 39
39 -
 40
40 -
 41
41 -
 42
42 -
 43
43 -
 44
44 -
 45
45 -
 46
46 -
47
-
48
-
49
-
50
-
51
-
52
-
53
-
54
-
55
-
56
-
57
-
58
-
59
-
60
-
61
-
62
-
63
-
64
-
65
-
66
-
67
-
68
-
69
-
70
-
71
-
72
-
73
 |
 |