Garmin eTrex Summit Owner's Manual - Page 30
View Points, To reset the Maximum Elevation, To reset the Elevation Data
 |
View all Garmin eTrex Summit manuals
Add to My Manuals
Save this manual to your list of manuals |
Page 30 highlights
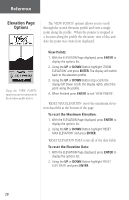
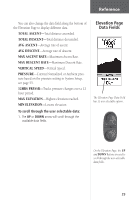
Reference Elevation Page Options The 'VIEW POINTS' options allows you to scroll through the stored elevation profile and view a single point along the profile. When the pointer is stopped at a location along the profile the elevation, time of day and date the point was created are displayed. Using the 'VIEW POINTS' option you can view any point in the elevation profile history. View Points: 1. With the ELEVATION Page displayed, press ENTER to display the options list. 2. Using the UP or DOWN Button highlight 'ZOOM ELEVATION' and press ENTER. The display will switch back to the elevation profile. 3. Using the UP or DOWN Button (Up scrolls the display left Down scrolls the display right), select the point along the profile. 4. When finished press ENTER to exit 'VIEW POINTS'. 'RESET MAX ELEVATION' resets the maximum elevation data field at the bottom of the page. To reset the Maximum Elevation: 1. With the ELEVATION Page displayed, press ENTER to display the options list. 2. Using the UP or DOWN Button highlight 'RESET MAX ELEVATION' and press ENTER. 'RESET ELEVATION DATA' resets all of the data fields. To reset the Elevation Data: 1. With the ELEVATION Page displayed, press ENTER to display the options list. 2. Using the UP or DOWN Button highlight 'RESET ELEV DATA' and press ENTER. 28
-
 1
1 -
2
-
3
-
4
-
5
-
6
-
7
-
8
-
9
-
10
-
11
-
12
-
13
-
14
-
15
-
16
-
17
-
18
-
19
-
20
-
21
-
22
-
23
-
24
-
 25
25 -
 26
26 -
 27
27 -
 28
28 -
 29
29 -
 30
30 -
 31
31 -
 32
32 -
 33
33 -
 34
34 -
 35
35 -
36
-
37
-
38
-
39
-
40
-
41
-
42
-
43
-
44
-
45
-
46
-
47
-
48
-
49
-
50
-
51
-
52
-
53
-
54
-
55
-
56
-
57
-
58
-
59
-
60
-
61
-
62
-
63
-
64
-
65
-
66
-
67
-
68
-
69
-
70
-
71
-
72
-
73
 |
 |
