HP 9500hdn HP Color LaserJet 9500nand 9500hdn - User Guide - Page 125
Any time a jam occurs in the fuser area including the lower left door area
 |
UPC - 808736429689
View all HP 9500hdn manuals
Add to My Manuals
Save this manual to your list of manuals |
Page 125 highlights
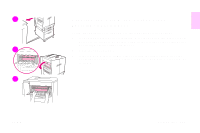
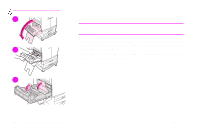
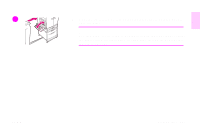
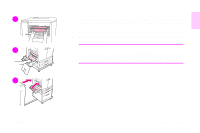
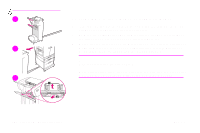
4 5 6 ENWW 6 4 If the jammed media is visible, remove it by slowly and carefully pulling up or down, and then go to step 6. If the jammed media is not visible, go to step 5. 5 Open the lower left door, and remove any jammed media from this area. 6 Close all of the open doors. If an optional output device is installed, push it back into place. Note Any time a jam occurs in the fuser area (including the lower left door area), the printer automatically sends a cleaning page through the paper path to remove loose toner. To cancel this operation, press CANCEL JOB. Clearing jams 123
-
 1
1 -
2
-
3
-
4
-
5
-
6
-
7
-
8
-
9
-
10
-
11
-
12
-
13
-
14
-
15
-
16
-
17
-
18
-
19
-
20
-
21
-
22
-
23
-
24
-
25
-
26
-
27
-
28
-
29
-
30
-
31
-
32
-
33
-
34
-
35
-
36
-
37
-
38
-
39
-
40
-
41
-
42
-
43
-
44
-
45
-
46
-
47
-
48
-
49
-
50
-
51
-
52
-
53
-
54
-
55
-
56
-
57
-
58
-
59
-
60
-
61
-
62
-
63
-
64
-
65
-
66
-
67
-
68
-
69
-
70
-
71
-
72
-
73
-
74
-
75
-
76
-
77
-
78
-
79
-
80
-
81
-
82
-
83
-
84
-
85
-
86
-
87
-
88
-
89
-
90
-
91
-
92
-
93
-
94
-
95
-
96
-
97
-
98
-
99
-
100
-
101
-
102
-
103
-
104
-
105
-
106
-
107
-
108
-
109
-
110
-
111
-
112
-
113
-
114
-
115
-
116
-
117
-
118
-
119
-
 120
120 -
 121
121 -
 122
122 -
 123
123 -
 124
124 -
 125
125 -
 126
126 -
 127
127 -
 128
128 -
 129
129 -
 130
130 -
131
-
132
-
133
-
134
-
135
-
136
-
137
-
138
-
139
-
140
-
141
-
142
-
143
-
144
-
145
-
146
-
147
-
148
-
149
-
150
-
151
-
152
-
153
-
154
-
155
-
156
-
157
-
158
-
159
-
160
-
161
-
162
-
163
-
164
-
165
-
166
-
167
-
168
-
169
-
170
-
171
-
172
-
173
-
174
-
175
-
176
-
177
-
178
-
179
-
180
-
181
-
182
-
183
-
184
-
185
-
186
-
187
-
188
-
189
-
190
-
191
-
192
-
193
-
194
-
195
-
196
-
197
-
198
-
199
-
200
-
201
-
202
-
203
-
204
-
205
-
206
-
207
-
208
-
209
-
210
-
211
-
212
-
213
-
214
-
215
-
216
-
217
-
218
-
219
-
220
-
221
-
222
-
223
-
224
-
225
-
226
-
227
-
228
-
229
-
230
-
231
-
232
-
233
-
234
-
235
-
236
-
237
-
238
-
239
-
240
-
241
-
242
-
243
-
244
-
245
-
246
-
247
-
248
-
249
-
250
-
251
-
252
-
253
-
254
 |
 |

ENWW
Clearing jams
123
6
4
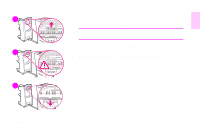
If the jammed media is visible, remove it by slowly and carefully pulling up
or down, and then go to step 6. If the jammed media is not visible, go to step
5.
5
Open the lower left door, and remove any jammed media from this area.
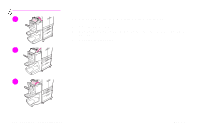
6
Close all of the open doors. If an optional output device is installed, push it
back into place.
Note
Any time a jam occurs in the fuser area (including the lower left door area),
the printer automatically sends a cleaning page through the paper path to
remove loose toner. To cancel this operation, press
C
ANCEL
J
OB
.
4
5
6